API Keys & Webhooks
Integrate Bambuddy with external tools using API keys and webhooks.
New in v0.2.4 — Cloud access for API keys (#1182)
API keys now carry an owner (the user who created them) and an opt-in cloud-access scope. Tick Allow cloud access on a new key to let it read its owner's Bambu Cloud presets, filament catalogue, and device list via /api/v1/cloud/* — perfect for headless slicing pipelines. Default is off, so existing automation never silently gains cloud-read access on upgrade. Jump to Cloud Access Scope below for the details.
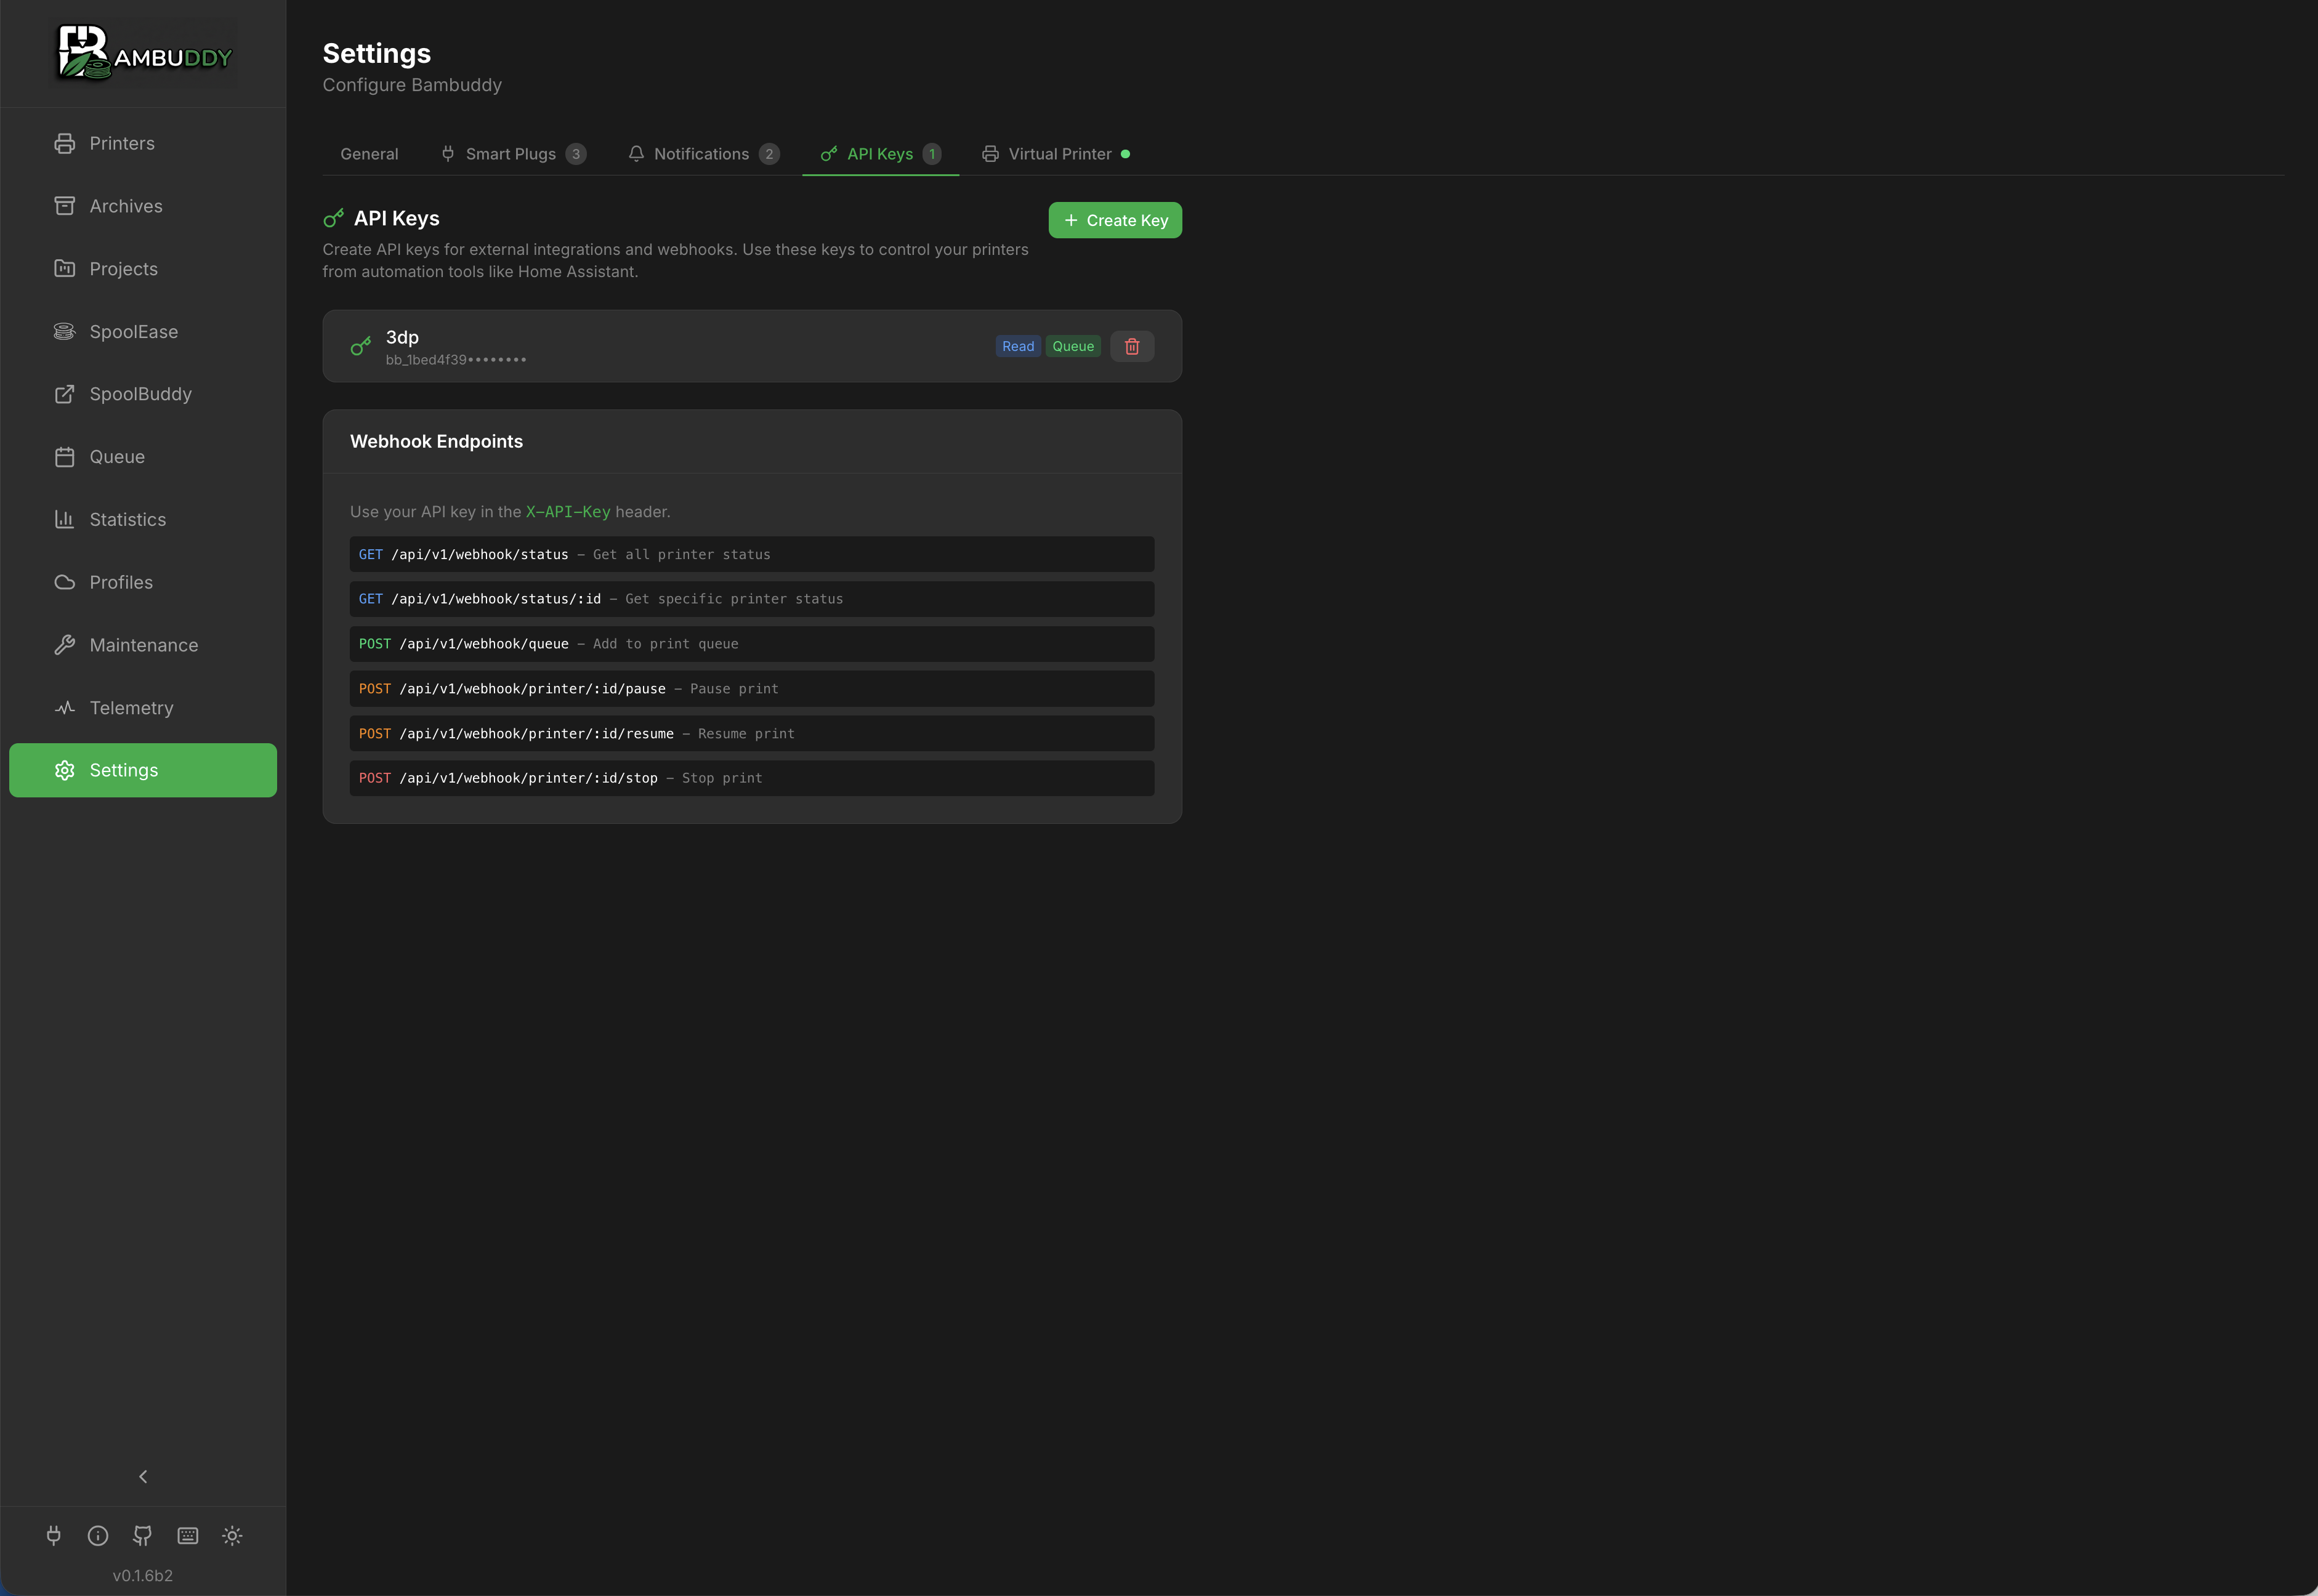
API Keys
Overview
API keys allow external applications to:
- Access Bambuddy data
- Trigger actions
- Integrate with automation tools
Creating an API Key
- Go to Settings > API Keys
- Click Create API Key
- Enter a name (e.g., "Home Assistant")
- Select permissions
- Click Create
- Copy the key immediately - it won't be shown again!
Save Your Key
API keys are shown only once at creation. Store it securely.
Mobile setup with a QR code
The success panel shown right after you create a key has a QR code button next to Use in API Browser:
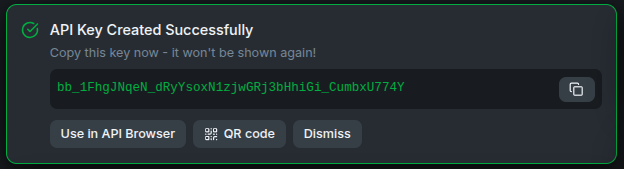
Click it to display a QR code that encodes the Bambuddy server URL and the new API key together, so a compatible mobile app (for example, an NFC spool-inventory app) can scan once to configure both — no copy-pasting the long key by hand.
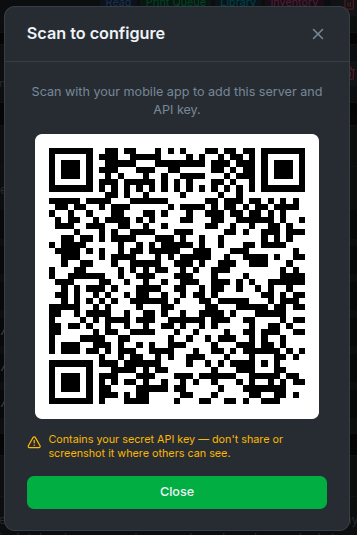
The encoded server URL comes from your configured Settings → Network → External URL, falling back to the address you're currently viewing Bambuddy on. If clients connect from outside your LAN (reverse proxy, Docker host, VPN), set the External URL so the scanned address is actually reachable from the phone.
The QR contains your secret key
The QR encodes the raw API key — treat the image like the key itself. Don't share it or screenshot it where others can see, and regenerate the key if it leaks.
Payload format (for app developers)
The QR is a single custom-scheme URI:
v=1 is the schema version (clients should check it), url is the Bambuddy base URL, and key is the API key — both URL-encoded. The key is only available here, at creation time: Bambuddy stores keys hashed and can never show them again. Permissions
Available Permissions
API keys are intentionally scoped narrowly — they cannot perform administrative operations (user management, full settings updates, backup restore, firmware installs). The seven toggles you can set on a key are:
| Permission | Allows |
|---|---|
| Read Status | Read printer state, archives, queue, library listings, projects, filaments, inventory, maintenance, notifications, K-profiles, AMS history, stats, system info, camera, and (scrubbed) settings |
| Manage Queue | Add to / remove from / reorder the print queue; reprint archives |
| Control Printer | Start, pause, resume, stop prints; send files to the printer; AMS RFID re-read; clear-plate confirmation; smart-plug on/off |
| Manage Library | Upload new files; rename and delete your own library entries; import models from MakerWorld |
| Manage Inventory | Create / update / delete spools, the spool/color catalogue, forecast SKU settings. Required for SpoolBuddy kiosks (NFC tag scan, scale readings, kiosk system commands like reboot/update). |
| Allow Cloud Access | Read the owner's Bambu Cloud presets/filaments via /cloud/* (see below) |
| Update Electricity Price | Push a new per-kWh tariff to POST /settings/electricity-price (see Energy Tracking) — narrowly scoped, the only settings field writable via API key |
Allowlist model since 0.2.4.5 (GHSA-r2qv-8222-hqg3)
Earlier Bambuddy versions gated API keys via a small denylist of administrative permissions. Anything outside that list — including physical printer control, queue writes, library uploads, and inventory writes — was reachable from any valid key regardless of which checkboxes you ticked, because the seven toggles were not actually enforced outside the legacy /webhook/* endpoints. Starting in 0.2.4.5, every Bambuddy endpoint maps to exactly one of the toggles above (or is admin-only and rejects all API keys). A key with no toggles ticked can hit no endpoints; a key with only Read Status cannot stop a print, edit the queue, upload files, or change a spool.
Why no general 'Write Settings' or 'Admin' permission?
The PATCH /settings route can rewrite SMTP/LDAP/MQTT credentials, the HA access token, and similar secrets. Allowing those writes from any API key would silently widen attack surface beyond what the documented use cases (Home Assistant tariffs, dashboards, automation) actually need. The narrowly-scoped Update Electricity Price toggle exists specifically to unlock the HA dynamic-tariff workflow without opening that door.
Principle of Least Privilege
Only grant permissions that are needed:
- Read-only dashboards: Read Status only.
- Home Assistant queue automation: Read Status + Manage Queue.
- Home Assistant queue + start prints: + Control Printer.
- Headless slicer / library-uploading automation: + Manage Library.
- SpoolBuddy kiosks (bundled installs handle this for you): + Manage Inventory.
- HA dynamic-tariff integration: + Update Electricity Price.
- Bambu Cloud slicing pipelines: + Allow Cloud Access (requires owner sign-in).
Upgrade Notes
When upgrading from a pre-0.2.4.5 install:
- Existing keys are backfilled: Manage Library and Manage Inventory default to whatever Manage Queue was set to (so "queue-only" keys keep working for the upload+queue workflow they already used, while hardened "read-only" keys do not silently gain write capabilities).
- The bundled SpoolBuddy kiosk key is explicitly granted Manage Inventory by the CLI (it needs to write NFC scans and scale readings).
- If a previously-working integration starts returning 403, the missing toggle is named in the response body — tick it in Settings → API Keys, regenerate or update the key, and retry.
Cloud Access Scope
API keys created in v0.2.4 and later carry an explicit owner (the user who created them) and an opt-in cloud-access scope. This unlocks a workflow that was previously blocked: reading the owner's Bambu Cloud presets, filament catalogue, and device list from /api/v1/cloud/* endpoints — exactly what a headless slicing pipeline needs.
When to enable it
Tick Allow cloud access on the create form when the key needs to:
- Pull filament profiles (
GET /cloud/filaments) for an automated slicer - List your Bambu Cloud devices (
GET /cloud/devices) - Read printer firmware availability (
GET /cloud/firmware-updates) - Read your slicer presets (
GET /cloud/settings)
The flag defaults to off, so existing automation never silently gains cloud-read access on upgrade.
Three fences a key must pass for /cloud/*
When an API-keyed call reaches /api/v1/cloud/*, three checks all need to succeed:
- The key has an owner. Keys created before v0.2.4 have no owner and are shown as Legacy in the API Keys list — they're rejected at
/cloud/*with a "recreate it" message. Every other endpoint they were used against (queue, status, control) keeps working. Allow cloud accessis enabled on the key. Otherwise/cloud/*returns403with a "enable cloud access" hint.- The owner is signed into Bambu Cloud (Settings → Cloud Profiles). Without a stored token,
/cloud/*returns the standard token-not-set error.
Auth-disabled deployments
The cloud-access scope only makes sense when authentication is enabled — auth-disabled deployments don't have per-user cloud tokens to read against. The create form refuses Allow cloud access = true in that mode with a 400 Bad Request so you don't end up with a non-functional key.
Migrating older keys
Keys created before v0.2.4 keep working against every non-cloud endpoint without any change. To grant one of them cloud access, delete the key and recreate it — there's no in-place upgrade because the original creator identity wasn't recorded at the time.
Owner deletion
Deleting a user removes all of their API keys (ON DELETE CASCADE on PostgreSQL, plus an explicit cleanup step in the user-delete route for SQLite where FK enforcement is off by default). Orphan keys can never authenticate.
Using the API
Authentication
Include the API key in request headers:
Base URL
Common Endpoints
| Endpoint | Method | Description |
|---|---|---|
/printers | GET | List all printers |
/printers/{id} | GET | Get printer details |
/printers/{id}/status | GET | Get printer status |
/archives | GET | List archives |
/archives/{id} | GET | Get archive details |
/queue | GET | View print queue |
/queue | POST | Add to queue |
/statistics | GET | Get statistics |
/inventory/spools | GET | List spools |
/inventory/spools/by-tag | GET | Find a spool by NFC tray_uuid/tag_uid |
Manage Inventory keys can look up spools by tag
The /inventory/spools/by-tag lookup is reachable with either the Read Status scope or the Manage Inventory scope, so a key created only with Manage Inventory — which can create, update, and delete spools — can look a spool up by its NFC tag without needing the broader Read Status scope. This is what lets an NFC inventory integration dedupe a scan with a single, narrowly-scoped key. Other inventory read endpoints (e.g. /inventory/spools to list all spools) still require Read Status.
See API Reference for complete documentation.
Interactive API Browser
Bambuddy includes a built-in API browser for testing endpoints directly in the interface.
Accessing the API Browser
The API Browser appears in the right column of the API Keys settings page.
- Go to Settings > API Keys
- Scroll to see the API Browser on the right
Features
- Auto-discovery - All endpoints loaded from OpenAPI schema
- Grouped by category - Printers, archives, settings, etc.
- Parameter inputs - Fill in path, query, and body parameters
- Request body examples - Pre-filled from schema
- Live execution - Test requests and see responses
- Response display - Formatted JSON with status and timing
- Search - Filter endpoints across categories
Using with API Keys
- Paste an API key in the "API Key for Testing" input
- Expand an endpoint and fill in parameters
- Click Execute to make the request
- View the response below
New Key Shortcut
After creating a new API key, click Use in API Browser to automatically add it for testing.
Webhooks
Outgoing Webhooks
Bambuddy can send notifications to external URLs:
- Go to Settings > Notifications
- Add a Webhook provider
- Enter your endpoint URL
- Configure events to trigger
Payload Format
{
  "event": "print_complete",
  "timestamp": "2024-01-15T14:30:00Z",
  "data": {
    "printer": "Workshop X1C",
    "filename": "benchy.3mf",
    "duration": 8100,
    "filament_used": 45.2,
    "filament_details": "PLA: 30.0g | PETG: 15.2g",
    "status": "success"
  }
}
For failed/stopped prints, filament_used is scaled by progress and additional fields are included:
{
  "event": "print_failed",
  "timestamp": "2024-01-15T15:15:00Z",
  "data": {
    "printer": "Workshop X1C",
    "filename": "benchy.3mf",
    "duration": 2700,
    "filament_used": 7.6,
    "filament_details": "PLA: 7.6g",
    "progress": 50,
    "reason": "Filament runout",
    "status": "failed"
  }
}
Events
| Event | Trigger |
|---|---|
print_started | Print begins |
print_progress | Progress milestone |
print_complete | Print finishes (includes filament usage) |
print_failed | Print fails (includes scaled filament usage and progress) |
print_stopped | Manual cancellation (includes scaled filament usage and progress) |
printer_offline | Connection lost |
printer_error | HMS error |
Integration Examples
Home Assistant
Use REST sensors to display status:
sensor:
  - platform: rest
    name: "Bambuddy Printer Status"
    resource: "http://bambuddy:8000/api/v1/printers/1/status"
    headers:
      X-API-Key: "your-api-key"
    value_template: "{{ value_json.state }}"
    json_attributes:
      - progress
      - remaining_time
      - temperature
Trigger automations on webhook events.
Node-RED
Use HTTP request nodes with API key authentication.
IFTTT / Zapier
Use webhook triggers and actions.
Managing API Keys
Viewing Keys
See all API keys in Settings:
- Name
- Created date
- Last used
- Permissions
Revoking Keys
Delete keys that are no longer needed:
- Find the key in the list
- Click Delete
- Confirm deletion
Key is immediately invalidated.
Rotating Keys
Best practice: Rotate keys periodically:
- Create new key
- Update applications
- Delete old key
Security Best Practices
Key Storage
- Never commit keys to version control
- Use environment variables
- Store in secrets managers
Network Security
- Use HTTPS for external access
- Limit API access to trusted IPs if possible
- Consider VPN for remote access
Monitoring
- Review API key usage
- Check for unauthorized access
- Revoke unused keys
Permissions
- Use minimum required permissions
- Create separate keys per application
- Avoid using admin keys in automation
Troubleshooting
401 Unauthorized
- Check API key is correct
- Verify key hasn't been revoked
- Ensure header name is
X-API-Key
403 Forbidden
- Check key has required permissions
- Verify endpoint matches permissions
Tips
Descriptive Names
Name keys after their purpose: "Home Assistant Dashboard" not "key1".
Separate Keys
Use different keys for different applications for easy management.
Regular Audit
Review API keys periodically and remove unused ones.
Test First
Test API calls manually before implementing in automation.
Document Usage
Keep notes on which keys are used where.