Print Archiving
Bambuddy automatically archives every print with full metadata, 3D previews, and duplicate detection.
How Archiving Works
SD Card Required
An SD card must be inserted in your printer for archiving to work. Bambuddy downloads the 3MF file from the printer's SD card after each print completes.
When a print completes:
graph LR
    A[Print Completes] --> B[Download 3MF]
    B --> C[Extract Metadata]
    C --> D[Generate Thumbnail]
    D --> E[Check Duplicates]
    E --> F[Save to Archive]
What Gets Archived
| Data | Description |
|---|---|
| 3MF File | Complete print file from printer |
| Thumbnail | Preview image from slicer |
| Metadata | Print settings, layers, filament, etc. |
| Print result | Success, failed, or stopped |
| Duration | Actual print time |
| Filament used | Grams consumed |
| Camera snapshot | Photo at completion (if enabled) |
What Gets Skipped
Bambuddy automatically skips archiving for:
- Calibration prints — Internal printer operations like flow rate calibration, vibration compensation, and bed leveling (gcode files under
/usr/on the printer) - Prints with auto-archive disabled — Per-printer toggle in printer settings
3D GCode Preview
Click the 3D-preview badge (layers icon) on an archive card — or the 3D Preview context-menu entry — to open the embedded GCode viewer for that archive. The viewer renders the sliced toolpath directly in the Bambuddy layout, with layer scrubbing and playback, so you can inspect exactly what the printer will do without leaving the app.
Opening the Viewer
- Archive card badge - Click the layers icon in the bottom-right corner of any card
- Context menu - Right-click an archive → 3D Preview
- List-view menu - Works the same way in compact list layout
The viewer opens in the main content pane with the Bambuddy sidebar still visible. Reloading the page keeps you in the shell — the viewer URL carries the archive reference so it re-renders correctly.
Plate Picker
For multi-plate 3MF files, a picker modal appears first:
- Grid layout - Plate thumbnails from the slicer, two columns on wider screens
- Object lists - Each row shows the first few object names on that plate + print time
- Scrollable - Archives with dozens of plates scroll inside the modal rather than overflow the page
Single-plate archives skip the picker and open the viewer directly.
Viewer Controls
- Layer slider (right side) - Scrub through the model layer by layer
- Play button + speed selector (1× / 3× / 10× / 25×) - Animate the toolpath
- Mouse - Left-drag to rotate, scroll to zoom, right-drag to pan
- Bed size - Automatically matches the printer model the archive was sliced for (H2D → 350 × 320 × 325 mm, X1C/P1S → 256³, A1 → 256³, etc.), no configuration needed
Source-Only Archives
Pure project 3MF files — exported from BambuStudio without being sliced — don't contain any G-code to preview. Clicking 3D Preview on those archives shows a short toast telling you to slice the file in BambuStudio first; the viewer isn't opened.
Duplicate Detection
Bambuddy automatically detects duplicate prints:
How It Works
- Extracts file hash from 3MF
- Compares with existing archives
- Marks potential duplicates
- You decide what to keep
Duplicate Indicators
- Badge showing "Duplicate"
- Link to original print
- Side-by-side comparison available
Managing Duplicates
- Keep both - Sometimes you intentionally reprint
- Delete duplicate - Remove the newer one
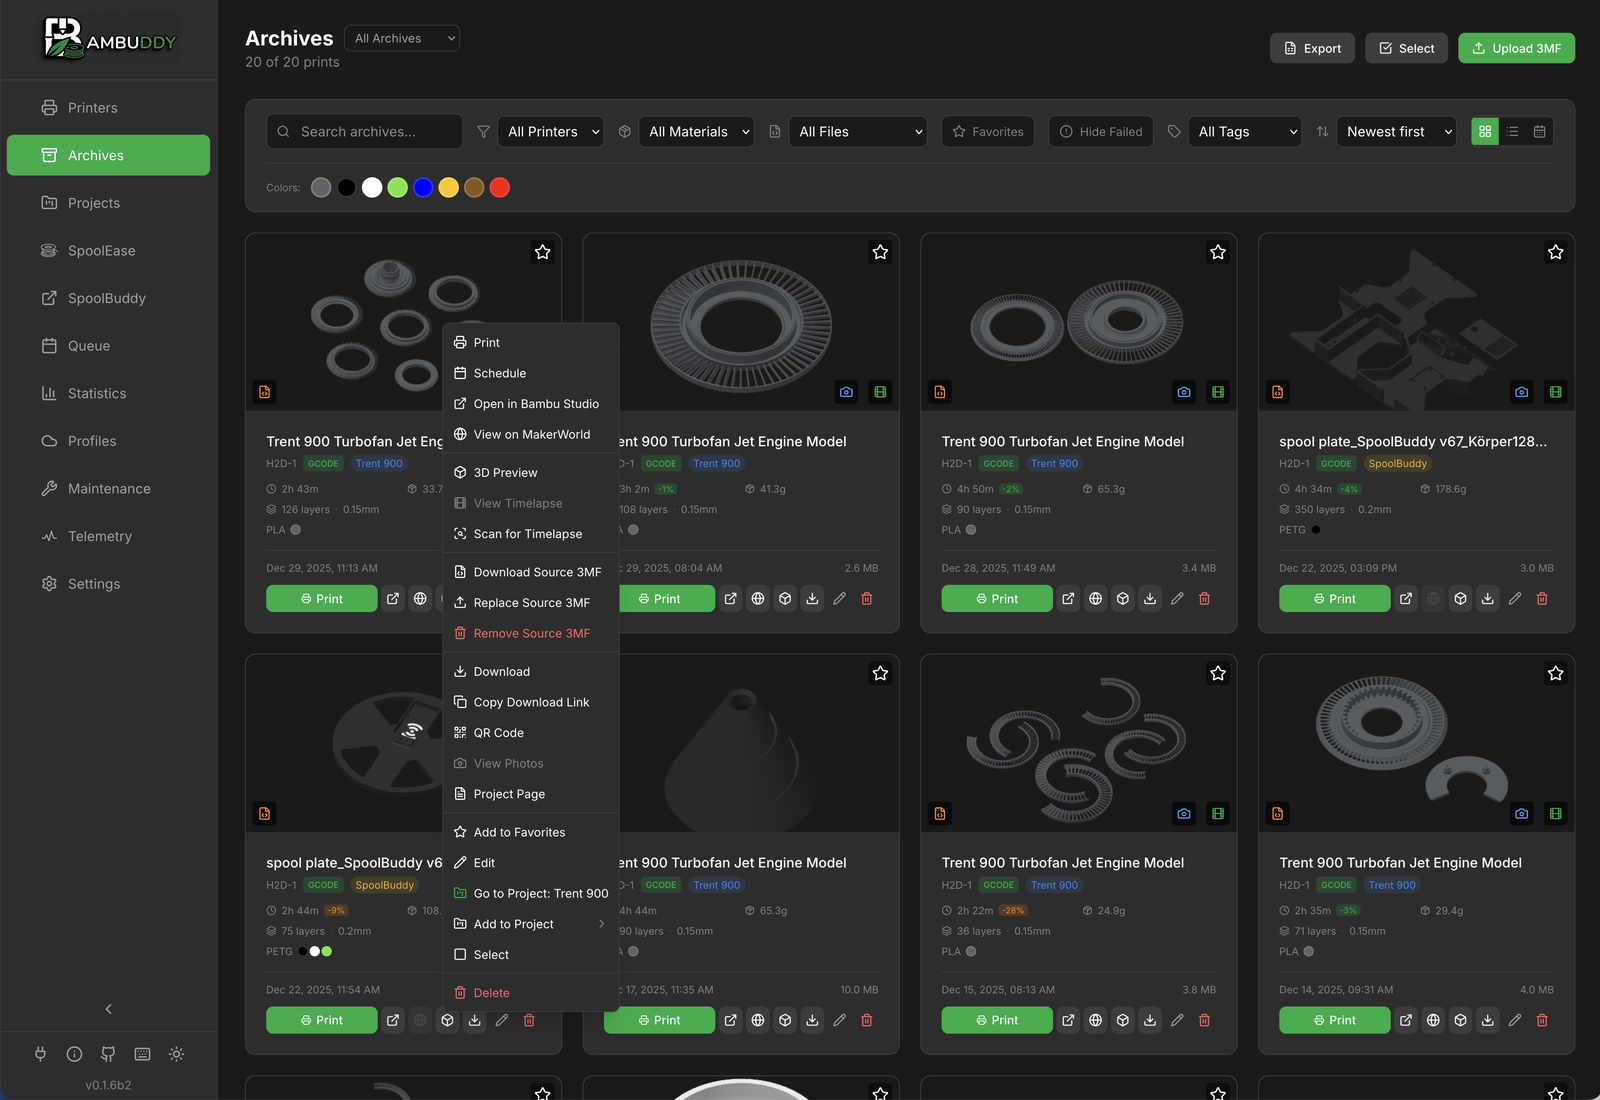
Archive Cards
Each archive displays as a card with key information:
┌────────────────────────────────────────┐
│  [Thumbnail]                           │
│                                        │
│  Benchy.3mf                           │
│  Workshop X1C • 2h 15m                │
│  ✓ Success • 45g PLA                  │
│                                        │
│  [Tags] [Project Badge]               │
└────────────────────────────────────────┘
Card Information
- Thumbnail - Visual preview
- Filename - Original file name
- Printer - Which printer completed it
- Duration - How long it took
- Result - Success, failed, or stopped
- Filament - Material and weight used
- Object Count - Number of printable objects in the 3MF
- Tags - Custom labels
- Project - Assigned project badge
- Uploaded by - Username who uploaded (when authentication is enabled)
Card Action Buttons
Each archive card has action buttons at the bottom for quick access:
| Button | Description |
|---|---|
| Reprint | Print immediately on a connected printer |
| Schedule | Add to print queue (schedule for later) |
| Open in Slicer (Bambu Studio or OrcaSlicer — configurable in Settings) | |
| Open external link (if set) | |
| 3D Preview | |
| Download 3MF file | |
| Edit archive details |
Permission Required
The Schedule button requires the queue:create permission. Users without this permission will see the button disabled.
Context Menu Button
Each card has a three-dot menu button (⋮) that appears on hover:
- Provides quick access to all context menu actions
- Always visible on mobile devices
- Located on the left side of the card
Multi-Plate Browsing
For archives created from multi-plate 3MF files, you can browse through each plate's thumbnail directly on the card:
- Hover over the archive card to reveal navigation controls
- Arrow buttons (◀ ▶) on left/right to cycle through plates
- Dot indicators at bottom show current plate (clickable)
- Each plate shows its individual thumbnail preview
Lazy Loading
Plate data is only fetched when you hover over the card, keeping the archives page fast even with many archives.
View Modes
Switch between different archive views using the toolbar buttons:
Grid View (Cards)
Default view showing archive cards in a responsive grid:
- Large thumbnails for visual browsing
- All metadata visible at a glance
- Best for visual identification
List View
Compact table view for data-focused browsing:
- One archive per row
- Sortable columns
- Inline edit and delete buttons
- Three-dot menu for full context menu access
- Best for managing large archives
Calendar View
Browse archives by date:
- Monthly calendar layout
- Dots indicate prints on each day
- Color coding for success/failure
- Click a day to see that day's prints
- Click an archive to highlight it in grid view
Cross-View Highlighting
Click an archive in calendar view or from a project's archive list:
- Switches to grid view automatically
- Scrolls to the selected archive
- Highlights with a yellow border for 5 seconds
- Great for finding specific prints across views
Context Menu Actions
Right-click (or long-press on mobile) for quick actions:
| Action | Description |
|---|---|
| Re-print | Send to any connected printer |
| Add to Project | Assign to a project |
| Edit Tags | Add or remove tags |
| Edit Details | Modify name, notes, etc. |
| Download 3MF | Get the original file |
| Upload Timelapse | Manually attach a timelapse video |
| Remove Timelapse | Remove attached timelapse |
| Upload/Replace F3D | Attach Fusion 360 design file |
| Download F3D | Download attached F3D file |
| Delete | Remove from archive |
Re-print with AMS Mapping
When re-printing an archive, Bambuddy shows a filament comparison with auto-matching and manual override options:
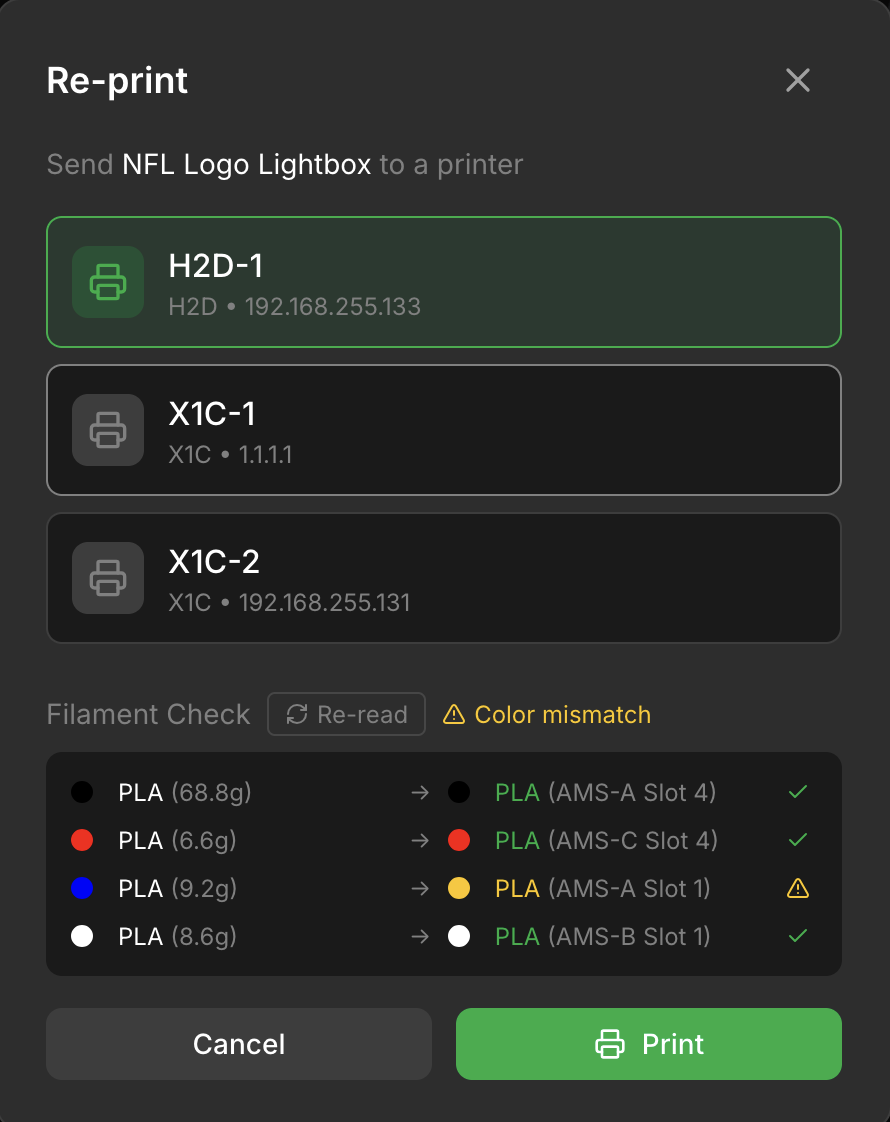
What It Shows
| Required (from 3MF) | → | Loaded (in AMS) | Status |
|---|---|---|---|
| PLA Red (25g) | → | PLA Red (AMS-A Slot 1) | ✓ Match |
| PETG Black (10g) | → | PETG White (AMS-B Slot 2) | ⚠ Color mismatch |
| PLA Blue (5g) | → | TPU (AMS-A Slot 3) | ⚠ Type mismatch |
Status Indicators
| Icon | Color | Meaning |
|---|---|---|
| ✓ | Green | Type and color both match (exact or similar) |
| ⚠ | Yellow | Same type, different color |
| ⚠ | Orange | Different filament type or not loaded |
Features
- Auto-Matching - Automatically finds the best AMS slot for each required filament (type + color)
- Manual Slot Selection - Click the dropdown to override auto-matching and select any AMS slot
- Color Names - Dropdown shows color names (decoded from Bambu filament codes like "Jade White", "Cobalt Blue", or derived from hex for third-party filaments)
- Blue Ring Indicator - Shows which slots have been manually selected vs auto-matched
- AMS Slot Labels - Shows which AMS unit and slot contains the filament (e.g., "AMS-B Slot 3")
- Fuzzy Color Matching - Colors are matched within a tolerance, so slight hex variations still show as a match
- Re-read Button - Refresh AMS status from the printer if you've swapped spools since the modal opened
Multi-Plate 3MF Files
When reprinting a multi-plate 3MF file (exported from Bambu Studio with "All sliced file"), Bambuddy shows a plate selection grid:
- Plate Thumbnails - Visual preview of each plate to help identify the correct one
- Plate Names - Shows object names and print time estimates
- Filtered Filaments - Only filaments used by the selected plate are shown for mapping
- Required Selection - You must select a plate before printing
This prevents the issue where all plates' filaments were shown together, causing incorrect AMS mapping.
Single-Plate Exports
For 3MF files exported as a single plate ("Plate sliced file"), the plate is auto-selected and no grid is shown.
Print Options
Click Print Options to configure settings before starting:
| Option | Default | Description |
|---|---|---|
| Bed Leveling | Enabled | Auto-level bed before print |
| Flow Calibration | Disabled | Calibrate extrusion flow |
| Vibration Calibration | Enabled | Reduce ringing artifacts |
| First Layer Inspection | Disabled | AI inspection of first layer |
| Timelapse | Disabled | Record timelapse video |
Multi-Color Prints
Bambuddy sends AMS mapping in the same format as Bambu Studio, ensuring reliable filament switching on multi-color prints.
How It Works
- Click Re-print on an archive
- Select target printer
- For multi-plate files: Select which plate to print from the grid
- Review filament comparison (click Re-read if you've changed spools)
- Expand Print Options to adjust settings if needed
- Click Print to start
File Type Badge
Archive cards show a GCODE (green) or SOURCE (orange) badge. Only GCODE files have AMS mapping data - SOURCE files are slicer project files without embedded print settings.
Photo Attachments
Add photos to your archives:
Camera Snapshot
Automatic camera capture on print completion:
- Go to Settings > General
- Enable Capture snapshot on print complete
- Photos are automatically added to archives
Manual Photos
Upload photos of your finished prints:
- Open an archive
- Click Add Photo
- Upload from your device
- Photos are stored with the archive
Failure Documentation
Add photos of failed prints to help analyze what went wrong.
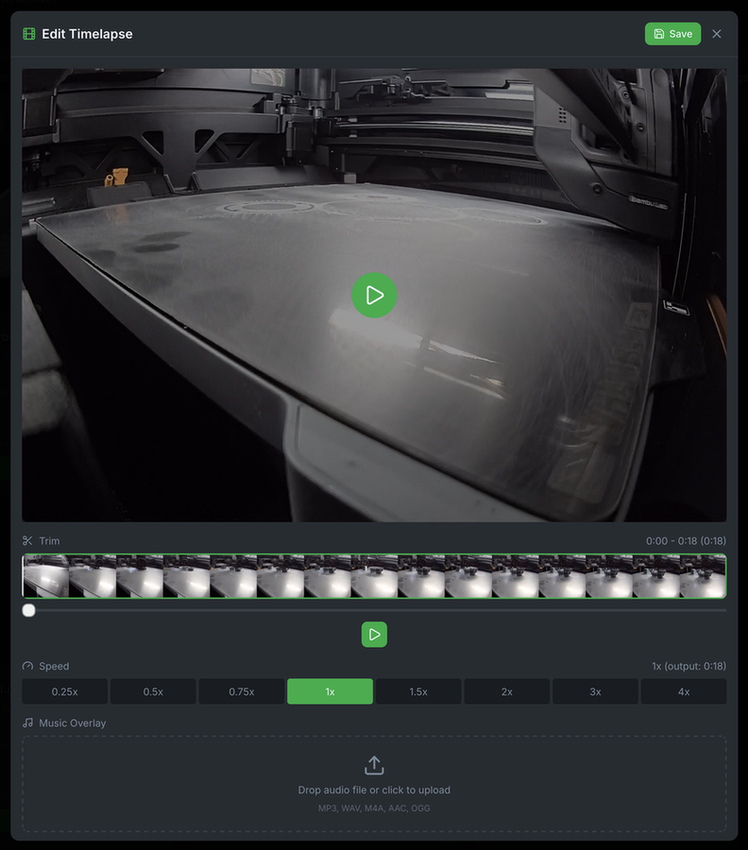
Timelapse Editor
Edit your timelapse videos directly in Bambuddy:
Supported Formats
| Format | Printers | Handling |
|---|---|---|
| MP4 | X1, X1C, X1E, A1, A1 Mini, H2D | Attached directly |
| AVI | P1S, P1P | Saved immediately, converted to MP4 in the background |
Background Conversion
AVI files from P1-series printers are converted to MP4 automatically using FFmpeg. The conversion runs at low CPU priority (-threads 1, nice -n 19) to avoid impacting performance on Raspberry Pi. The timelapse is available immediately after the print — the conversion happens silently in the background.
Opening the Editor
- Open an archive with a timelapse
- Click the timelapse to view it
- Click Edit in the viewer header
Editor Features
| Feature | Description |
|---|---|
| Trim | Set start and end points with visual timeline |
| Speed | Adjust playback from 0.25x to 4x |
| Music | Add audio overlay with volume control |
| Preview | Preview changes before saving |
Timeline Controls
- Thumbnail strip - Visual preview of video frames
- Trim handles - Drag to set start/end points
- Playhead - Shows current position
- Play/Pause - Preview trimmed section
Adding Music
- Click the Music section
- Upload an audio file (MP3, WAV, M4A, AAC, OGG)
- Adjust volume with the slider
- Preview synced with video playback
Saving Changes
Click Save to process the video. The original timelapse will be replaced with the edited version.
Processing Time
Video processing uses FFmpeg on the server. Longer videos may take a few moments to process.
Manual Timelapse Upload & Remove
If the auto-scan attaches the wrong timelapse or your printer is in LAN-only mode:
- Remove the incorrect timelapse via the context menu → Remove Timelapse
- Upload the correct file via the context menu → Upload Timelapse
| Action | When Visible | Description |
|---|---|---|
| Upload Timelapse | No timelapse attached | Upload .mp4, .avi, or .mkv from your device |
| Remove Timelapse | Timelapse attached | Delete the timelapse and clear the reference |
AVI Auto-Conversion
Uploaded AVI and MKV files are automatically converted to MP4 in the background, just like auto-scanned timelapses.
Source 3MF Upload
Upload the original 3MF file for prints started outside Bambuddy:
- Open an archive
- Click Upload 3MF
- Select the source file
- 3MF is stored with the archive
This enables 3D preview and re-printing even for imported archives.
Fusion 360 Design Files
Attach F3D design files to archives for complete design tracking:
Uploading F3D Files
- Right-click an archive (or use the context menu button)
- Select Upload F3D
- Choose your
.f3dfile - File is stored with the archive
F3D Badge
Archives with attached F3D files show a cyan badge on the card (next to the source 3MF badge if present). Click the badge to download the file.
Context Menu Options
| Action | When Visible | Description |
|---|---|---|
| Upload F3D | No F3D attached | Attach a new design file |
| Replace F3D | F3D exists | Replace with a different file |
| Download F3D | F3D exists | Download the attached file |
| Remove F3D | F3D exists | Delete the attachment |
Design Tracking
Keep your Fusion 360 source files alongside your prints for complete project documentation.
Tags
Organize archives with custom tags:
Creating Tags
- Open any archive
- Click Edit Tags
- Type a new tag name
- Press Enter to create
Using Tags
- Filter archives by tag
- Combine multiple tags
- Color-coded in the interface
Tag Examples
functional- Useful printsdecoration- Decorative itemsgift- Prints for othersprototype- Test iterationsfailed- Print failures
Tag Management
Manage all tags from a centralized location:
- Navigate to Archives page
- Click the gear icon next to the tag filter dropdown
- View all tags with usage counts
Available actions:
| Action | Description |
|---|---|
| Search | Filter tags by name |
| Sort | Order by usage count or alphabetically |
| Rename | Change tag name across all archives |
| Delete | Remove tag from all archives |
Bulk Rename
Renaming a tag updates all archives that use it in one action. Great for fixing typos or consolidating similar tags.
Notes
Add notes to archives:
- Design changes
- Print settings tweaks
- Quality observations
- Reference links
Notes are searchable via full-text search.
Designer Attribution
Credit the model designer:
- Open an archive
- Click Edit Details
- Add Designer name
- Optionally add Designer URL
Great for tracking models from Printables, Thingiverse, etc.
External Links
Link archives to their source on Printables, Thingiverse, or other sites:
Adding an External Link
- Open an archive
- Click Edit (pencil icon)
- Enter the URL in the External Link field
- Click Save
How It Works
| Source | Behavior |
|---|---|
| External Link set | Globe button opens your custom URL |
| MakerWorld detected | Globe button opens auto-detected MakerWorld URL |
| Neither | Globe button disabled |
MakerWorld Auto-Detection
Files downloaded from MakerWorld include metadata that Bambuddy extracts automatically. The external link field lets you manually add links for files from other sources.
Filtering Archives
Find archives quickly:
Filter Options
| Filter | Description |
|---|---|
| Printer | Show only from specific printer |
| Tags | Has specific tags |
| Material | Filament type used |
| Color | Filter by filament color (AND/OR modes) |
| File type | GCODE, SOURCE, or ALL |
| Favorites | Show only favorited archives |
Combining Filters
Stack multiple filters to narrow results. For example: "PLA prints from Workshop X1C in the last week."
Sorting
Sort archives by:
- Date (newest/oldest)
- Name (A-Z/Z-A)
- Size (largest/smallest)
Auto-Purge
Your archive can grow forever. For admins who don't want to babysit disk usage, Bambuddy can automatically delete old archives on a daily cadence.
Enabling Auto-Purge
Navigate to Settings → General → Archive Settings. Below the familiar toggles (auto-archive, save thumbnails, capture finish photo) there's an Auto-purge old archives section.
- Flip the toggle on.
- Set the age threshold (minimum 7 days, maximum 10 years, default 365).
- Changes save immediately with a confirmation toast — no separate Save button.
A background sweeper runs every 15 minutes but throttles actual purge runs to once per 24 hours, so flipping the toggle does not trigger an immediate deletion — the next daily tick picks it up.
Manual Purge
Need to clean up right now? The Archives page header has a Purge old button right next to Upload 3MF. It opens a modal with a live preview: "N archives · size would be deleted" plus up to five sample filenames. Adjust the age input to see the count update, then confirm.
What happens when you click Purge
- Each matching archive is permanently removed from the database.
- The 3MF, thumbnail, timelapse, source 3MF, F3D design file, and photo folder are all deleted from disk.
- There is no trash bin for archives — deletion is immediate and cannot be undone.
- Reprinting an archive refreshes its age clock, so archives you still use are safe.
How "old" Is Measured
The threshold is based on the most recent time each archive was printed, not its original creation date. When you reprint an archive Bambuddy reuses the same row and refreshes its completed-at timestamp, so reprinting a two-year-old archive yesterday moves its age clock back to yesterday. In practice: only archives you haven't actually used in a while get purged.
What Gets Deleted
Unlike the File Manager trash bin, archives are hard-deleted. There is no restore. For every archive past the threshold the sweeper removes:
- The database row
- The 3MF file
- The thumbnail
- The timelapse (if any)
- The source 3MF (if uploaded separately)
- The F3D design file (if uploaded)
- The photo folder
Everything goes through the same safety-checked path as the single-archive delete button, so the existing "refuse to delete outside the archive directory" guards still apply.
Keeping Archives Safe
If you want to make sure certain prints survive the purge:
- Download them first — the 3MF and thumbnail are easy to grab individually.
- Favourite them (planned) — a future release may exclude favourited archives from auto-purge.
Auto-purge is off by default on new installs, so nothing disappears until you opt in.
Permissions
Both the toggle and the manual purge require the archives:purge permission (Administrators group by default). Regular users don't see either UI.
Tips
Batch Operations
Enter selection mode and click archives to select them for batch actions (tagging, project assignment, comparison).
Quick Search
Press / to jump to the search box from anywhere.
Project Organization
Use projects to group related prints (like "Voron Build" or "Gift Set").
Tag Consistently
Develop a consistent tagging system for easy filtering later.