Authentication
Bambuddy includes an optional authentication system that allows you to secure your instance with user accounts and group-based permissions. This feature is completely optional and can be enabled or disabled at any time.
Overview
When enabled, authentication provides:
- User Accounts: Create multiple users with unique credentials
- Group-Based Permissions: 80+ granular permissions organized by feature
- Customizable Groups: Create custom groups or use default system groups
- Secure Authentication: JWT tokens with password hashing using PBKDF2
- User Activity Tracking: See who uploaded archives, library files, queued prints, and started prints
- Advanced Auth via Email: Optional SMTP-based user onboarding and self-service password resets
Groups & Permissions
Default Groups
Bambuddy comes with three default system groups:
| Group | Description | Permissions |
|---|---|---|
| Administrators | Full access to all features | All permissions |
| Operators | Control printers and manage content | Printer control, queue, archives, projects, library |
| Viewers | Read-only access | View printers, archives, queue, projects |
Permission Categories
Permissions follow a resource:action pattern. Categories include:
- Printers: read, create, update, delete, control, files, ams_rfid, clear_plate
- Archives: read, create, update_own, update_all, delete_own, delete_all, reprint_own, reprint_all
- Queue: read, create, update_own, update_all, delete_own, delete_all, reorder
- Library: read, upload, update_own, update_all, delete_own, delete_all
- Projects: read, create, update, delete
- Inventory: read, create, update, delete, view_assignments
- Cloud: auth (login/logout and read/write cloud profiles)
- Settings: read, update, backup, restore
- Users/Groups: read, create, update, delete
- And many more...
Cloud Profiles Are Per-User
When authentication is enabled, each user has their own independent Bambu Cloud login. User A logging into Cloud does not affect User B's session. To use Cloud Profiles, a user needs the cloud:auth permission — this single permission covers login, logout, and all cloud profile operations (reading, creating, editing, deleting presets). The settings:read permission is NOT required for cloud profiles.
Separating Inventory Access from AMS Assignments
The inventory:view_assignments permission controls whether spool-to-AMS-slot assignment data is visible on the Printers page. This is separate from inventory:read, which controls access to the full Inventory page. Grant only inventory:view_assignments to let users see what's loaded in each AMS slot without exposing the full spool inventory.
Ownership-Based Permissions
For archives, queue items, and library files, permissions are split into "own" and "all" variants:
| Permission Type | Description |
|---|---|
*_own | User can only modify items they created |
*_all | User can modify any item (includes *_own capability) |
Examples:
archives:delete_own- Delete only archives you uploadedarchives:delete_all- Delete any archivequeue:update_own- Edit only queue items you addedlibrary:update_all- Rename/move any library file
Default Group Assignments:
| Group | Permissions |
|---|---|
| Administrators | All *_all permissions (full access) |
| Operators | All *_own permissions (own items only) |
| Viewers | No update/delete permissions (read-only) |
Ownerless Items:
Items created before authentication was enabled (or by deleted users) have no owner. These "ownerless" items require *_all permission to modify.
Library folders never track an owner, so deleting a folder with contents requires library:delete_all. One exception: users with library:delete_own may delete empty folders (no subfolders, no files — including trashed ones); external and project/archive-linked folders always require library:delete_all. See File Manager → Deleting Folders.
Users in Multiple Groups
Users can belong to multiple groups. Permissions are additive - a user has all permissions from all their groups combined.
Enabling Authentication
First-Time Setup
- Navigate to any page in Bambuddy
- You'll be redirected to the Setup Page if authentication is not configured
- Choose to Enable Authentication
- Create your admin account:
- Enter a username
- Enter a password (minimum 6 characters)
- Click Enable Authentication
The first user is automatically added to the Administrators group.
From Settings (When Already Running)
- Go to Settings → Users tab
- Click Activate Authentication
- You'll be redirected to the Setup Page
- Complete the setup as described above
Managing Users
Creating Users
Standard Mode
- Log in as a user with
users:createpermission - Go to Settings → Users tab
- Click Add User
- Fill in:
- Username
- Password (minimum 6 characters)
- Confirm Password
- Groups (select one or more)
- Click Create
With Advanced Auth (Email)
When Advanced Auth via Email is enabled:
- Go to Settings → Users tab
- Click Add User
- Fill in:
- Username
- Email address
- Groups (select one or more)
- Click Create — the system generates a secure random password and emails it to the user automatically
No one besides the new user sees the password, making this inherently more secure than manually assigning passwords.
Editing Users
- Go to Settings → Users
- Click the edit icon next to a user
- Modify username, password, or group assignments
- Click Save
Deleting Users
- Go to Settings → Users
- Click the delete icon next to a user
- If the user has created any archives, queue items, or library files, you'll be asked what to do:
- Delete user AND their items - Removes the user and all content they created
- Delete user, keep items - Removes the user but keeps their content (items become "ownerless")
- Confirm deletion
Note: You cannot delete yourself or the last administrator. Ownerless items require *_all permission to modify.
Managing Groups
Viewing Groups
- Go to Settings → Users → Groups tab
- View all groups with their permission counts
Creating Custom Groups
- Go to Settings → Users → Groups tab
- Click Add Group — this opens the full-page group editor
- Enter group name and description
- Use the permission grid to select permissions:
- Search: Filter permissions by name using the search bar
- Select All / Clear All: Bulk-select or deselect all permissions
- Category checkboxes: Toggle all permissions in a category at once
- Each category card shows a count badge (e.g., "5/7") for selected permissions
- Click Save
Editing Groups
- Click the edit icon next to a group — this opens the full-page group editor
- Modify name, description, or permissions
- Click Save
Note: System groups (Administrators, Operators, Viewers) cannot be deleted.
Adding Users to Groups
- Go to Settings → Users → Groups tab
- Click on a group to view details
- Click Add User and select a user
- Or edit a user and select their groups
Changing Your Password
Any authenticated user can change their own password:
- Click the Key icon in the sidebar (next to logout)
- Enter your current password
- Enter your new password
- Confirm the new password
- Click Change Password
Forgot Password
With Advanced Auth (Email)
If Advanced Auth via Email is enabled, users can reset their own password:
- Click "Forgot your password?" on the login page
- Enter your username or email address
- A new secure random password is emailed to you automatically
- Log in with the new password and change it if desired
Admins can also trigger a password reset from User Management with a single click — the new password is emailed to the user.
Without Advanced Auth
If email-based auth is not enabled:
- Contact your Bambuddy administrator
- They can reset your password in User Management
- Log in with the temporary password and change it
Disabling Authentication
If you need to disable authentication:
- Log in as an administrator
- Go to Settings → Users tab
- Click Disable Authentication
- Confirm the action
Warning: Disabling authentication removes access control. All features become accessible without login.
Advanced Auth via Email
Advanced Authentication adds SMTP-based email integration for streamlined user onboarding and self-service password management. This is an optional feature that can be enabled or disabled independently of basic authentication.
Setting Up SMTP
- Go to Settings → Email tab
- Configure your SMTP server:
- SMTP Host — Your mail server (e.g.,
smtp.gmail.com) - SMTP Port — Typically
587(TLS) or465(SSL) - Username — SMTP login (if authentication is required)
- Password — SMTP password or app-specific password
- From Address — Sender email shown in outgoing messages
- External URL — Your Bambuddy instance URL (used in email links)
- Enable Advanced Authentication
- Use the Test Email button to verify your configuration
How It Works
Once enabled:
- User creation: Admins enter a username and email address. The system generates a secure random password and emails it directly to the user. No one else sees the password.
- Admin password reset: In User Management, admins can click a reset button to generate a new password and email it to the user — one click, no manual entry.
- Self-service reset: Users can click "Forgot your password?" on the login screen to receive a new password via email without contacting an admin.
- Email validation: The system validates email addresses since email is the sole mechanism for password delivery.
- Case-insensitive login: Usernames and email addresses are not case-sensitive when logging in.
Email Templates
Bambuddy includes customizable notification templates for:
- Welcome Email — Sent when a new user account is created
- Password Reset — Sent when a password is reset (by admin or self-service)
- User Print Started Email — Sent when a user's print job begins
- User Print Completed Email — Sent when a user's print job finishes successfully
- User Print Failed Email — Sent when a user's print job fails
- User Print Stopped Email — Sent when a user's print job is cancelled
Templates can be edited in Settings → Email → Templates.
These are distinct from the provider-level Print Completed / Failed / Stopped templates
The four User Print … Email templates are the per-user emails sent directly to the user who submitted the print (SMTP only, requires Advanced Auth and the user's opt-in). The provider-level Print Completed / Failed / Stopped templates in Settings → Notifications → Message Templates are the broadcast events sent through whatever notification providers the admin has configured (ntfy, Pushover, Telegram, Discord, Email, Webhook, Home Assistant). The " Email" suffix on the user templates is how Bambuddy distinguishes the two paths in the Message Templates list (#1792).
Per-User Email Notifications
When Advanced Auth is enabled, individual users can opt in to email notifications for their own print jobs. This is separate from the global notification system — it only emails the user who submitted the print.
Enabling User Notifications
- Go to Settings → Notifications tab
- Enable User Notifications
- SMTP must be configured (see Setting Up SMTP)
Managing Your Preferences
- Click Notifications in the sidebar (visible when User Notifications are enabled)
- Toggle notifications for each event type:
- Print Job Starts — Email when your print begins
- Print Job Finishes — Email when your print completes successfully
- Print Errors — Email when your print fails
- Print Job Stops — Email when your print is cancelled
- Click Save
Requires Email Address
Users must have an email address on their account to receive notifications. The email address can be set by an administrator in User Management.
Permission Required
The notifications:user_email permission is required to access the Notifications page. Administrators and Operators have this by default. Viewers do not.
Enabling/Disabling
Advanced Auth can be toggled on or off at any time without affecting basic authentication or existing user accounts. When disabled, user creation and password resets revert to the standard manual workflow.
LDAP Authentication
Bambuddy supports LDAP/Active Directory authentication, allowing users to log in with their directory credentials. LDAP users coexist with local accounts — the local admin remains as a fallback when the LDAP server is unreachable.
Setting Up LDAP
- Go to Settings → Authentication → LDAP tab
- Configure your LDAP server:
- Server URL —
ldaps://ldap.example.com:636for LDAPS orldap://ldap.example.com:389for StartTLS - Security — StartTLS (upgrades plain connection to TLS) or LDAPS (TLS from the start)
- Bind DN — Service account DN for searching users (e.g.,
cn=admin,dc=example,dc=com) - Bind Password — Service account password
- Search Base — Where to search for users (e.g.,
dc=example,dc=com) - User Search Filter — LDAP filter to find users.
{username}is replaced with the login name- Active Directory:
(sAMAccountName={username}) - OpenLDAP:
(uid={username})
- Active Directory:
- Click Save, then Test Connection to verify
- Click Enable to activate LDAP authentication
TLS Required
Plaintext LDAP is not supported. All connections use either StartTLS or LDAPS to encrypt credentials in transit.
User Provisioning
There are two ways to create LDAP users in BamBuddy:
- Auto-provision (toggle in LDAP settings) — When enabled, a BamBuddy account is automatically created on the user's first successful LDAP login. Group mapping (below) runs at provision time.
- Manual provision — Open Add User (either from the Users page or from Settings → Authentication) and switch to the LDAP tab. The tab only appears when LDAP is enabled in settings. Type at least 2 characters to search your directory across
sAMAccountName,uid,mail,displayName, andcn— the filter spans both Active Directory and OpenLDAP layouts, so attributes the directory doesn't recognise are silently skipped. Pick a user from the results and click Provision user — BamBuddy re-resolves the entry via the service-account bind, creates the account withauth_source=ldapand no local password, and applies the same group mapping as the auto-provision path. Users that already exist in BamBuddy are marked Already provisioned in the results so you can't accidentally duplicate them.
Other LDAP-user behaviour:
- Email sync — The user's email address from LDAP is synced on each login.
- Auth source — LDAP users are tagged with
auth_source=ldapand shown with an "LDAP" badge in user management.
Group Mapping
LDAP groups can be mapped to BamBuddy groups for automatic role assignment. The mapping is configured as a JSON object in the LDAP settings:
{
  "cn=PrintFarm_Admins,ou=groups,dc=example,dc=com": "Administrators",
  "cn=PrintFarm_Operators,ou=groups,dc=example,dc=com": "Operators",
  "cn=PrintFarm_Viewers,ou=groups,dc=example,dc=com": "Viewers"
}
- Keys are LDAP group DNs (case-insensitive matching)
- Values are BamBuddy group names
- Both Active Directory groups (
memberOfattribute) and POSIX groups (memberUidattribute) are supported - A user's POSIX primary group — the one their
gidNumberpoints at — counts as full membership, the same as Unix treats it - Group membership is synced on every login
No Mapping? No Problem
If no group mapping is configured, LDAP users are created without any group. Admins can manually assign groups in BamBuddy afterward.
Directories without POSIX groups
The POSIX lookups above need your directory to define the posixGroup object class in its published schema. Some directories do not — lldap is the common one: it marks every account it creates as posixAccount, but its groups are only ever groupOfNames. There is nothing to configure. BamBuddy notes the absence in the log and maps groups from memberOf, which is where those directories keep membership anyway.
Password Management
LDAP users cannot change their password through BamBuddy — passwords are managed by the LDAP server. The following features are automatically disabled for LDAP users:
- Change Password button (hidden in UI)
- Forgot Password (skipped for LDAP emails)
- Admin Password Reset (blocked with error message)
Local Admin Fallback
Local accounts always work regardless of LDAP status. If the LDAP server is unreachable, LDAP authentication fails gracefully and falls back to local authentication. This ensures administrators can always access BamBuddy.
Same Username
If a local user and an LDAP user have the same username, the local account takes priority. LDAP will not override an existing local account.
Two-Factor Authentication (2FA)
Bambuddy supports per-user opt-in two-factor authentication via either TOTP (time-based one-time password, compatible with Google Authenticator, Authy, 2FAS, and any standard TOTP app) or Email OTP (a 6-digit code delivered to the user's registered email). Each user independently decides whether to enable 2FA and which method to use.
2FA is configured from Settings → Authentication → Two-Factor Auth. The tab header shows a green bullet when 2FA is active for your account.
Enabling TOTP
- Settings → Authentication → Two-Factor Auth → Set up TOTP
- Scan the displayed QR code with your authenticator app, or paste the secret manually
- Enter the 6-digit code your app currently shows to confirm
- Bambuddy displays 10 single-use backup codes — save them in a password manager or print them. They are shown only once
- On next login, after entering username + password, Bambuddy prompts for the TOTP code
Enabling Email OTP
- Settings → Authentication → Two-Factor Auth → Set up Email OTP
- Bambuddy emails a 6-digit setup code to your registered address
- Enter the code to confirm; email 2FA is now active
- Requires Advanced Auth via Email to be configured (for SMTP delivery)
Backup Codes
Each enrolled TOTP user receives 10 backup codes. Any backup code can substitute for the TOTP code once — after use it is consumed. Regenerate a fresh set any time from Settings → Two-Factor Auth (invalidates all prior codes).
Security Properties
- Brute-force protection — per-user and per-IP rate limits on every verify attempt
- Replay protection — a TOTP code cannot be accepted twice within the same 30-second window, on any of: setup, enable, verify, disable, backup-code regenerate
- Single-use challenge — the pre-auth token issued between password and 2FA verification is a DB-backed single-use token bound to the browser via an HttpOnly cookie. It cannot be replayed on a different browser or reused after a successful verify
- Constant-time backup-code check — all stored hashes are iterated on every attempt so the matching position in the list does not leak through timing
- Silent-replacement guard — replacing an active TOTP requires verifying the current code first
Admin Reset
An administrator with users:update can disable any user's 2FA (TOTP, Email OTP, and backup codes) from Settings → Users → Edit user. Disabling also bumps the user's password_changed_at, invalidating any JWT issued before the reset.
Single Sign-On (OIDC / SSO)
Bambuddy integrates with any standards-compliant OpenID Connect provider — PocketID, Authentik, Keycloak, Google Workspace, Azure AD, etc. The login page renders an SSO button for every enabled provider.
OIDC providers are configured from Settings → Authentication → SSO / OIDC (admin only). The tab header shows a green bullet when at least one provider is enabled.
Adding a Provider
- Create a client on your identity provider with redirect URI
https://<your-bambuddy>/api/v1/auth/oidc/callback - Settings → Authentication → SSO / OIDC → Add Provider
-
Fill in:
- Name — display name shown on the login page
- Issuer URL — must start with
https://(HTTP is rejected; private/loopback/link-local IPs are rejected to prevent SSRF) - Client ID / Client Secret — from the IdP. The client secret is encrypted at rest
- Scopes — default
openid email profile(theopenidscope is required) - Icon URL (optional) — public HTTPS URL of a PNG/JPEG/WebP/GIF (≤ 1 MB). Bambuddy fetches it once and serves it from a same-origin proxy, so the strict Content-Security-Policy doesn't block external icon hosts on the login page
-
Toggle Enabled — the SSO button appears on the login page immediately
Configuring a Provider via Environment Variables
Deployments managed by a compose file, Helm chart or GitOps repo have no one to click through the settings UI. One provider can therefore be defined entirely from the environment — it is written to the database on startup and re-applied on every boot.
Set the four required variables; the provider activates only when all four have a value (empty, or nothing but whitespace, counts as unset). Surrounding whitespace is trimmed from all four — a secret mounted from a Kubernetes stringData block carries a trailing newline that would otherwise be part of the value:
BAMBUDDY_OIDC_NAME=Keycloak
BAMBUDDY_OIDC_ISSUER_URL=https://sso.example.com/realms/main
BAMBUDDY_OIDC_CLIENT_ID=bambuddy
BAMBUDDY_OIDC_CLIENT_SECRET=your-client-secret
Everything else is optional and shown here with its default:
| Variable | Default | Notes |
|---|---|---|
BAMBUDDY_OIDC_SCOPES | openid email profile | openid is required |
BAMBUDDY_OIDC_ENABLED | true | Whether the SSO button appears |
BAMBUDDY_OIDC_AUTO_CREATE_USERS | false | Create a local account on first sign-in |
BAMBUDDY_OIDC_AUTO_LINK_EXISTING | false | See the safety rule below |
BAMBUDDY_OIDC_EMAIL_CLAIM | email | Claim to read the address from |
BAMBUDDY_OIDC_REQUIRE_EMAIL_VERIFIED | true | Reject unverified addresses |
BAMBUDDY_OIDC_ICON_URL | (none) | Same rules as the UI icon field |
BAMBUDDY_OIDC_AUTOLOGIN | false | Redirect straight to this provider |
BAMBUDDY_OIDC_DEFAULT_GROUP | (none) | Group new users land in — a group name, see below |
BAMBUDDY_OIDC_GROUP_CLAIM | groups | Claim to read IdP groups from — see Group Sync |
BAMBUDDY_OIDC_GROUP_MAPPING | (none) | JSON object mapping IdP groups to BamBuddy group names |
Booleans accept true, 1 or yes for on and false, 0 or no for off (case-insensitive). Leaving a variable out, or setting it to an empty value, gives you the default from the table above.
Anything else — on, y, enabled — is rejected rather than guessed at: the whole configuration is skipped, a log line names the variable that could not be read, and a provider that was already running is left exactly as it was. The alternative would be BAMBUDDY_OIDC_REQUIRE_EMAIL_VERIFIED=on quietly meaning off.
BAMBUDDY_LOCAL_LOGIN is deliberately more forgiving
The recovery flag is read on the login request itself, not at startup, so a rejected value there would return an error from the very endpoint the flag exists to keep reachable. An unrecognised value simply counts as off.
BAMBUDDY_OIDC_ISSUER_URL is held to the same policy as an issuer entered in the UI: https:// only, with private, loopback, link-local, cloud-metadata, numeric-encoded and IPv4-mapped hosts all rejected. An in-cluster address such as http://keycloak:8080 is therefore refused — one log line, no SSO button and no other signal — so use the externally reachable HTTPS issuer even when Bambuddy and the IdP sit in the same cluster.
It is read-only in the UI
The provider appears in Settings → Authentication → SSO / OIDC like any other, marked (Environment Managed) with a lock, but without edit, delete or enable controls. Startup rewrites the row from the environment on every boot, so a change made here would be reverted at the next restart — the API refuses it outright instead of accepting a change that cannot last.
Providers you created in the UI are untouched and stay fully editable. Both kinds work side by side — with one exception, below.
The provider is identified by its name
The provider is matched by name — a name clash adopts an existing one
On every boot the environment provider is found by its BAMBUDDY_OIDC_NAME. If a provider you already created in the UI carries that exact name, startup adopts that row instead of creating a second one: its issuer, client ID and secret are overwritten from the environment and it becomes environment-managed and read-only. Accounts already linked to it keep their link, but the provider is otherwise taken over — and unsetting the variables later releases it as a former environment-managed row, not as the provider you originally built. Give the environment provider a name that no UI provider uses, unless you deliberately intend to repoint that one from the environment.
Renaming releases the previous provider
BAMBUDDY_OIDC_NAME is the identity, so changing it does not rename the row — it takes over (or creates) the row with the new name and releases the previous one: disabled, unlocked, editable in the UI again, and no longer the autologin target. Nothing is deleted, so accounts linked to the old provider keep their link; re-add the old name and it comes back with those links intact.
Groups, autologin and multiple replicas
The default group is named, not numbered
With BAMBUDDY_OIDC_AUTO_CREATE_USERS=true, accounts created on first sign-in land in the group named by BAMBUDDY_OIDC_DEFAULT_GROUP; without it they get Viewers. It matches the group name exactly, including case — group IDs are handed out per installation, so an ID in a compose file would point at a different group on the next deployment.
A name that matches no group is refused: the provider is left exactly as it was, the reason is logged, and the app still starts. Silently falling back to Viewers would mint under-privileged accounts for as long as the typo lives — and because the provider is locked, the UI could not correct it.
On a first boot there is nothing to leave as it was, so nothing is created and no SSO button appears until the name matches. Create the group first, then set the variable.
Removing the variable clears the group again on the next boot: the environment is the whole truth for this row, so a group it no longer names does not linger.
Autologin is exclusive
Only one provider can be the autologin target. Setting BAMBUDDY_OIDC_AUTOLOGIN=true therefore clears the autologin flag on every other provider on each boot — including one you set in the UI, which will not stay set while the environment claims it.
It runs the other way too, but only until the next boot: turning autologin on for another provider in the UI clears it on the environment-managed row as well, and the environment does not take it back until the next restart re-applies the config. Until then the UI choice wins.
Running more than one replica
Startup finds the provider by name and inserts it if it is missing. When two replicas boot at the same time they can both find nothing and both attempt the insert; the unique constraint on the name lets the first win and turns the second into a caught error, so no duplicate row is created and nothing breaks. The replica that lost the race logs BAMBUDDY_OIDC_* could not be applied: IntegrityError once — it reads more alarming than it is, it is expected on a simultaneous boot, and it needs no action.
Removing the variables disables, it does not delete
Unset the variables and the provider is switched off, not removed. Accounts linked to it keep their link, and re-adding the variables brings the provider back with those links intact — deleting the row would drop them permanently.
It also stops being environment-managed: the lock disappears and the provider becomes editable in the UI again. A provider the API still refused to touch, with no configuration left behind it, would be a dead end reachable only through the database.
Auto-link needs verified email addresses
BAMBUDDY_OIDC_AUTO_LINK_EXISTING=true binds an OIDC identity to an existing local account with the same address. With the default BAMBUDDY_OIDC_EMAIL_CLAIM=email this is refused unless BAMBUDDY_OIDC_REQUIRE_EMAIL_VERIFIED=true — an identity provider that does not verify addresses would let anyone claim someone else's account.
A rejected configuration is logged and skipped; the app still starts and any previously applied provider is left as it was.
Locked out?
BAMBUDDY_LOCAL_LOGIN=true re-enables username and password sign-in. See Recovery below.
Group Sync
OIDC providers can sync the user's groups from the identity provider into BamBuddy groups on every login — the same behaviour the LDAP group mapping has had since the beginning. Two per-provider settings control it:
- Group Claim — the JWT claim that carries the user's groups at the IdP. Defaults to
groups. Providers put groups in different claims (Keycloak:groupsas an array after a client mapper; Authentik:groupsas an array; some setups userolesor a custom claim), so the claim name is configurable like the Email Claim. Namespaced claims such asapp/rolesare accepted too, for Auth0. The claim value may be a JSON array or a space/comma-separated string — both are accepted. The claim is read from the ID token only, not from the userinfo endpoint: make sure your IdP puts the groups into the ID token (in Keycloak, the group mapper's Add to ID token switch; elsewhere often a scope such asgroupsthat has to be added to Scopes). - Group Mapping — which IdP group maps to which BamBuddy group. The admin picks the pairs; names do not have to match. With no mapping configured the feature is off and the provider behaves exactly as before.
The provider form builds the mapping as rows, with the BamBuddy side limited to existing groups, so an unknown group cannot be entered by accident. A row with only one side filled in, or a second row for an IdP group already mapped above (compared ignoring case), is flagged and blocks Save until you complete or remove it. A row left completely empty is simply skipped:
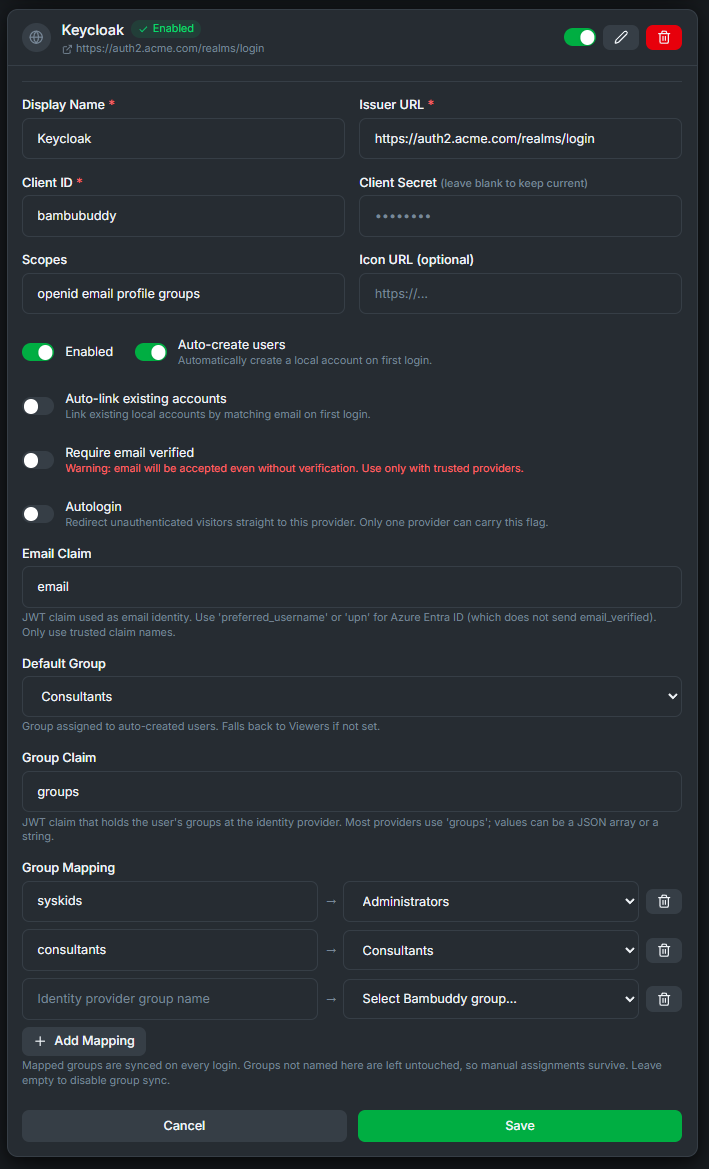
How the sync behaves:
- Runs on every SSO login, not just when the account is created.
- Only the mapped slice is managed. Groups named in the mapping follow the IdP; any other group on the user is a manual assignment and survives logins unchanged. Promoting a user into a non-mapped group therefore sticks — the same rule the LDAP sync settled on after #1292.
- Revocation propagates. Losing the IdP group removes the mapped BamBuddy group at the next login.
- Matching is case-insensitive on the IdP side, and a missing claim simply means "no mapped groups" — it never blocks a login that already authenticated. Neither does a sync that fails: the error is logged and the user keeps the groups they had.
- The Default Group is not re-applied. It is assigned once, when the account is created; the sync never puts it back, so moving a user out of it sticks.
Deleting a mapped group: removing a BamBuddy group does not rewrite any provider's mapping. The mapping row is flagged in the form (red border, the stale name shown as (deleted)) until you pick a replacement or remove the row; at sync time a dangling entry is skipped.
Renaming a mapped group has the same effect. Mappings store group names, so renaming a non-system BamBuddy group turns its mapping row into an orphan just like a deletion does — and users who already hold that group keep it, because the group is no longer in the set the mapping manages. The LDAP group mapping behaves the same way.
Via environment variables, the same two settings are BAMBUDDY_OIDC_GROUP_CLAIM (default groups) and BAMBUDDY_OIDC_GROUP_MAPPING (a JSON object whose values are BamBuddy group names, not IDs):
Like BAMBUDDY_OIDC_DEFAULT_GROUP, a mapping value that matches no group is refused — the whole provider configuration is skipped, the reason is logged, and the app still starts. Invalid JSON, a value that is not a group name (such as null or a number), and two IdP groups that differ only by case are rejected the same way, with the reason in the log. Removing the variable clears the mapping on the next boot.
Provider Icons
If an Icon URL is configured, Bambuddy fetches the image server-side at save time and caches the bytes in the database. The SSO button on the login page then loads the icon from a same-origin proxy at /api/v1/auth/oidc/providers/{id}/icon — never from the IdP's host directly.
Why proxy: the SPA's img-src Content-Security-Policy is intentionally strict ('self' data: blob:), so hot-linking arbitrary IdP icon hosts would be blocked. The proxy keeps the CSP locked down while still letting admins point at any public icon URL, and as a side effect keeps anonymous users' IP addresses out of the IdP's access logs on every login page render.
Each provider card in Settings → Authentication → SSO / OIDC has two icon-related buttons (visible only when relevant):
- Refresh icon (🔄) — re-fetches from the stored URL. Use after the IdP has updated its icon, or to retry after a transient fetch failure.
- Remove icon (🚫) — removes the icon entirely. Clears both the URL and the cached bytes; the provider stays enabled and renders the default Shield fallback on the login page. To re-add an icon, edit the provider and enter the URL again.
Neither button is offered for an environment-managed provider: its icon comes from BAMBUDDY_OIDC_ICON_URL and is re-applied on every boot, so the API refuses both calls. Change the variable instead.
What's allowed
| Constraint | Detail |
|---|---|
| Scheme | https:// only — HTTP and other schemes are rejected |
| Format | PNG, JPEG, WebP, GIF (SVG is not supported) |
| Size | 1 MB hard cap — streamed and aborted early past the limit |
| Redirects | Not followed — the URL must respond with the image directly |
| Host | Public internet only — private/RFC-1918, loopback, link-local, cloud-metadata, multicast and numeric-encoded IPs are rejected as SSRF risks |
A failed fetch surfaces as a precise error in the admin UI (e.g. "Icon URL returned HTTP 404", "Icon URL response is missing a Content-Type header") and the provider save is rolled back — there is no half-configured state.
Account Linking & Auto-Provisioning
Two independent toggles per provider:
| Toggle | Default | Effect |
|---|---|---|
| Auto-create users | Off | On first successful SSO login, create a new BamBuddy account for the verified email. Off → unknown emails are rejected |
| Auto-link existing accounts | Off | On first successful SSO login where the verified email matches an existing local user, link the two accounts. Off → admins must pre-link manually to prevent silent takeover by an attacker-controlled IdP |
| Email Claim | email | JWT claim used as the user's email identity. Set to preferred_username or upn for Azure Entra ID. Custom claims bypass the email_verified check entirely |
| Require Email Verified | On | Only accept the email claim if the provider marks it as verified (email_verified: true). Disable only when the provider never sends this flag (e.g. Azure Entra ID) or when using a custom Email Claim |
| Group Claim | groups | JWT claim that carries the user's IdP groups — see Group Sync |
| Group Mapping | (empty) | IdP group → BamBuddy group pairs; empty disables group sync |
Auto-link is gated by an additional check: if the target user already has any OIDC link, a second IdP cannot auto-link to the same account.
Security constraint: Auto-link requires both Require Email Verified to be on and Email Claim set to
preferred_username) or disabling the verified-flag check automatically blocks auto-linking — this is enforced at the UI and database level. The reasoning: auto-linking based on an unverified or non-standard claim could allow an attacker-controlled IdP to silently take over a local account.
Autologin & disabling local login
Two related options for operators who run their own OIDC SSO and want exactly one auth path. Both live under Settings → Authentication → SSO / OIDC (admin only).
Disable local username/password login
The Disable local username/password login toggle (above the provider list) hides the credentials form on the login page and rejects POST /auth/login for local accounts. LDAP keeps its own ldap_enabled switch and is not affected — a delegated directory has its own policy and lockouts and is closer to SSO than to local credentials.
When the toggle is on:
POST /auth/loginrejects username + password with HTTP 401 — the response wording is identical to wrong-password so credential-stuffing tools cannot distinguish "local disabled" from "wrong password" across an install fleetPOST /auth/forgot-passwordrejects with HTTP 403 — the reset link wouldn't grant access anyway- The login page hides the credentials form, the Remember Me checkbox, and the Forgot Password link, leaving only the OIDC provider buttons
Safety refusals. Saving the toggle is refused with HTTP 400 in two cases:
| Condition | Reason |
|---|---|
| No OIDC provider is enabled | Nobody could authenticate |
| The calling admin has no OIDC link | You would lock yourself out |
Autologin
The Autologin toggle on each provider (in the provider edit form) redirects unauthenticated visitors directly to that provider's authorize URL on mount — no manual click on the provider button. At most one provider can carry this flag at a time; turning it on for one provider clears it on every other.
The login page never gets stuck on a dead IdP:
- The authorize-URL fetch is raced against a 5-second timeout
- On timeout or fetch error the redirect is aborted, the page renders normally, and a sticky amber banner explains "Automatic SSO sign-in failed. Pick a provider below to continue."
https://<your-bambuddy>/login?fallback=localalways skips the autologin redirect — bookmark this if you want the option to land on the normal login page
Disabling a provider also clears its autologin effect even if the flag stays set on the row.
Recovery: BAMBUDDY_LOCAL_LOGIN=true
If your SSO provider becomes unreachable while local login is disabled, set the env var on the server and restart Bambuddy:
Accepted truthy values: true, 1, yes (case-insensitive). The env var:
- Bypasses the gate on
/auth/loginso username + password is accepted again - Bypasses the gate on
/auth/forgot-password - Flips the reported
local_login_enabledon/auth/advanced-auth/statusback totrueso the login page shows the credentials form (matching what the route will actually accept)
Combined with /login?fallback=local, this is the documented "SSO is broken, let me back in" path — no DB editing required. The env var lives in .env.example. Unset it and restart once the IdP is healthy again.
Security Properties
- PKCE (S256) on every authorization request — safe for public clients without a secret
email_verifiedenforcement — the IdP must explicitly mark the email as verified; unverified claims are ignored- Issuer /
aud/noncevalidation on every callback — replayed or cross-client ID tokens are rejected - State single-use — the OIDC
stateis a DB-backed single-use token that is atomically consumed on callback - Discovery-document SSRF hardening — every URL pulled from the provider's
/.well-known/openid-configuration(authorization_endpoint, token_endpoint, jwks_uri) is validated for scheme (http(s) only) and for private/loopback/link-local host IPs, so a compromised IdP cannot redirect the server's outbound calls at169.254.169.254, RFC1918, or loopback /oidc/authorizerate-limited per-IP to prevent discovery-document request amplification- OIDC users blocked from local password change / reset — credentials live at the IdP, not in BamBuddy
Email Claim
Defines which JWT claim from the provider's ID token is used as the user's email identity. Default is email (works with most providers). For Azure Entra ID, set this to preferred_username or upn — Entra ID always populates these with the user's UPN (e.g. user@contoso.com) but does not send an email_verified flag.
Only use claim names you fully trust. Custom claims bypass the email_verified check entirely (see below).
Require Email Verified
When enabled (default), BamBuddy only accepts the email claim if the provider explicitly marks it as verified (email_verified: true in the ID token). This prevents unverified addresses from being used as identity anchors.
Disable this only when:
- The provider never sends
email_verified(e.g. Azure Entra ID), or - You are using a custom Email Claim (e.g.
preferred_username) — in that case the verified-flag check is skipped automatically regardless of this setting.
Note: If Auto-link existing accounts is enabled,
Require Email Verifiedmust be on and Email Claim must be
Trailing-Slash Tolerance
Both the admin-supplied issuer URL and the issuer claim returned by the discovery document are normalised (trailing slashes stripped) before the PyJWT iss check, so a provider that disagrees with itself by one byte (e.g. stores https://idp/ but returns https://idp in the discovery doc) still works.
MFA At-Rest Encryption
Bambuddy can encrypt sensitive secrets — TOTP authenticator keys and OIDC client secrets — in the database using symmetric Fernet encryption (AES-128-CBC + HMAC-SHA256). Encryption is transparent: existing plaintext rows keep working even after a key is introduced, and users never have to re-enroll unless they choose to migrate legacy rows.
Where to find it
Settings → Authentication → Security
The MFA Encryption Status card is at the top of this sub-tab and refreshes automatically every 30 seconds.
Status overview
| Colour | Meaning |
|---|---|
| 🟢 Green | Encryption is active and all secrets are encrypted. No action required. |
| 🟠 Orange | Encryption is active with an auto-generated key. Back up the key file or set MFA_ENCRYPTION_KEY explicitly. |
| 🟡 Yellow | Encryption is active but legacy plaintext rows still exist. Re-save the OIDC provider or re-enroll the user's authenticator to migrate them. |
| 🔴 Red | Encrypted records exist but the key is no longer available. Recovery required. |
| ⚪ Grey | Encryption is not configured and no encrypted rows exist yet. Secrets are stored in plaintext. |
Orange + Yellow together
Both can appear at the same time — auto-generated key active and legacy plaintext rows still present.
Below the banner the card shows row counts for Encrypted rows and Legacy plaintext rows, broken down by OIDC providers and TOTP secrets.
What the user sees
The card is read-only:
- A coloured banner with the current state (see table above).
- A 2-column row-count grid: encrypted vs. legacy plaintext, for OIDC and TOTP.
Configuration is done via environment variable or the filesystem — there are no buttons on the card.
How encryption works
On startup the key is resolved in this order:
MFA_ENCRYPTION_KEYenv var — URL-safe base64, decoding to exactly 32 bytes (Fernet format).DATA_DIR/.mfa_encryption_key— read if present and valid. A corrupted file is not overwritten — Bambuddy refuses to destroy already-encrypted rows.- Auto-generate — if neither exists, a new Fernet key is written to
DATA_DIR/.mfa_encryption_keywith permissions0600. Status turns orange. - Plaintext fallback — if the filesystem is read-only or the file is unreadable, secrets remain in plaintext. Status: grey (clean) or red (encrypted rows exist but key is gone).
Generating a key manually
Add to .env:
Restart Bambuddy. The card turns green once all secrets have been re-saved or re-enrolled.
Production deployments
Setting MFA_ENCRYPTION_KEY explicitly is recommended — it separates the key from the backup data.
Migrating legacy plaintext rows
- OIDC provider — open the provider, re-enter the client secret, save.
- TOTP user — disable and re-enroll the authenticator app.
Backups
Local backup ZIPs (Settings → Backup) automatically include DATA_DIR/.mfa_encryption_key so each ZIP is self-contained.
Treat backup ZIPs as sensitive
Anyone with the ZIP can decrypt the OIDC client secrets and TOTP secrets stored inside.
Recovery: broken decryption (red status)
Red appears when encrypted rows exist but the current key can no longer decrypt them (key file deleted, replaced, or MFA_ENCRYPTION_KEY changed).
To recover:
- Restore the original key — either the
.mfa_encryption_keyfile or the previousMFA_ENCRYPTION_KEYvalue. - Restart Bambuddy.
- The card returns to green (or orange/yellow if legacy rows remain).
Key rotation is not supported
If the original key is lost, affected users must re-enroll their authenticators and OIDC client secrets must be re-entered manually.
Security Details
Password Storage
Passwords are never stored in plain text. Bambuddy uses PBKDF2-SHA256 hashing with a secure salt for password storage.
Token Authentication
- Bambuddy uses JWT (JSON Web Tokens) for authentication
- Tokens expire after the configured Session Policy lifetime — default 24 hours, configurable up to 30 days (see Session Policy below)
- Tokens are stored in the browser's localStorage
- Each API request includes the token for validation
Session Policy
Administrators can extend the default 24-hour session lifetime under Settings → Users → Session Policy. This is the right knob if Bambuddy is exposed as a PWA on your phone, on a kiosk you trust, or behind a VPN where the every-24-hour re-login is more friction than security.
Choices:
- 24 hours (default) — Bambuddy's audit baseline. Recommended for any deployment reachable from a network you don't fully control.
- 7 days — Reasonable for home-lab LAN setups behind a router/firewall.
- 30 days — The hard ceiling. Recommended only for trusted single-user deployments (e.g. local Docker, Tailscale-only access).
- Custom — Any whole number of hours from 1 to 720.
Important behaviour:
- The setting applies to new logins only. Already-issued tokens keep their original expiry — lowering the value does not retroactively log existing users out, and raising it does not retroactively extend them.
- The setting is gated by
settings:update, which by default is held only by the Administrators group. - The "Remember Me" checkbox on the login screen still only controls whether the token persists across browser restarts (localStorage vs sessionStorage). The Session Policy controls how long the token itself remains valid.
- API keys, camera-stream tokens, media tokens, WebSocket tokens, and slicer-download tokens have their own independent lifetimes and are not affected by this setting.
Security tradeoff
Longer sessions mean a stolen token has a longer blast radius. The 24-hour default exists for that reason. Bumping to 7 or 30 days is a per-deployment call — make it only on environments you trust.
Best Practices
- Use Strong Passwords: Choose passwords with at least 8 characters, mixing letters, numbers, and symbols
- Limit Admin Access: Only add users to Administrators group when necessary
- Create Custom Groups: Define groups matching your team's needs
- Use Least Privilege: Give users only the permissions they need
- Regular Password Changes: Consider changing passwords periodically
- Logout on Shared Devices: Always log out when using shared computers
User Activity Tracking
When authentication is enabled, Bambuddy tracks who performs key actions:
What's Tracked
| Activity | Where It Shows |
|---|---|
| Archive uploads | Archive cards show "Uploaded by {username}" |
| Library file uploads | File cards show "Uploaded by {username}" |
| Queue additions | Queue items show who added the print job |
| Print starts | Printer cards show "Started by {username}" during active prints |
How It Works
- User tracking is automatic when logged in
- Information displays on cards and list items
- When auth is disabled, tracking fields are hidden
- Historical data is preserved even if the user is later deleted
Privacy Note
User activity tracking helps teams understand who is using the system. If you prefer anonymous operation, simply disable authentication.
Backup & Restore
User accounts and groups are included in backups:
- Enable Include Users and Include Groups options when creating a backup
- Passwords are NOT included in backups for security
- When restoring users, temporary passwords are generated
- Administrators must share these temporary passwords with users
- Users should change their passwords after restoration
- Group assignments are preserved during restore
Troubleshooting
Forgot Admin Password
If you forget your admin password and cannot log in:
- Stop the Bambuddy service
- Access the database directly
- Delete the users table entries
- Restart Bambuddy
- Re-run the setup process
Session Expired
If you see "Session expired" or get redirected to login:
- Your JWT token has expired
- The default token lifetime is 24 hours; an administrator can extend it under Settings → Users → Session Policy up to 30 days (see Session Policy)
- Simply log in again to continue
Cannot Access a Feature
If a button or feature is disabled:
- Hover over it to see what permission is required
- Ask an administrator to add you to a group with that permission
- Or create a custom group with the needed permissions
Cannot Access Settings
If you cannot access the Settings page:
- You need
settings:readpermission - Ask an administrator to add you to a group with settings access
- Operators group has settings access by default