Backup & Restore
Protect your print history with database backups and restore when needed.
Overview
Bambuddy's backup system:
- Full database backup - All your data in one file
- User settings included - Preferences preserved
- Archives included - Print history saved
- ZIP format - Includes 3MF files and thumbnails when selected
- Git backup - Automatic cloud backup of profiles and settings to a Git provider
- Selective Git restore - Pull individual categories back from any backup commit
Git Profile Backup
Automatically back up your K-profiles, cloud profiles, app settings, spool inventory, and print archive history to a Git repository.
Bambuddy supports multiple Git providers. Choose one below and follow the setup steps.
Private repositories only
Bambuddy refuses to back up to a public (or GitLab "internal") repository — the saved data includes MQTT credentials, Home Assistant tokens, Prometheus tokens, your Bambu Cloud email, and printer access codes via K-profiles. The save endpoint runs a privacy check on every config change and returns HTTP 400 if the target isn't confirmed private. Scheduled backup runs re-check before each push, so flipping a previously-private repo to public in your provider's UI also aborts the next run with a clear failure log entry. There is no opt-out. If you have an existing public bambuddy-backup repository on GitHub or elsewhere, delete it now and create a fresh private one.
Setup
GitHub
- Create a GitHub repository (must be private — see warning above)
- Generate a Personal Access Token (PAT):
- Go to GitHub Personal Access Tokens (
https://github.com/settings/tokens) - Click Generate new token, then Generate new token (classic)
- Choose your expiration timeframe (
No expirationis recommended) - Under Select scopes, check
repo(required for repository access and commits)
- Go to GitHub Personal Access Tokens (
- Configure in Bambuddy:
- Go to Settings → Backup & Restore
- Enter your repository URL (e.g.,
https://github.com/username/bambuddy-backup) - Enter your PAT (from Step 2)
- Click Test Connection to verify
GitHub Authentication
Instead of Classic Tokens, you can use the Fine-grained tokens. Be sure to choose read access for Metadata. It will automatically include Read and Write access to code upon creation.
GitLab
- Create a GitLab repository (must be private — see warning above)
- Generate a Personal Access Token (PAT):
- Go to GitLab Personal Access Tokens (
https://gitlab.com/-/user_settings/personal_access_tokens) - Under Personal access tokens, click Generate token, then Legacy token
- Under scopes, check the
apiscope (required for repository access and commits)
- Go to GitLab Personal Access Tokens (
- Configure in Bambuddy:
- Go to Settings → Backup & Restore
- Select GitLab from the provider dropdown
- Enter your repository URL (e.g.,
https://gitlab.com/username/bambuddy-backup) - If you are hosting locally without HTTPS, be sure to check the
Allow insecure HTTPcheckbox - Enter your PAT (from Step 2)
- Click Test Connection to verify
GitLab Authentication
Project Access Tokens may also be used. Be sure to give your token the api and write_repository scopes, otherwise you'll run into access failures.
Gitea
- Create a new repository (must be private — see warning above)
- Generate a Personal Access Token (PAT):
- Go to Settings → Applications
- Under Manage Access Tokens, expand Generate New Token
- Enter a name for the token
- Under Repository and organization access, choose
All (public, private, and limited) - Under Repository permissions, set repository to
Read and write - Click Generate token
- Configure in Bambuddy:
- Go to Settings → Backup & Restore
- Select Gitea from the provider dropdown
- Enter your repository URL (e.g.,
https://example.com/username/bambuddy-backup) - If your instance is served under a URL path (a
ROOT_URLsubpath such ashttps://example.com/gitea), include that prefix in the URL — e.g.https://example.com/gitea/username/bambuddy-backup - If you are hosting locally without HTTPS, be sure to check the
Allow insecure HTTPcheckbox - Enter your PAT (from Step 2)
- Be sure to specify the right Branch (main/master/etc)
- Click Test Connection to verify
Tested Versions
Bambuddy has been tested and verified against Gitea 1.24.x, 1.25.x, and 1.26.x. Other versions may work but are not officially supported.
Forgejo
- Create a new repository (must be private — see warning above)
- Generate a Personal Access Token (PAT):
- Go to Settings → Applications
- Click New access token
- Enter a name for the token
- Under Repository and organization access, choose either:
Allto allow access to all repositoriesSpecificand select your Bambuddy backup repository
- Under Repository permissions, set repository to
Read and write(thewrite:repositoryscope) - Click Generate Token
- Configure in Bambuddy:
- Go to Settings → Backup & Restore
- Select Forgejo from the provider dropdown
- Enter your repository URL (e.g.,
https://example.com/username/bambuddy-backup) - If your instance is served under a URL path (a
ROOT_URLsubpath such ashttps://example.com/forgejo), include that prefix in the URL — e.g.https://example.com/forgejo/username/bambuddy-backup - If you are hosting locally without HTTPS, be sure to check the
Allow insecure HTTPcheckbox - Enter your PAT (from Step 2)
- Click Test Connection to verify
Scoping the token to one repository
Choosing Specific in step 2 is the safest option and works from Bambuddy 1.2.6 onwards. Forgejo v15 only allows read:issue, write:issue, read:repository and write:repository on a repository-scoped token — write:repository is all a backup needs, and a token that reaches nothing else limits what a leak could cost you.
On earlier versions Test connection rejected such a token with a message about a missing read:user scope. That check no longer blocks the connection; if you hit it, update Bambuddy rather than widening the token.
Tested Versions
Bambuddy has been tested and verified against Forgejo 11.x LTS and 15.x LTS. Other versions may work but are not officially supported.
What's Backed Up
| Data | Description | Default |
|---|---|---|
| K-profiles | Per-printer pressure advance profiles (organized by serial number) | On |
| Cloud profiles | Filament, printer, and process presets from Bambu Cloud and Orca Cloud, for every connected account | On |
| App settings | Application configuration | Off |
| Spool inventory | Filament spools, usage history, and cost tracking | Off |
| Print archives | Print history metadata — filament, temperatures, times, costs, energy (no gcode/3MF files) | Off |
A cloud login is required
K-profiles need a Bambu Cloud login. Cloud profiles need at least one connected cloud account — Bambu Cloud, Orca Cloud, or both. Sign in via Profiles → Cloud Profiles or Orca Cloud Profiles. The Cloud profiles checkbox stays disabled until something is connected, and shows how many accounts are in scope.
With authentication enabled each user has their own cloud logins, and the backup collects from all of them — not just yours. Accounts appear in the repository as user-{id} directories; no email address is ever written, so the backup does not expose who signed in to what.
Schedule Options
| Schedule | Description |
|---|---|
| Hourly | Backup runs every hour |
| Daily | Backup runs once per day (midnight) |
| Weekly | Backup runs once per week (Sunday midnight) |
Manual Backup
Click Backup Now to trigger an immediate backup.
Repository Structure
repo/
├── backup_metadata.json
├── kprofiles/
│   └── {serial_number}/
│       ├── 0.2.json
│       ├── 0.4.json
│       └── ...
├── cloud_profiles/
│   ├── bambu/
│   │   └── {account}/          # "global", or "user-{id}" when auth is on
│   │       ├── filament.json
│   │       ├── printer.json
│   │       └── process.json
│   └── orca/
│       └── {account}/
│           ├── filament.json
│           ├── printer.json
│           └── process.json
├── settings/
│   └── app_settings.json
├── spools/
│   ├── inventory.json
│   └── usage_history.json
└── archives/
    └── print_history.json
What cloud profiles contain
Only your custom presets. Bambu Cloud's bundled catalogue is skipped: it is the same hundreds of entries for every user, always re-downloadable, and cannot be recreated under your account anyway — including it would rewrite the repository on every run for nothing.
Each Bambu preset is stored with the payload needed to recreate it, not just its name. Orca profiles keep their full content, which the Orca sync API returns inline.
If an account's cloud session has expired, that account is skipped and the run says so in the log — the backup never signs anyone out on its own. For Orca Cloud the stored credentials are cleared the next time you open Orca Cloud Profiles, where you can pair again.
backup_metadata.json reports what was actually collected, per cloud and per account. If the category is enabled but nothing came back, it records false and the reason appears in the application log as a warning.
Backup History
View backup history in the Backup History section:
- Status (success, failed, skipped)
- Trigger (manual or scheduled)
- Files changed
- Commit SHA (linked to GitHub)
Skip Unchanged
Bambuddy only creates a commit when data has actually changed, avoiding unnecessary commits.
Restoring from a Git Backup
Every backup commit is a restore point. The Restore from Git button on the Git Backup card lets you pick one of those commits and pull selected categories back into Bambuddy — without touching anything you didn't select.
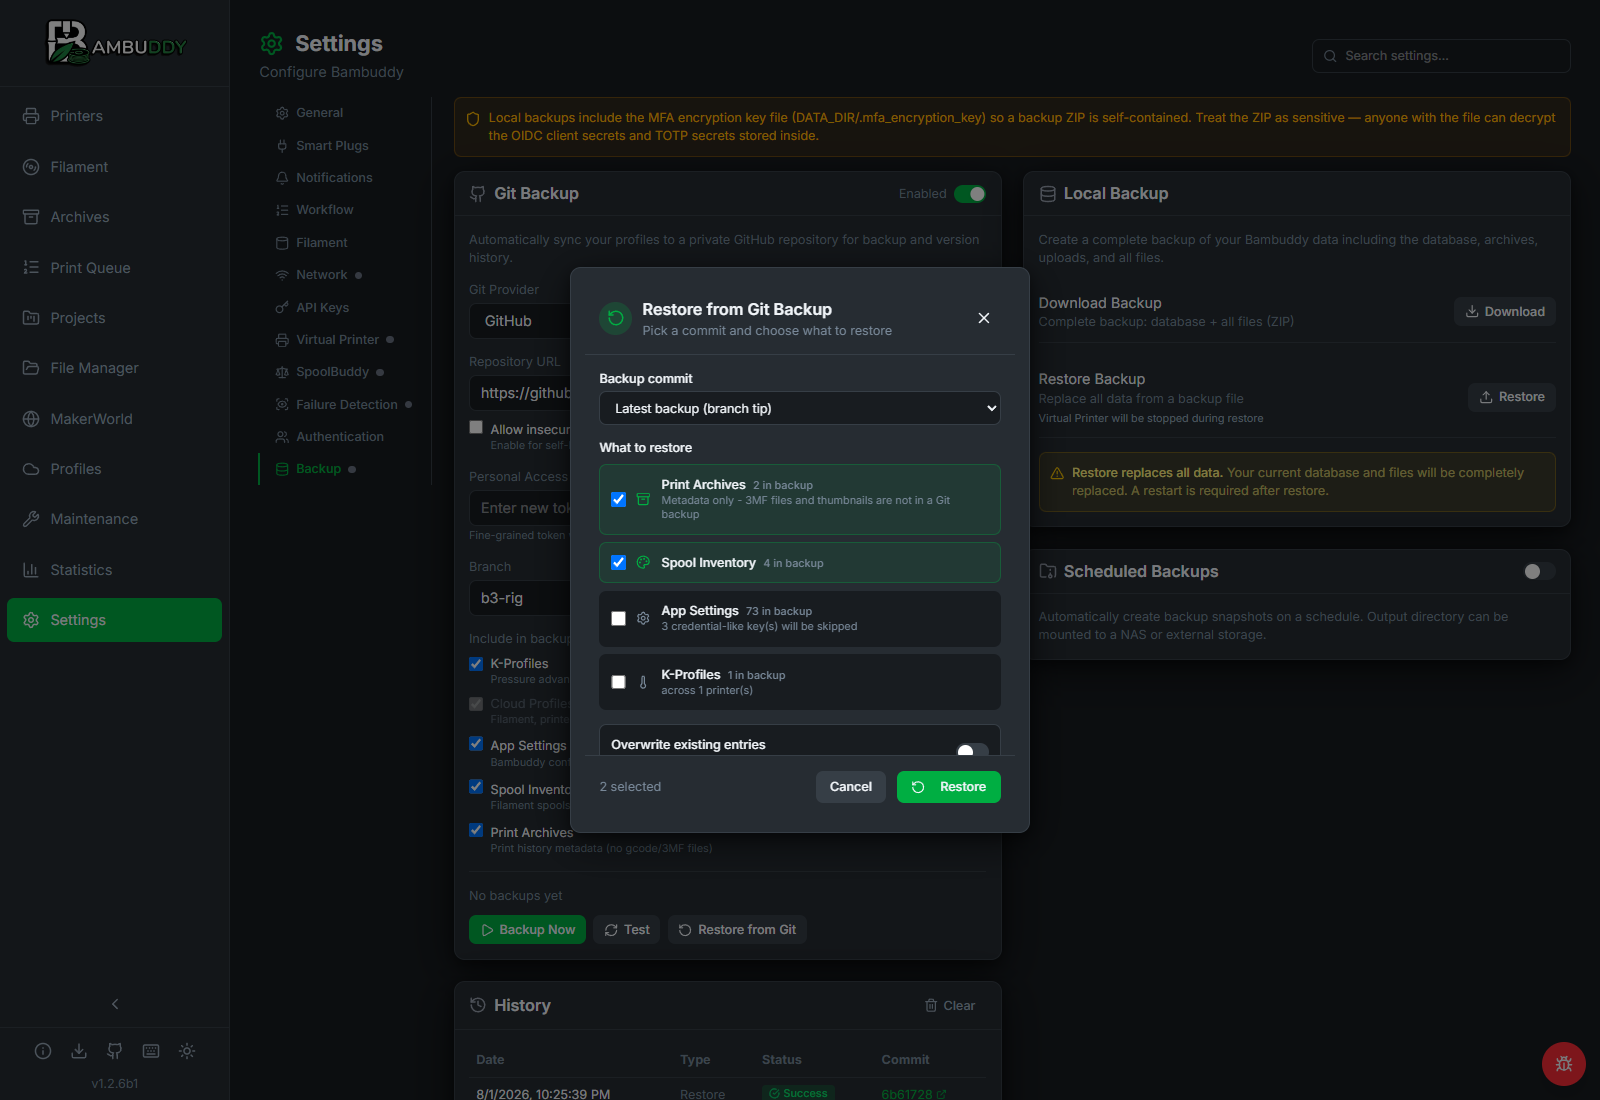
How to Restore
- Go to Settings > Backup & Restore
- On the Git Backup card, click Restore from Git
- Pick a Backup commit from the dropdown (the 20 most recent, newest first)
- Tick the categories you want under What to restore
- Choose whether to Overwrite existing entries (see below)
- Click Restore
The modal shows how many items each category holds in the commit you picked, and greys out any category that commit doesn't contain — a category you only enabled recently simply isn't in older commits. That number is what the result summary adds up to afterwards: restored plus skipped plus failed always equals it. Spool inventory counts the usage records alongside the spools, since both are restored under that category.
Restoring needs its own permission
With authentication enabled, the button only appears for users holding the github:restore permission. Configuring backups is a separate permission, so a user can be allowed to set up and run backups without being allowed to restore from them.
Each category additionally requires the permission that owns the rows it writes: settings:update for App settings, inventory:update for Spool inventory, archives:update_all for Print archives, and kprofiles:update for K-profiles. Backup is its own permission group, so without this a user holding only the Backup group could write through a restore what they cannot write through the page that owns it. Archives take archives:update_all rather than archives:create because a restore writes rows belonging to other users, and update_all is the permission that means "may write an archive that is not yours".
A restore you are not allowed to run fails with Missing required permissions: followed by every permission you are missing across the categories you ticked, so one attempt tells you everything to fix rather than one thing at a time. The check is on the server only — the modal does not grey out categories you cannot restore, so you find out when you click Restore, not before.
Granting restore to a custom role
github:restore on its own is enough to open the dialog and preview a commit, but not to write anything. A role that should be able to restore everything needs all four permissions above alongside it; one that should only put spools back needs inventory:update and nothing else. Administrators already hold every one of them.
What Can Be Restored
| Category | Restores | Notes |
|---|---|---|
| K-profiles | Pressure advance profiles, back onto the printer | Needs kprofiles:update; printer must be online |
| App settings | Application configuration | Needs settings:update; credential, authentication and credential-dependent keys are skipped |
| Spool inventory | Spools plus their usage history | Needs inventory:update; matched on tag UID |
| Print archives | Print history metadata only | Needs archives:update_all; no gcode, 3MF, or thumbnails |
Cloud profiles cannot be restored
Cloud profiles are listed under What's Backed Up but are not offered as a restore category. Re-sync them from Profiles → Cloud Profiles instead.
Archives come back as metadata
A Git backup stores print history as JSON — filament, temperatures, times, costs, energy. Restoring gives you the history rows back, but the 3MF files and thumbnails are not in the repository and cannot be recovered from it. Use a local ZIP backup if you need the files.
Restored archives keep their owner
With authentication enabled, each print archive belongs to the user who made it, and users only see their own unless they have the archives:read_all permission. A restore carries that ownership across by username, so an archive lands with the same person it belonged to when the backup was taken.
The username is what makes this safe across instances. User ids are assigned in order as accounts are created, so they mean nothing on a rebuilt instance — restoring there by id would hand one person's print history to whoever happens to hold that number now, with nothing to indicate it had gone wrong. Matching on the name instead means a match is the same person, and anything else is treated as unknown rather than guessed at.
Three situations produce a newly added archive with no owner. The backup predates Bambuddy recording an owner at all; the archive genuinely had no owner on the source instance; or the name it carries does not belong to anyone here — which includes a user who still exists but has since been renamed. All three are visible only to users with archives:read_all, and the result summary says which of them happened so an administrator can reassign them.
Backups written before this change carry only the id, and those still restore: the id is used as a fallback and checked against the user table, so a stale one is dropped rather than pointing at the wrong person.
An owner the backup cannot name is never removed. If overwrite is on and the backup either predates this or names someone this instance does not have, the existing owner is left as it is — a backup that cannot tell you who owns an archive has nothing to say about it. The same applies to archives you have deleted: an older backup will not bring them back.
Overwrite vs. Skip
The Overwrite existing entries toggle decides what happens when something in the backup already exists locally:
| Toggle | Behaviour |
|---|---|
| Off (default) | Only missing entries are added. Anything already present is left exactly as it is. |
| On | Existing entries are updated to the backed-up values as well. |
Leave it off to recover something you deleted by accident. Turn it on to roll your current data back to how it looked at that commit. K-profiles are the one category the toggle doesn't reach — see the note below.
Restores never reuse the backup's IDs
Entries are matched on natural keys — a spool by its tag UID, an archive by its content hash — and re-inserted with a fresh ID if missing. A spool that was #3 when the backup was taken may come back as #5. This is deliberate: the old ID very likely belongs to an unrelated row by now. Links between restored entries (a spool and its usage history, for example) are remapped so they still line up.
Restore spools and archives together
Spool usage history records which print each entry belongs to. Restoring Spool inventory without Print archives leaves those links unresolved, so the usage entries come back without them — filament totals are still right, but the entries no longer point at a print. Restoring Print archives afterwards doesn't repair it, because the usage entries already exist by then. Tick both in the same run if you want the links kept; the result summary tells you when links were dropped.
K-profiles need the printer online
K-profiles don't live in Bambuddy's database — they live on the printer, and restoring them means writing to it over MQTT. Any printer that isn't connected is skipped, and the result says which. Reconnect it and restore again. Bambuddy resolves each profile's current slot on the printer before writing, so profiles you have edited since the backup are still updated correctly. If the printer rejects a batch, those profiles are counted as failed and the result gives the printer's own reason. A printer that doesn't answer at all still counts as restored — older firmware never answers — so verify the values on the printer or in Profiles → K-Profiles afterwards.
Overwrite existing entries doesn't apply to K-profiles. Writing a slot on the printer is always a replacement — there is no "add only if missing" for a value the printer already holds — so a K-profile restore updates the matching slot whichever way you set the toggle, replacing the calibration currently on the printer. The restore screen says so beside the category as soon as you tick it, and the result summary repeats it.
Credentials are never restored
Tokens, secrets, passwords, access codes, API keys, and passphrases are skipped on restore, the same way they're skipped on backup. Re-enter them by hand if you're rebuilding an instance.
Authentication settings are never restored either
Four settings are refused even with Overwrite existing entries on: whether authentication is enabled, Advanced Authentication, local login, and whether first-time setup has completed. Restoring those would change who can reach Bambuddy rather than how it behaves — a backup taken before you turned authentication on would switch it back off, and the checks that stop you disabling local login without a working OIDC provider don't run on a restore.
The whole LDAP configuration is refused with them, not just the bind password: the server URL, search base, user filter, security mode, group mapping, auto-provision and default group. Together those name which directory server decides who you are, and Bambuddy reads them on every login — so restoring them from a file would let the file choose the directory that authenticates your users.
Change all of these in Settings → Authentication instead. Rebuilding an instance means setting LDAP up again by hand; that is deliberate.
A switch is left off when its credential can't come with it
Because credentials are never restored, turning a switch on without one would leave the integration in a worse state than either the backup or your current instance. Four pairs are treated as travelling together:
| Switch | Credential it needs |
|---|---|
| Prometheus metrics | Prometheus token |
| MQTT relay | MQTT password |
| Home Assistant | Home Assistant token |
| Virtual printer | Virtual printer access code |
A switch is left off when the backup has it on and this instance has no usable credential of its own. For the MQTT relay, Home Assistant and the virtual printer there is one further condition: the backup must have carried a non-empty credential too. An anonymous MQTT broker is a perfectly valid setup, so a backup describing one restores as normal — the restore isn't leaving you with anything weaker than what was backed up. Nor is anything already switched on locally affected, for the same reason.
LDAP is not in this table. It used to be, paired with its bind password, but an anonymous bind is a valid setup too — which meant a backup that simply left the password out had its LDAP switch restored. That is fine for an integration and wrong for a login source, so LDAP is refused outright instead (see above) rather than judged on whether it would still work.
Prometheus is the exception, deliberately. /api/v1/metrics is unauthenticated whenever no token is set, so restoring that switch onto an instance with no token publishes your metrics to anyone who can reach the port. The token is optional, which means the likeliest backup to do that is one taken on an instance that had metrics switched on and never set a token — so for Prometheus the switch is left off whenever this instance has no token, whether or not the backup carried one.
Fill the credential in under the relevant settings section, then turn the switch on yourself.
The result summary reports all three groups in its notes.
After Restoring
The result summary lists restored / skipped / failed counts per category, plus any notes explaining a skip. Those three add up to the item count the preview showed for that category.
A failed restore can still have applied part of itself
Categories are written one at a time and each is committed as it finishes, so a restore that fails part-way through leaves the categories that already completed in place rather than undoing them. The summary reports those rather than claiming nothing was restored, so what it lists is what is actually on disk. Re-running the restore is safe — with overwrite off, anything already restored is recognised and skipped.
If App settings was one of the restored categories, Bambuddy reloads the page when you close the modal. Most restored settings appear immediately, but the ones the interface applies at startup — the display language and whether authentication is on — won't until it reloads.
If any MQTT settings were restored, Bambuddy reconnects the MQTT relay to the restored broker immediately, so you don't need to restart for those to take effect. The MQTT password isn't in the backup, so a broker that needs a different one won't connect until you re-enter it — the result summary says when the relay couldn't reconnect.
Restores are recorded in Backup History with a restore trigger, alongside your backup runs.
Restore API Endpoints
| Method | Endpoint | Description |
|---|---|---|
GET | /github-backup/commits | List recent backup commits (limit, 1--100, default 20) |
GET | /github-backup/restore/preview | Report which categories a commit contains (ref, default HEAD) |
POST | /github-backup/restore | Restore selected categories from one commit |
POST /github-backup/restore takes ref (a commit SHA, or HEAD for the branch tip), categories (one or more of kprofiles, settings, spools, archives), and overwrite_existing:
Scheduled Local Backups
Automate local backups on a recurring schedule so you never forget to protect your data.
Overview
The Scheduled Backups card in Settings > Backup lets you configure automatic local backups that run in the background. Each backup produces the same complete ZIP file as a manual backup (database + all data directories), stored on disk where you can easily copy them to a NAS or external drive.
Works with both SQLite and PostgreSQL installations.
Configuration
| Setting | Options | Default |
|---|---|---|
| Enable | On / Off | Off |
| Frequency | Hourly, Daily, Weekly | Daily |
| Time of day | Time picker (for Daily and Weekly) | 00:00 |
| Retention count | 1--100 | 5 |
| Output path | Any local or network path | DATA_DIR/backups/ |
Retention
When a new backup completes, Bambuddy automatically deletes the oldest backups beyond the retention count. For example, with retention set to 5, only the 5 most recent backups are kept.
Timezone
The time-of-day picker is interpreted in the container's local timezone, read from the TZ environment variable. The resolved zone name (e.g. Europe/Berlin) is shown next to the picker. If TZ is not set, times are interpreted as UTC. Set TZ in docker-compose.yml (e.g. TZ=Europe/Berlin) to match your local time.
Managing Backups
Each backup in the list supports three actions:
- Download -- download the ZIP file to your browser
- Restore -- restore directly from the backup (same as manual restore)
- Delete -- remove the backup file from disk
Click Run Now to trigger an immediate backup outside the schedule.
Docker Setup
Docker users should mount the backup output directory as a volume so backups are persisted outside the container. Add a bind mount to your docker-compose.yml:
services:
  bambuddy:
    image: ghcr.io/maziggy/bambuddy:latest
    container_name: bambuddy
    network_mode: host
    volumes:
      - bambuddy_data:/app/data
      - bambuddy_logs:/app/logs
      - /path/to/nas/bambuddy-backups:/app/data/backups  # Scheduled backup output
    environment:
      - TZ=Europe/Berlin
    restart: unless-stopped

volumes:
  bambuddy_data:
  bambuddy_logs:
Or with docker run:
docker run -d \
  --network host \
  -v bambuddy_data:/app/data \
  -v bambuddy_logs:/app/logs \
  -v /path/to/nas/bambuddy-backups:/app/data/backups \
  -e TZ=Europe/Berlin \
  --name bambuddy \
  --restart unless-stopped \
  ghcr.io/maziggy/bambuddy:latest
NAS or Network Share
Point the bind mount at a NAS share, Samba mount, or NFS path for automatic off-site backups without any extra scripts.
An output path that isn't mounted is worse than one that fails
If the Output path points somewhere that is not bind-mounted from the host, the backups still succeed -- they land in the container's own writable layer and are lost the next time the container is recreated (compose up after an image update, for example). Bambuddy detects this and warns on the backup card, but the rule is simple: whatever you set as the output path must appear in volumes:.
Non-Docker Setup
For bare-metal or virtual machine installs, set the Output path in the UI to any directory your Bambuddy process can write to -- a local folder, a mounted network drive, or an external USB drive.
systemd: a NAS share needs to be allowed explicitly
Bambuddy's systemd unit runs with ProtectSystem=strict. That makes every directory outside the install, data and log directories read-only for the service -- including a NAS share you mounted yourself and can write to from your own shell. Backups there fail with [Errno 30] Read-only file system, which looks like a permission problem but is not one (errno 30 is EROFS; a permission problem is errno 13).
Add the path to the unit's writable list with a drop-in, which survives reinstalls and upgrades:
Confirm it took with systemctl show bambuddy -p ReadWritePaths.
Bambuddy checks the output directory when you save it and tells you if it cannot write there, so you should not have to work this out from a failed backup at 03:00. Installing over an existing setup keeps any paths you added -- the installer backs the old unit up and carries them forward.
API Endpoints
For automation or monitoring, the scheduled backup system exposes a REST API:
| Method | Endpoint | Description |
|---|---|---|
GET | /local-backup/status | Current schedule config and next run time |
GET | /local-backup/path-check | Check the output directory is writable (writes and removes a probe file) |
POST | /local-backup/run | Trigger an immediate backup |
GET | /local-backup/backups | List all backup files |
GET | /local-backup/backups/{filename}/download | Download a backup file |
POST | /local-backup/backups/{filename}/restore | Restore from a backup file |
DELETE | /local-backup/backups/{filename} | Delete a backup file |
Creating a Local Backup
Manual Backup
- Go to Settings > Backup & Restore
- Click Download Backup
- Wait for backup to complete (progress indicator shown)
- ZIP file downloads automatically
Don't Navigate Away
During backup/restore, stay on the page. The UI blocks navigation to prevent data corruption.
Backup Contents
The backup is a complete ZIP file containing:
| Data | Included |
|---|---|
| Database (all tables) | |
| Print archives (3MF files) | |
| Archive thumbnails | |
| Timelapse videos | |
| Library files | |
| Library thumbnails | |
| Project files | |
| Printer icons | |
| Plate calibration data | |
| Virtual printer uploads |
Complete by Definition
The new backup system copies the entire database file and all data directories. No data can be missed because everything is included automatically.
Backup File
Format
Backup files are ZIP archives:
ZIP Structure
bambuddy-backup-YYYYMMDD-HHMMSS.zip
├── manifest.json            # Which Bambuddy version made this backup
├── bambuddy.db              # Database (portable SQLite format, works on both SQLite and PostgreSQL installs)
├── archive/                 # All archive data
│   ├── <archive_id>/        # Individual archive folders
│   │   ├── *.3mf            # Archived print files
│   │   ├── thumbnail.png    # Thumbnails
│   │   ├── timelapse.mp4    # Timelapses
│   │   ├── source.3mf       # Original source 3MF
│   │   ├── *.f3d            # Fusion 360 files
│   │   └── photos/*.jpg     # Photo attachments
│   └── library/             # File Manager
│       ├── files/           # Uploaded files
│       ├── thumbnails/      # Generated thumbnails
│       └── photos/<id>/     # Photos attached to library files
├── virtual_printer/         # Pending uploads
├── projects/                # Project files
├── icons/                   # Custom printer icons
└── plate_calibration/       # Plate detection references
File Size
Typical sizes depend on your archive content:
- Small archive (100 prints, no timelapses): ~100-500 MB
- Medium archive (500 prints, some timelapses): ~1-5 GB
- Large archive (1000+ prints, full timelapses): ~10+ GB
Large Backups
If you have many timelapse videos, backups can be large. Consider periodic cleanup of old timelapses.
Restoring from Backup
Full Restore
Restore everything from a backup ZIP:
- Go to Settings > Backup & Restore
- Click Restore Backup
- Select your backup ZIP file
- Wait for restore to complete (progress indicator shown)
- Restart Bambuddy when prompted
Full Restore Overwrites
A full restore replaces all current data including the database and all files. Create a backup first!
Restart Required
After restore, you must restart Bambuddy for changes to take effect. The database connection is replaced during restore.
Portable Backups
Backups are fully portable between installations:
- Different servers: Move from one machine to another
- Different paths: Works even if data directory changed
- Different Docker volumes: Migrate between container setups
- Different database backends: Restore a SQLite backup into a PostgreSQL install (and vice versa)
The backup system always exports data in portable SQLite format, regardless of which database backend you use. When restoring into PostgreSQL, Bambuddy automatically converts data types (booleans, datetimes) and handles foreign key constraints.
Backups and versions
A backup carries the database of the version that made it, and manifest.json records which version that was. Restoring into a different version is normal and supported in both directions: a newer Bambuddy migrates an older backup forward after the restore, and a column a newer backup has but an older version does not know about is ignored.
The one case that cannot work is a column the version you are restoring into requires and the backup has no value for. On a PostgreSQL install that is checked before the restore starts, and an incompatible backup is refused with a message naming the columns and both version numbers — nothing is changed, so your current data is still there. If you see it, restore the backup on the version that made it, or upgrade this install to that version first.
Keep the versions together
The simplest way to never meet this is to upgrade before restoring: restore a backup into the same version or a newer one, never into an older one. Downgrading an install and restoring yesterday's backup into it is the combination that gets caught.
Manual Database Access
Location
The database is stored at:
Direct Backup
Copy the database file directly:
Stop Bambuddy First
Stop Bambuddy before copying to ensure consistency.
SQLite Tools
Use SQLite tools for advanced operations:
```bash
Dump to SQL
sqlite3 bambuddy.db .dump > backup.sql
Connection
Connect to your PostgreSQL database using the same DATABASE_URL from your configuration:
Direct Backup
Restore
Bambuddy's Built-in Backup is Easier
The Settings > Backup page creates portable backups that work across both SQLite and PostgreSQL. Use manual pg_dump only if you need PostgreSQL-specific features like point-in-time recovery.
Restore from SQL
sqlite3 new.db < backup.sql ```
Downloading Archives
3MF files aren't in database backups. Download separately:
Individual Download
- Open an archive
- Click Download 3MF
Bulk Export
- Go to Archives
- Click Export
- Select Include 3MF files
- Download the archive
Recovery Scenarios
Lost Database
If database is corrupted or deleted:
- Stop Bambuddy
- Remove corrupted
bambuddy.db - Start Bambuddy (creates fresh database)
- Go to Settings > Backup
- Restore from your backup
New Installation
Moving to a new server:
- Install Bambuddy on new server
- Copy backup file to new server
- Go to Settings > Backup
- Full restore from backup
Data Migration
Moving between versions:
- Create backup on old version
- Upgrade Bambuddy
- If needed, restore from backup
Best Practices
Recommended Backup Frequency
| Frequency | Good For |
|---|---|
| Daily | Active printing (use Scheduled Local Backups) |
| Weekly | Regular use |
| Monthly | Light use |
Storage
- Keep backups off the Bambuddy server
- Use cloud storage (Dropbox, Google Drive, etc.)
- Keep multiple versions
Testing
- Periodically test restoring
- Verify backup integrity
- Document your backup process
Tips
Before Major Changes
Always backup before upgrading or making big configuration changes.
Off-Site Storage
Store at least one backup off-site (cloud or another location).
Regular Testing
Test your restore process periodically to ensure backups work.
Version in Filename
Include date and version in backup filenames for easy identification.
3MF Backup
For complete backup, also download your 3MF files separately.