Spool Inventory
Bambuddy includes a built-in spool inventory system to track your filament collection, assign spools to AMS slots, and automatically monitor filament consumption.
Inventory Overview
The Spool Inventory page shows all your spools in a searchable, filterable table with summary statistics.
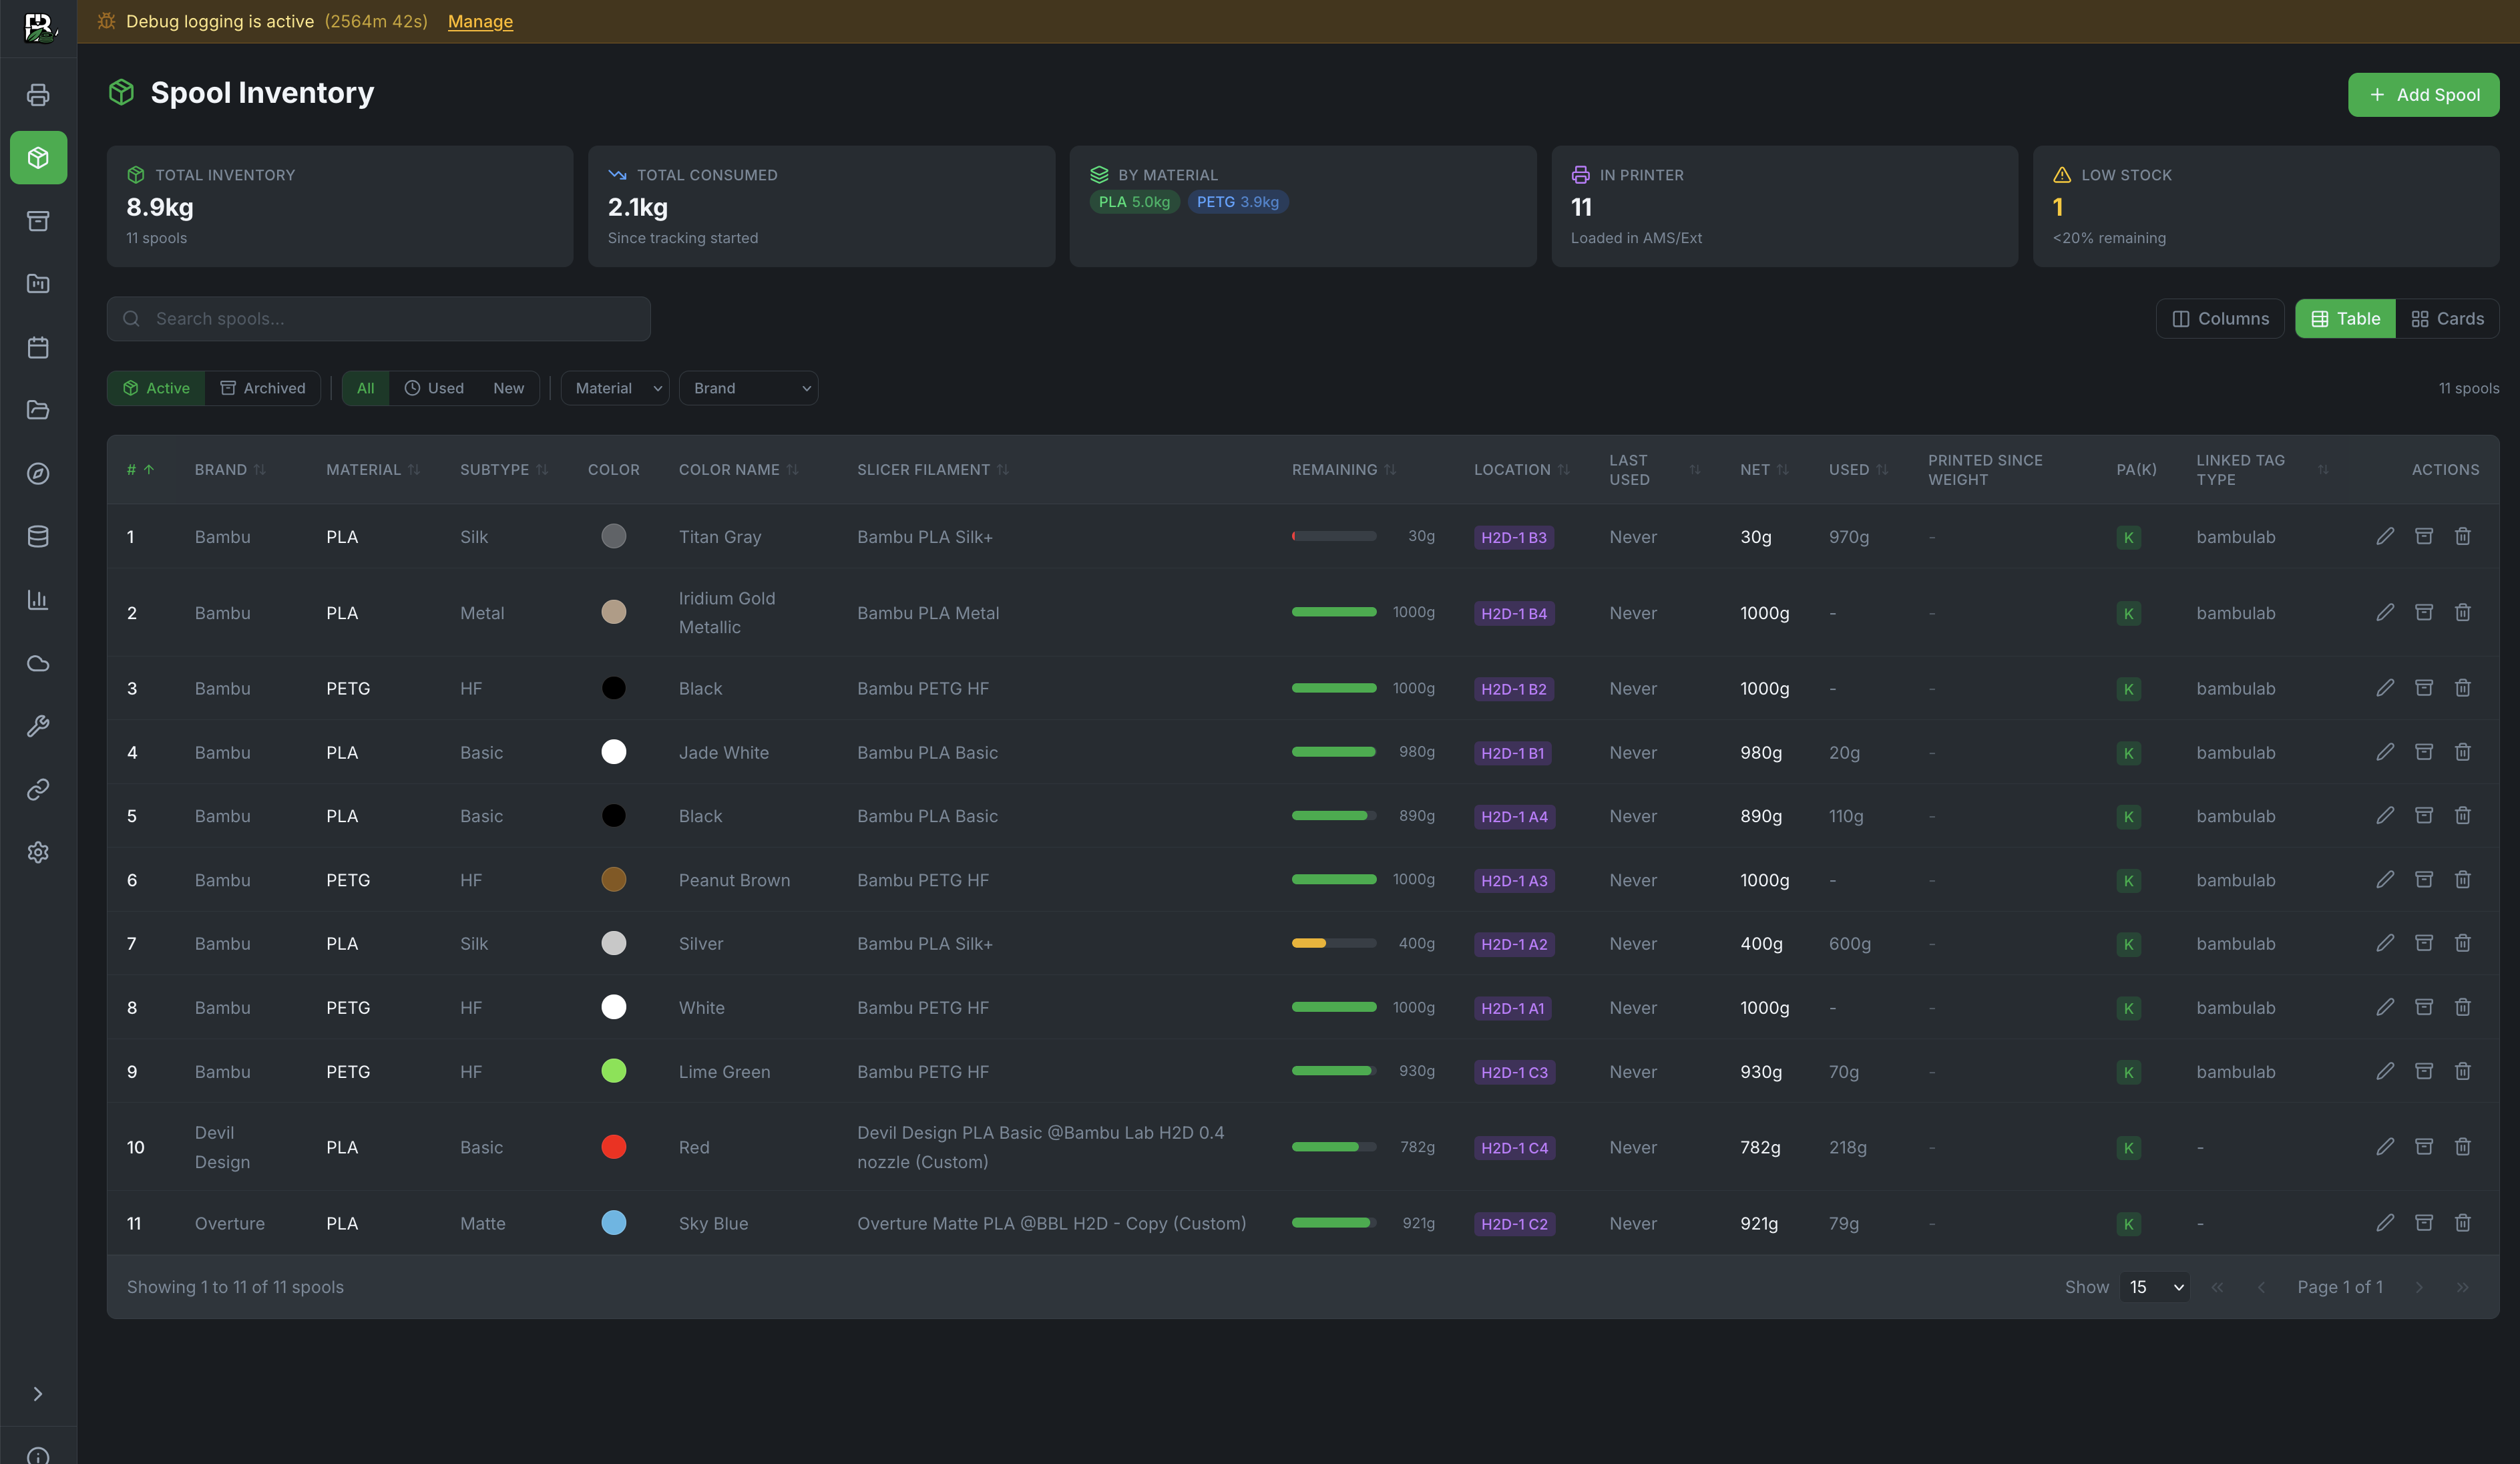
Summary Cards
| Card | Description |
|---|---|
| Total Inventory | Total filament weight across all spools |
| Total Consumed | Total filament used since tracking started |
| By Material | Breakdown by filament type (PLA, PETG, etc.) |
| In Printer | Number of spools currently loaded in AMS slots |
| Low Stock | Spools with less than 20% remaining |
Filtering & Search
- Status tabs: Active, Archived, All
- Quick filters: Used, New
- Stock filter: All, Stock (no slicer profile), Configured (has slicer profile)
- Dropdowns: Filter by Material, Brand, Category, Spool Name, Storage Location
- The Storage Location chip lists every entry in your storage locations catalog (e.g. Shelf A, 4l drybox), plus No location set for unassigned spools. The chip stays hidden until at least one spool has a storage location. Manage the catalog from Inventory → Locations — see Storage Locations.
- Search: Find spools by name, brand, material, or color. Enter an ID with a leading
#(for example,#42) to find only that exact spool; a number without#keeps the normal partial search behavior. The same search works in the Assign Spool dialog and on the SpoolBuddy inventory page. - View modes: Table or Cards
- Group similar: Toggle to visually collapse identical unused/unassigned spools into a single expandable row or card with a count badge (e.g., "5 identical spools"). Spools are grouped by material, subtype, brand, color, and label weight. Used or AMS-assigned spools always appear individually. Group state persists across sessions.
Storage location sensor readings
If a spool's storage location has a bound Home Assistant sensor, its card shows a footer with the location name and live temperature/humidity/battery readings, and the table gains sortable Temperature/Humidity/Battery columns. See Sensors → Storage Location Sensors.
Sorting
Click any column header to sort by it; click again to reverse, and a third time to return to the unsorted order. Your choice is remembered per browser.
The Color column sorts by the colour itself rather than by name, so you can find a shade you can picture but can't name. Ascending walks the rainbow — red, orange, yellow, green, cyan, blue, purple, pink — then browns, then the neutrals from white through the greys to black, and finally any spool with no colour recorded.
Why browns and greys sit apart from the rainbow
Sorting purely by hue looks right in theory and falls apart on a real inventory. A grey is only a shade off neutral, but it still has a hue and that hue can be anything — Titan Gray reads as 210°, so it would sort in among the blues, while a slightly warm grey lands next to the reds. Brown is a dark orange by hue and would split the oranges in two. Bambuddy groups those families first and runs the continuous hue sort inside each one, using the same classification that names a colour when it isn't in the colour catalog — so the sort and the Color Name column always agree.
Multi-colour spools sort by their primary colour; the gradient stops don't affect placement.
Adding Spools
Click + Add Spool to create a new inventory entry.
You can also copy an existing spool. Copying opens the Add Spool form with the existing spool data pre-filled, so you only need to change what is different.
When editing an existing spool, the modal header shows the spool's numeric ID (e.g. Edit Spool #42) so you can confirm which record you are modifying.
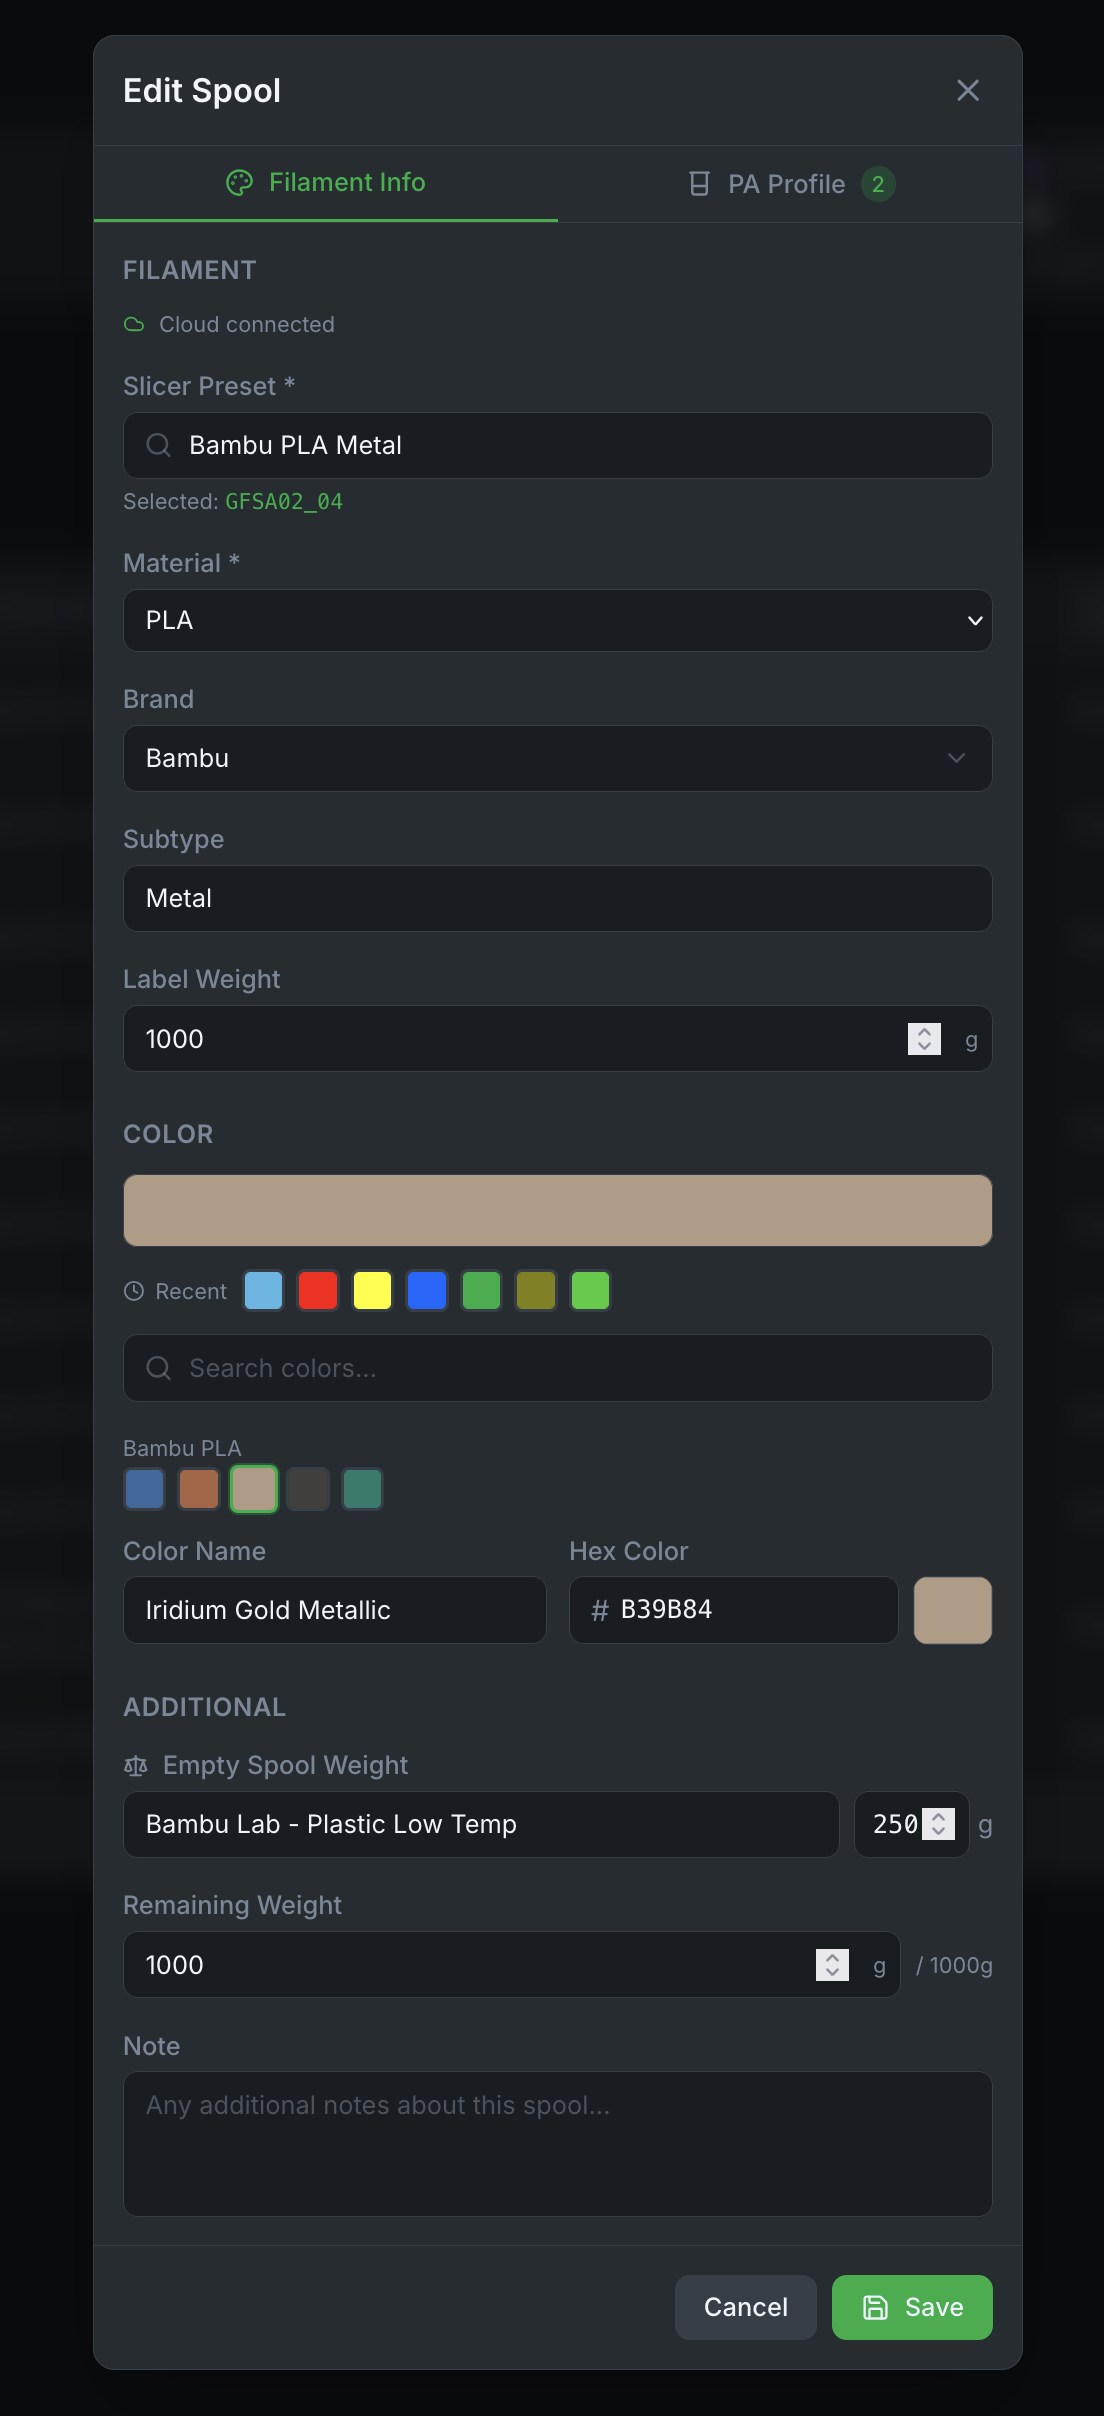
Filament Info Tab
| Field | Description |
|---|---|
| Slicer Preset | Search and select a filament profile (see Where Presets Come From below) |
| Material | PLA, PETG, ABS, ASA, TPU, etc. (see Custom Materials below) |
| Brand | Filament manufacturer |
| Subtype | Basic, Matte, Silk, HF, Metal, etc. |
| Label Weight | Net weight as printed on the spool (default: 1000g) |
| Quantity | Number of identical spools to create (1–100, default: 1) |
| Color | Visual color picker with recent colors, brand palettes, and hex input |
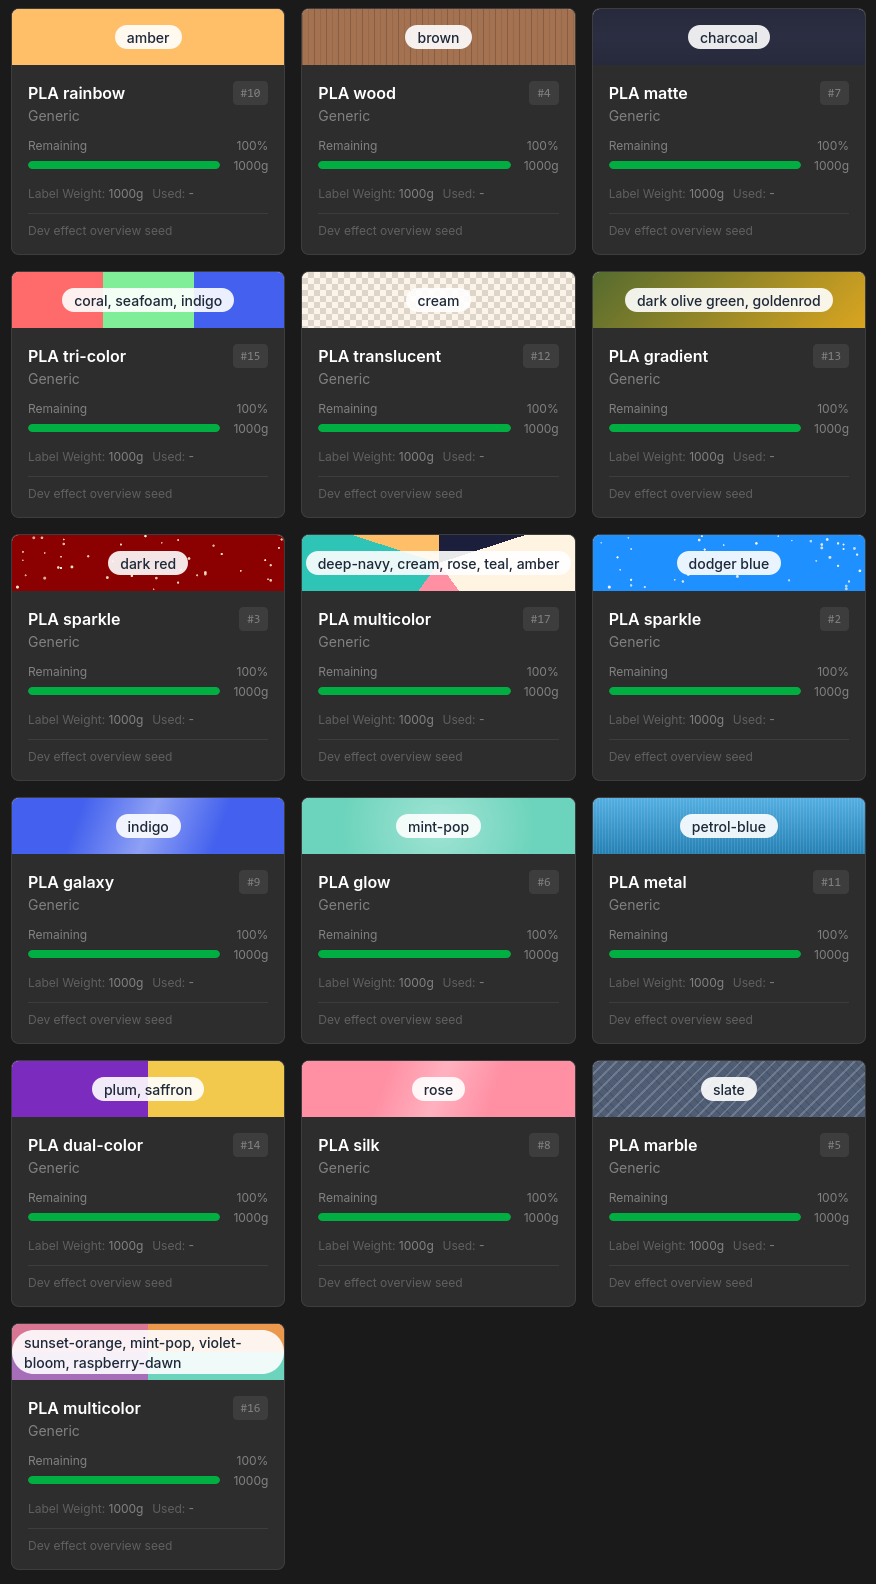
| Extra colours | Optional. Comma-separated list of 2 to 8 hex stops (e.g. EC984C,#6CD4BC,A66EB9,D87694). Leave blank for a solid colour. Without set Effect they will be rendered as gradient, or as colour wheel pie when Subtype = Multicolor is set |
| Effect | Optional. Visual rendering hint, see below. |
Effects
Effects can be use to give a visual hint on the filaments look, covering:
- surface effects (Sparkle, Wood, Marble, Glow, Matte),
- sheen variants (Silk, Galaxy, Rainbow, Metal, Translucent)
- structural variants (Gradient, Dual Color, Tri Color, Multicolor).
They are rendered on top of the colour swatch, using the information from Extra Colours — effects do not change the slicer profile or anything the printer sees.
Colour lists for multi-color filaments can easily be gathered from a site like 3dfilamentprofiles.com and pasted into the Extra Colours field.
Quick Add (Stock Spools)
Toggle Quick Add (Stock) at the top of the spool form to switch to a simplified mode. This hides the slicer preset and the Printers tab — only Material (required), Brand, Subtype (both optional), Label Weight, Quantity, and Color are shown.
Use Quick Add when you want to inventory filament without picking a specific slicer profile. These are called "stock" spools — they track weight and usage like any other spool, but they aren't linked to a printer filament profile. You can always edit a stock spool later to assign a slicer preset, at which point it becomes a "configured" spool.
Editing and copying a stock spool
Only Material is required when you edit or copy an existing spool, whichever way it was created. Slicer preset, brand and subtype stay optional there, so you can change a stock spool's storage location, cost or notes — or duplicate it — without first assigning a profile. The Quick Add toggle itself is a create-only convenience; the edit form always shows every field.
Bulk Buying
Set the Quantity field to create multiple identical spools at once — for example, if you bought a 5-pack of PLA. All spools are created in a single operation with the same material, color, weight, and other settings. The quantity field is only available in Quick Add mode.
Group Similar Spools
After adding multiple identical spools, use the Group toggle in the inventory toolbar to collapse them into a single row with a count badge. This keeps your inventory clean when you have many spools of the same filament. Click a group to expand and see individual spools.
Multi-colour gradients and transparency
Multi-colour spools (gradient, dual-colour, tri-colour, multicolour) and translucent filaments now render correctly in the inventory. Paste a hex list like EC984C,#6CD4BC,A66EB9,D87694 into the Extra colours field — that's the same format 3dfilamentprofiles.com puts on its filament details pages, so you can copy and paste directly. The swatch becomes a gradient strip; setting the spool's Subtype to Multicolor makes it render as a colour wheel pie instead. Transparency in the base colour (alpha < FF) shows through a checkerboard pattern beneath the colour layer, so partially translucent spools actually look translucent on the inventory page. Pick an Effect (Sparkle, Wood, Marble, Glow, Matte) for an overlay that mimics how the spool looks in real life. None of these affect the slicer profile or anything the printer sees — they're purely a visual hint to help you tell spools apart at a glance. The same fields exist on entries in Settings → Color Catalog, so a multi-colour combo can be saved once and reused across spools.
Where Presets Come From
The Slicer Preset dropdown merges filament profiles from three sources, checked in order:
| Source | Badge | Description |
|---|---|---|
| Bambu Cloud | — | Your personal cloud presets synced from BambuStudio. Includes both Bambu's official presets and any custom presets you've created (e.g., "# Overture Matte PLA @BBL P1S"). Requires Cloud Profiles login. |
| Local Profiles | Local (green) | OrcaSlicer presets you've imported via Local Profiles. Useful if you don't use Bambu Cloud. |
| Built-in Fallback | Built-in (amber) | A static table of ~150 Bambu Lab filament IDs (PLA Basic, PETG HF, ABS, etc.). Always available, no login needed. |
Presets from all three sources are merged and deduplicated. If cloud login fails, local + built-in presets still appear — the preset list is never empty.
Selecting a preset auto-fills the Material, Brand, and Subtype fields from the preset name, saving you from filling them manually.
Auto-fill only touches fields that are still empty (or that a previously selected preset filled in). A brand you typed yourself — or one that was already stored on the spool you are editing — is never overwritten by picking a preset. Switching between presets still replaces the values the earlier preset contributed.
Brand and Material Suggestions
The Brand and Material dropdowns both list everything Bambuddy knows about — the Color Catalog, your slicer presets, and a built-in brand list — plus whatever the spool you are editing already has stored.
When one of the two fields is set, the combinations known from the catalog and presets are grouped at the top under Suggested, and everything else follows under All. This is only an ordering: nothing is hidden, so an unusual-but-real combination (Elegoo ASA, when the catalog only knows Elegoo PLA) is always one click away. Typing a name that doesn't exist yet still offers a Use custom brand / material entry at the bottom of the list.
Inventory vs AMS Slot Configuration
The spool inventory is for tracking your filament collection — every spool you own, regardless of whether it's loaded in a printer. You can inventory a spool of PETG sitting on a shelf even if no printer is currently using it.
AMS Slot Configuration (see below) is a separate action: it tells the printer what filament profile to use for a specific slot. The two features work together but serve different purposes.
Custom Materials
The material dropdown includes common types: PLA, PETG, ABS, TPU, ASA, PC, PA, PVA, HIPS, PA-CF, PETG-CF, and PLA-CF.
If your material isn't listed (e.g., PCTG, PHA, PP, PVDF), simply type it into the Material field. A "Use custom material" option will appear at the bottom of the dropdown — click it to use your custom material type.
Custom materials work just like built-in ones for inventory tracking, usage history, and filtering.
Example: Adding 3D-Fuel PCTG Pro
- Click + Add Spool
- In Slicer Preset, search for your closest PETG preset (PCTG is a PETG variant). If you have a custom OrcaSlicer profile for PCTG, import it via Local Profiles first and it will appear here.
- In Material, type
PCTGand click "Use custom material: PCTG" - In Brand, type
3D-Fuel - In Subtype, type
Pro - Set the color, label weight, and save
Additional Section
| Field | Description |
|---|---|
| Empty Spool Weight | Select from the spool catalog or enter manually (for accurate remaining calculations) |
| Remaining Weight | Current filament remaining — shows label_weight - weight_used with a reference maximum |
| Cost per kg | Used for archive cost roll-ups in Statistics. |
| Category | Free-text label like Production, Prototype, or Client A. Used purely for organisation — appears as an inventory filter chip and as a way to group spools that share a different low-stock threshold. The form autocompletes from categories already in use across your other spools so casing stays consistent. Optional. |
| Material No. | Your internal purchasing / article number (e.g. 15 = Bambu Lab PLA Basic). Shared by every spool of the same product — see Material Numbers. Optional. |
| Low-stock threshold (this spool) | Per-spool override of the global low-stock percentage. Leave blank to use whatever's set in the inventory's stat-card threshold control (default 20 %). Useful for marking production spools to alert earlier (e.g. 50 %) while letting prototype spools stay quiet until much later. The override applies to the stat-card "Low Stock" count, the "Low Stock" filter and the Low Filament notification. |
| Storage Location | Physical shelf, drawer, or drybox from your locations catalog. Pick an existing entry from the dropdown or type a new name and click Add. |
| Note | Free-text notes about the spool |
Printers Tab
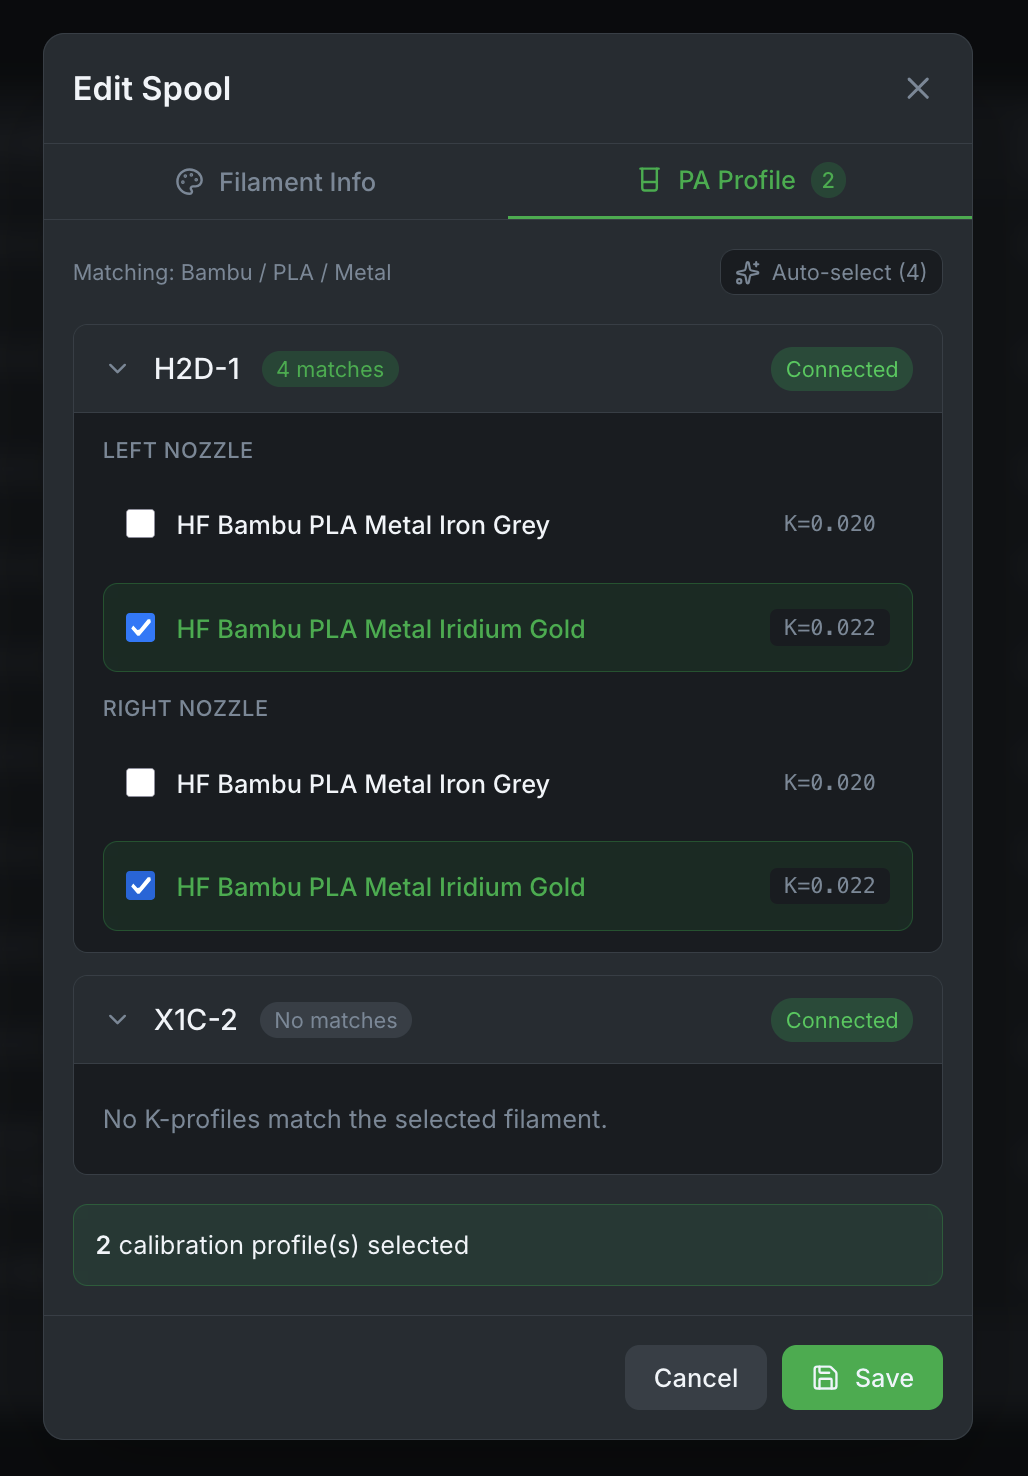
This tab answers two questions per printer you own: which filament preset this spool uses, and which pressure advance (K) profile it uses.
Pick a model from the list on the left; everything for that model appears on the right. The list stays the same height however many printers you own, so a large fleet reads the same as a single machine.
Filament preset, per printer model
A slicer preset is bound to a printer model — Bambu PLA Basic @BBL X1C is not the same preset as @BBL H2C. The spool itself stores one preset, which is right until you use that spool on a second model: the AMS slot on the other machine then gets configured with a preset that machine has no profile for.
There is a row per nozzle size — 0.2, 0.4, 0.6 and 0.8 — for every model, whether or not that size is currently fitted. The preset is written to an AMS slot and a slot feeds exactly one nozzle, and Bambu names its presets per size anyway (@BBL X1C 0.4 nozzle), so the size is part of the answer rather than a refinement of it. Sizes you don't own are worth setting too: a spool is configured once and nozzles get swapped.
Anything left at Use the spool's preset inherits what the Filament tab has, and keeps inheriting it if you change it later — so you only override where a model actually differs.
Every preset is badged with where it came from — Bambu Cloud, Orca Cloud, Local or Built-in — the same way the Configure AMS Slot modal badges them. The same filament often exists in more than one of those sources, and which one you pick is what reaches the printer.
The list offers each model only the presets that name it, so an X1C preset is never proposed for an H2C. Presets whose name doesn't identify a model — which is most user-authored and OrcaSlicer ones — stay available everywhere, and a preset you have already saved is never hidden from you.
Auto-match fills every size of every model with the variant of the spool's own preset that names it, preferring the variant for that exact nozzle size and falling back to one that names the model without a size. A model with no matching variant is left inherited rather than given an approximate one.
K profiles, per hotend
A K value is measured on one individual hotend, so unlike presets these stay per machine — two printers of the same model legitimately have different K values for the same spool.
Each printer gets a grid: nozzle size down the side, hotend across the top (left and right on a dual-nozzle machine, a single unnamed column otherwise). A cell lists the calibration profiles on that printer, for that hotend and size, that match this spool's brand, material and subtype, with the K value shown for reference. A dash means the printer has no calibration there — the size is still listed so it's visibly accounted for rather than looking forgotten.
Bambuddy asks the printer for every nozzle size, so a profile for a size you aren't currently running still appears.
Where a printer distinguishes High Flow from Standard nozzles, each profile is labelled [HF] or [S] — the same filament reads a different K value through each, and a printer can hold both for one nozzle size. A profile measured on the other flow is not applied to the nozzle currently fitted, and the picker marks it so it doesn't look configured while doing nothing. Printers that don't report a flow type (an X1C reports none) show no label and behave as they always have.
Everything you set here is applied wherever a slot gets configured — assigning a spool by hand, an RFID spool being detected, a Spoolman spool being linked by tag, and when a Filament Track Switch moves an AMS to the other nozzle. The Configure AMS Slot dialog also opens on these values, so what you set on the spool is what that dialog offers first.
The number beside a model in the list counts cells that could hold a profile but don't, so you can see at a glance whether a spool is fully configured. An offline printer says so instead of showing an empty grid — Bambuddy reads calibration profiles from the printer itself.
AMS Slot Assignment
Assign inventory spools to AMS slots to track which filament is loaded where.
Assigning a Spool
You can start an assignment from either the printer card or the spool itself.
From a printer card
- Hover over any AMS slot on the printer card (empty or configured, non-Bambu-Lab)
- Click Assign Spool in the hover card
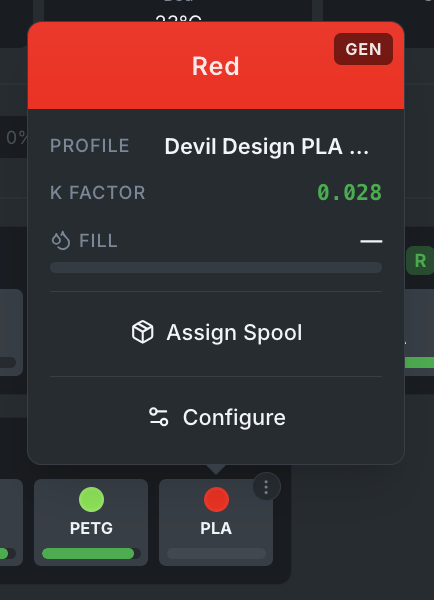
- Select a spool from the filtered list. Each result includes its
#ID, which helps distinguish otherwise identical spools. - Click Assign Spool to confirm
The assign modal automatically:
- Filters out already-assigned spools — each spool can only be in one slot at a time
- Shows only matching spools — a spool is listed when its slicer profile or material matches the slot (a partial material match counts, so a PLA spool fits a PLA Basic slot). Show all spools lifts this filter and also lists spools already assigned to another slot
From the spool editor or QR view
- Open an existing spool from Inventory, or scan its Bambuddy QR code.
- If the spool has no slot yet, click Assign Spool in the spool editor. An assigned spool shows Unassign there instead.
- Select the printer, then an AMS, AMS-HT or external slot.
- Review the selected slot and click Assign Spool to confirm.
To change the spool's color, use the Color & Cost tab in the spool editor.
Selecting a slot does not change the assignment until you click the confirmation button. If the spool material conflicts with the material reported by the slot, Bambuddy asks you to confirm the mismatch. An offline printer or an unavailable AMS is shown in the dialog instead of silently failing.
Keyboard users can select AMS slots with Enter or Space.
Bulk actions
When you need to act on more than one spool at a time, tick the checkbox at the left of each row in the Inventory table. As soon as one row is selected, a sticky toolbar appears above the list with these actions:
| Action | What it does |
|---|---|
| Edit | Opens a bulk-edit modal — apply the same value to one or more fields across every selected spool. |
| Print labels | Opens the existing label picker with the selected spools pre-checked. |
| Reset usage | Zero the "Total Consumed" counter on all selected spools without touching remaining weight. |
| Archive / Restore | Soft-archive (or restore from Archived view) all selected spools in one click. |
| Delete | Permanently delete the selected spools (confirmation required). |
| Clear selection | Drop the selection without acting on it. |
Selection clears automatically when you change tabs, filters, or search — the count on the toolbar always matches what you're looking at.
The bulk-edit modal uses a three-state design per field: by default fields are left unchanged, and you opt-in per field by ticking its checkbox before entering a value. Only fields you tick are sent to the backend, so unrelated fields on the selected spools are not touched. Editable fields: material, sub-type, brand, color name + colour, storage location, slicer filament name + ID, cost / kg, note, label weight, core weight, category, low-stock threshold %.
Clearing fields is per-spool only
The bulk-edit modal lets you SET non-empty values. It deliberately does not offer a "clear this field" option — emptying ten notes by mistake should not be a single click. Use the per-spool editor when you need to blank a field.
K-profiles stay per-spool
Pressure-advance (K-profile) calibrations are tied to a specific printer + extruder + nozzle, so the bulk-edit modal does not include them. Edit K-profiles per spool from the inventory row's edit dialog.
The bulk-edit modal uses the same dropdowns the per-spool editor shows for material, sub-type, brand, category, slicer preset name, slicer filament, and storage location. Slicer presets pull from Bambu Cloud (when signed in), Orca Cloud, local presets, and the built-in filament list — so picking a preset here behaves identically to picking it on the per-spool form.
What the toast tells you
After a bulk action, the toast at the bottom of the screen reflects the actual outcome:
- Green "N spools …" — every selected spool succeeded.
- Yellow "N updated, M failed" — partial success. The toolbar still closes and the selection clears, but the message tells you exactly how many rows the backend rejected. Inspect the listed rows in the inventory to confirm what was changed.
- Red "All N … failed — selection kept so you can retry" — every row failed. The selection and the modal stay open so you can fix the cause (e.g. Spoolman is unreachable, a coworker deleted the rows in another tab) and click Apply again.
The same three-outcome pattern applies to Edit, Delete, Archive, and Restore. Reset usage stays simple — it either zeros every selected spool's counter or surfaces a single error.
The bulk actions work identically in Built-in Inventory and Spoolman modes.
Unassigning a Spool
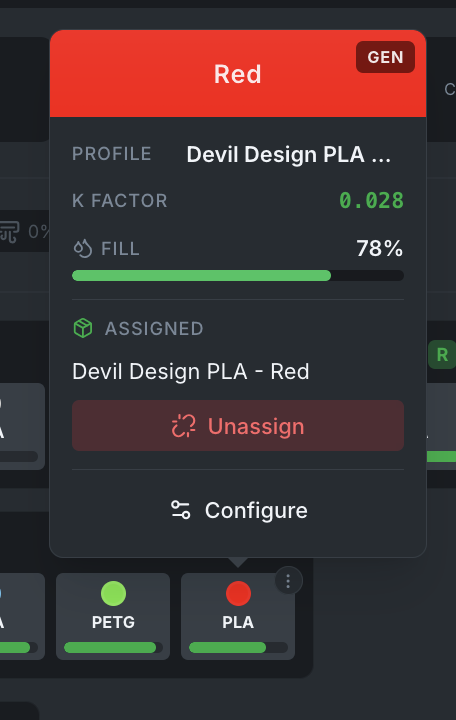
- Hover over an assigned AMS slot
- Click Unassign in the hover card
The hover card shows the assigned spool's material, brand, color, and numeric ID so you can confirm the correct spool without opening the inventory page.
Bambu Lab Spools
Slots containing Bambu Lab spools (identified by RFID) do not show assign/unassign buttons. These spools are managed automatically by the AMS.
Auto-Unlink
When a Bambu Lab spool is inserted into a slot that has a manual spool assignment, the assignment is automatically removed.
The same happens when the slot's filament stops matching the spool at all — a different colour or a different material means a different roll is in there, so the stale assignment is released rather than left pointing at filament you are no longer printing. A slot that empties during a print is left alone, because that is a runout and the spool is still in the AMS.
Taking a spool out releases its assignment after two minutes, not at once. The AMS sometimes reports a slot, or a whole unit, as empty for a moment while every spool stays where it is, and an assignment released on that report would be lost for good. A slot that reads normally again within the two minutes keeps its assignment. A different spool the AMS can identify still releases the old assignment straight away. One it cannot read releases it when the two minutes are up.
Stable Assignments on Startup
Spool assignments are preserved across Bambuddy restarts. If the same spool is still in the slot (verified by RFID identifiers), the assignment is kept without sending any commands to the printer.
Auto-tracking new Bambu spools
When a Bambu Lab spool is detected in the AMS and no inventory row already has its tray UUID, Bambuddy first looks for an existing untagged spool (matching material, color, and brand of "Bambu" / "Bambu Lab" / unspecified) and attaches the RFID to it — so a spool you logged ahead of time via Quick Add reuses your existing record (with your weight, notes, and cost data) rather than producing a duplicate. If no match is found, a new inventory row is created from the AMS data.
Configure AMS Slot
AMS slot configuration tells the printer what filament profile to use for a specific slot. This is separate from inventory — it controls how the printer handles the filament during printing (temperature, flow rate, pressure advance, etc.).
- Hover over an AMS slot on the printer card
- Click the menu button ()
- Select Configure Slot
- Choose a filament preset
- Optionally select a K profile and custom color
- Click Configure Slot to apply
When to Configure vs When to Assign
- Assign Spool: Links an inventory spool to a slot for tracking (weight, usage history, cost) and automatically configures the slot with the spool's filament profile, color, and K-profile. Works on both configured and empty slots.
- Configure Slot: Manually sends a specific filament profile to the printer. Useful when you want to override the auto-configured settings or set up a slot without an inventory spool.
Where Configure Slot Presets Come From
The preset list in the Configure Slot modal comes from the same three sources as the spool form, but filtered by printer model:
| Source | Description |
|---|---|
| Bambu Cloud | Cloud presets filtered by model suffix (e.g., @BBL P1S, @BBL H2D). Custom presets you created in BambuStudio appear here with a Custom badge. |
| Local Profiles | OrcaSlicer imports filtered by compatible_printers. |
| Built-in Fallback | Bambu Lab's filament catalog (~150 entries). Always available. |
Only presets compatible with the specific printer model are shown, reducing clutter and preventing mismatches.
User Presets
User presets that inherit from Bambu presets (e.g., "# Overture Matte PLA @BBL H2D") are fully supported. Bambuddy automatically derives the correct filament ID from the preset's base configuration.
Usage Tracking
Bambuddy tracks filament consumption automatically using 3MF slicer data as the primary source for all spools.
3MF Slicer Estimates (Primary)
For all spools — both Bambu Lab (RFID) and third-party — Bambuddy uses the per-filament used_g data from the archived 3MF file:
- Extracts per-filament usage from the slicer's slice_info
- Maps 3MF filament slots to physical AMS trays using the actual AMS mapping from the print command
- For slicer-initiated prints (BambuStudio, OrcaSlicer, Bambu Handy): captures the
ams_mappingdirectly from the MQTT print command, ensuring the correct tray is tracked regardless of which application starts the print - For queue prints: uses the stored AMS mapping for exact slot-to-tray resolution
- For single-filament prints: uses the printer's active tray for reliable tracking
- For completed prints: uses the full slicer estimate
- For failed/aborted prints: uses per-layer G-code data for accurate partial tracking, with linear progress scaling as fallback
- For mid-print spool changes: if a spool assignment is changed during a print, the live assignment is used for filament deduction (when the change timestamp is after print start); otherwise the snapshot from print start is preserved
AMS Remain% Delta (Fallback)
When 3MF data is unavailable (e.g., G-code-only prints without an archived 3MF file), Bambuddy falls back to AMS remain% tracking:
- Captures remain% at print start and end to compute consumption deltas
- Only used for trays not already tracked via 3MF
Accuracy
3MF estimates come from the slicer and are very accurate for completed prints. For partial prints, per-layer G-code analysis provides precise filament consumption up to the exact layer where the print stopped. If layer data is unavailable, a linear estimate (total × progress%) is used as a final fallback.
Usage History
Each consumption event is recorded with:
- Spool ID and printer
- Print name
- Weight consumed (grams)
- Percentage consumed
- Print status (completed / failed / aborted)
- Cost (calculated from spool cost/kg)
Resetting Usage
Each spool's weight_used counter accumulates over the lifetime of the spool and feeds the Total Consumed (Since tracking started) summary card. Two affordances let you zero it out without touching anything else:
- Per spool — In the inventory table, an eraser icon appears in the row's action column on active spools that have consumed grams. Clicking it opens a confirm dialog and resets that spool's
weight_usedto 0. - All spools at once — On the Total Consumed summary card, an eraser icon next to the label resets every active spool's counter in one go. The confirm dialog tells you how many spools will be affected.
Both actions leave the spool itself untouched: the label weight, remaining weight calculation, AMS lock flag (weight_locked), cost-per-kg, and storage location are not changed. Only the accumulated consumption counter goes back to 0. Future prints continue to increment normally — unlike manually editing the Current Weight field in the spool form, which auto-locks the spool and stops AMS auto-sync.
The bulk variant is the recommended way to clean-slate the Total Consumed stat (for example, after deleting all archives on a test instance) so subsequent prints track from zero. Spoolman users get the same actions — the request routes to Spoolman's PATCH /spool/{id} with used_weight: 0 for each target instead of the built-in inventory table, but the UX is identical.
Cost Tracking
Track filament costs per spool and see cost breakdowns for every print.
Setting Cost Per Kg
Each spool can have an individual Cost per kg value, set in the Additional section of the spool form. This value is used to calculate the cost of each print based on actual filament consumption.
How Cost Calculation Works
When a print completes, Bambuddy calculates the cost for each spool used:
- Per-spool cost: Uses the spool's
cost_per_kgif set - Default fallback: Uses the global Default Filament Cost from Settings → Filament
- Formula:
cost = (weight_used_grams / 1000) × cost_per_kg
The calculated cost is stored in the usage history record and aggregated to the archive's total cost.
Cost Display
- Print modal: Shows a real-time cost preview based on loaded filaments and their cost/kg values before starting a print
- Archive cards: Display the total filament cost for each print
- Inventory table: Includes a sortable "Cost/kg" column (hidden by default — enable via column settings)
- Statistics: Total cost across all prints is included in the stats summary
Recalculating Costs
If you update spool prices or add cost data retroactively, use Recalculate Costs on the Archives page to update all archive costs based on current filament prices. This recalculates costs using:
- Spool usage history records (by archive ID)
- Legacy usage records (by print name, for older records)
- Filament catalog prices (if no usage records exist)
Default Filament Cost & Currency
Configure in Settings → Filament:
| Setting | Description |
|---|---|
| Default Filament Cost | Fallback cost per kg when a spool doesn't have an individual cost set (default: 25.00) |
| Currency | Currency symbol used for cost display throughout the app (USD, EUR, GBP, MYR, and 23 more) |
Set Costs on Your Spools
For the most accurate cost tracking, set cost_per_kg on each spool when you add it to inventory. The default cost is a rough estimate — individual spool prices give you precise per-print cost data.
Suppliers
The spool record's Brand says who made the filament; suppliers say where you buy it (#2988). The same product is often available from several shops at different prices, and one shop carries many brands — so suppliers are a managed master list with an n:m assignment, not a free-text field that drifts in spelling.
- Master list: the Suppliers button on the Inventory page toolbar, right next to Locations — suppliers are the same kind of inventory master data that spools reference. Each supplier has a name (required), website/shop URL, your own customer number there, and a note. Names are unique regardless of case (
Extrudrandextrudrare the same supplier) and cannot contain;, which separates names in the CSV. The list shows how many spools reference each supplier, and a referenced supplier cannot be deleted — remove or reassign its spool assignments first. - Assigning on the spool: the Suppliers section sits on the Color & Cost tab of the spool dialog (so it is not shown in Quick Add). Use Add supplier… to pick one from the list; typing a name that does not exist yet offers Create "…", so a missing supplier is added without leaving the dialog. Each assignment is a row where you can record the supplier's article number (their number for the product — not your internal one) and a quoted price per kg there, so sources of the same product compare at a glance. The quoted price is for comparison only — the spool's own Cost per kg stays the cost basis for print costing and is never overwritten by an assignment.
- Bought here: tick this on the supplier this concrete spool was actually purchased from. The other assignments read as alternative sources. At most one assignment can carry the marker; leaving it unticked everywhere is fine.
- Inheritance: a new spool of a product that already carries supplier assignments — same brand, material, subtype and colour — arrives with the source list filled in, as long as you leave its supplier list untouched when adding it. Bought here is not inherited, since where the new spool was bought is not something Bambuddy can know. This covers manual adds, bulk adds (every copy gets the same list), the API, and RFID auto-added refills. Copying a spool takes the suppliers of the spool you copied, again without Bought here.
- Deleting and archiving: deleting a spool removes its assignments, so its suppliers become deletable again. Archiving keeps them — an archived spool still records where it was bought.
- List & search: an optional sortable Suppliers column (purchase source highlighted first), a supplier filter in the filter bar (including No supplier), and the free-text search matches supplier names and their article numbers.
- Statistics: the Statistics page gains a By Supplier widget — spools, remaining stock, consumption and cost grouped by the Bought here supplier. Consumption and cost follow the dashboard's date range; stock is always the current state. Cost aggregates the recorded usage history (based on each spool's Cost per kg), never the quoted prices.
- CSV & API: the inventory CSV carries two columns,
suppliersandpurchase_supplier— see the CSV schema for how they are matched on import. The REST API exposes/api/v1/inventory/suppliersfor the list and embeds assignments in the spool responses.
Spoolman mode
The supplier list, the toolbar button and the section in the spool dialog are the same in Spoolman mode. The assignments are stored on the Bambuddy side (keyed by the Spoolman spool id), because Spoolman's vendor is the manufacturer (it maps to Bambuddy's Brand), not the seller — forcing suppliers into it would corrupt that field. Three things differ:
- No inheritance — a new Spoolman spool starts without suppliers, unless you copy an existing one.
- No By Supplier widget — it groups Bambuddy's own spools, not the Spoolman-side assignments, so it is hidden on the Statistics page.
- No CSV — import and export are disabled in Spoolman mode, as for the rest of the inventory.
A spool deleted directly in Spoolman leaves its assignments behind in Bambuddy. They are cleared the next time you try to delete one of its suppliers, provided Spoolman is reachable at that moment.
Permissions
Suppliers use the regular inventory permissions, exactly like storage locations: anyone who can read the inventory sees the list, anyone who can edit the inventory manages it. No new permissions are introduced.
Material Numbers
If your business purchases and costs filament by an internal article number (e.g. 15 = Bambu Lab PLA Basic, 16 = Bambu Lab ABS-GF), the Material No. field puts that identifier on the spool record itself (#2870) — unlike the free-text note it is sortable, filterable and usable as a statistics group. It is your number for the product; the article number on a supplier assignment is the supplier's number for it, and the two are independent.
- Where to set it: in the spool dialog next to Cost per kg and Category (with autocomplete from numbers already in use), or via Bulk Edit to number an existing inventory in one pass. Surrounding spaces are trimmed and a blank value means no number, so
15and15can never become two groups. - Inheritance: a new spool of an already-numbered product — same brand, material, subtype and colour — arrives with the number filled in automatically. That covers manual adds, bulk adds, the API, and spools created by the RFID auto-add when a new refill is scanned. A blank field on a new spool of such a product therefore always inherits: to keep one spool deliberately unnumbered, clear its number after adding it. If spools of the same product carry different numbers, the most recently updated one is used; bulk-edit them to one number to avoid surprises. CSV import does not inherit — the file is authoritative, so a row without a number imports without one.
- List & search: an optional sortable Material No. column (enable it in the column chooser; numbers sort numerically,
2before15), a filter chip ("everything with number 15", including a No material number option), and the free-text search also matches the number. - Statistics: the Statistics page gains a By Material Number widget — spool count, remaining stock, consumed grams and cost per number. Consumption and cost follow the dashboard's date range and come from the recorded usage history (archived spools included); stock is always the current state.
- Backup & CSV: the number is part of the GitHub backup and restore, and of the inventory CSV as the
material_numbercolumn — see the CSV schema.
Spoolman mode
In Spoolman mode the number is read from Spoolman's own filament-level article_number and shown read-only — maintain it in Spoolman itself. The field is not shown in the spool dialog or in Bulk Edit, the By Material Number widget is hidden (it groups Bambuddy's own spools), and CSV import and export are disabled as for the rest of the inventory.
Inventory Forecast
See inventory depletion rates based on material usage and handle stock logistics.
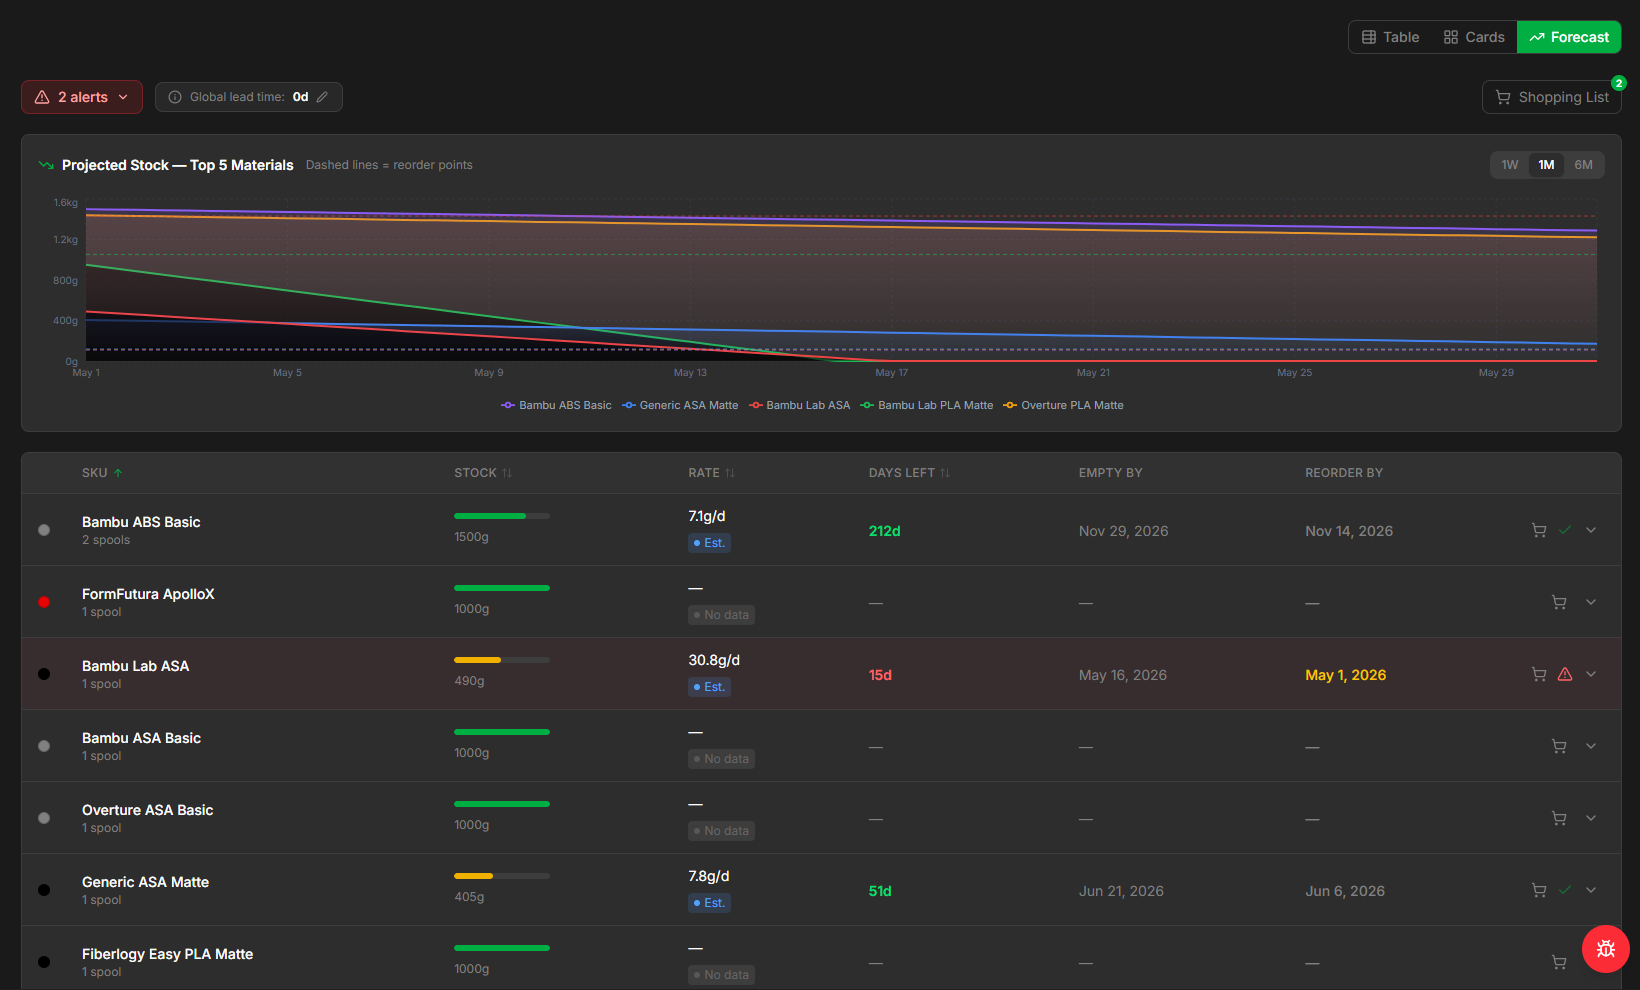
Forecasting
The Forecast view shows all Inventory spools. Identical spool types are grouped together.
Each rown can be expanded to show additional settings, data, and actions.
| Setting | Description |
|---|---|
| Effective lead time | The maximum between the SKU Lead Time and the Global Lead Time |
| SKU Lead Time Override | A user defined lead time in days |
| Safety Margin | A buffer added on top of the statistical safety stock |
| Reorder Point | The point (expressed in grams) when the stock item should be reordered |
| Add to Shopping List | The cart icon adds the spool to the Shopping Cart. Quantity can either be expressed as spools or as days of stock |
The user can set a Global Lead Time that will override all lower lead times (or lead times that are not set).
The interface will alert of any stock breakage forecasted. These can also be sent via the notification service by enabling them in Settings → Notifications. To exclude spools from forecasting and alert logging, click the Snooze icon in item row.
Set Lead Time on Your Spools
For the most accurate tracking, set Lead Time on each spool group.
Usage
Material usage is calculated based on how many data points are available:
History-based (needs ≥2 print events):
interval_rate = grams_used_in_print / days_between_prints   (floor: 0.5 days)
recency_weight = exp(−ln(2)/30 × days_since_print)          (30-day half-life)
Weighted mean across all intervals:
daily_rate = Σ(interval_rate × recency_weight) / Σ(recency_weight)
std_dev    = sqrt( Σ(weight × (interval_rate − daily_rate)²) / Σ(weight) )
Delta-based (only 1 event, or no history):
Shopping Cart
The shopping cart lists all user added spools that are set to be reordered.
In the List view the user can set a row item as Purchased. Once set as Purchased, the item can set as Received to be removed form the list.
Add Purcahses To Stock
All items marked as Received will be automatically added to Inventory in the Stock category.
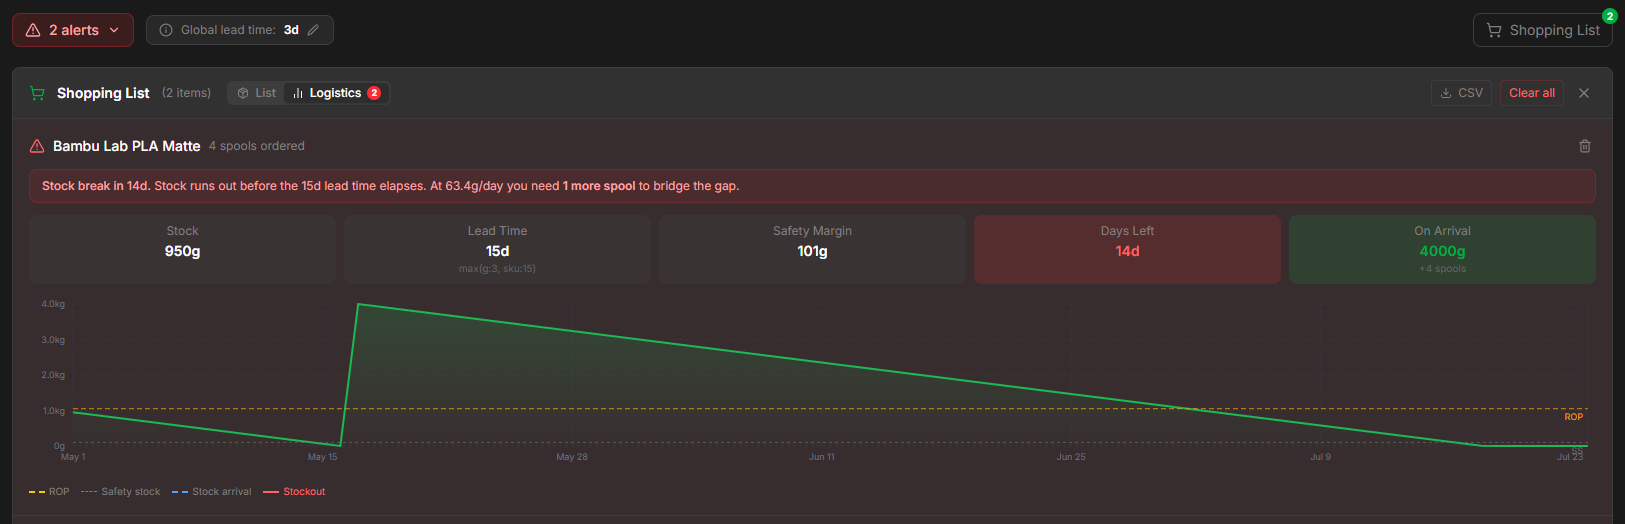
In the Logistics view a graph shows predicted stock variations based on reorder quantity and data.
Printable Labels
Bambuddy can generate PDF labels for any selection of spools. The label carries the colour swatch (with multi-colour gradient stripes for spools that have extra colours), brand, material, name, the spool ID, and a QR code that deep-links straight back to that spool's row in Bambuddy when scanned with a phone — useful for finding the right spool in storage.
Two ways to start
- Per-spool icon — every spool card and table row has a small printer icon. Click it to print just that one spool's label.
- Header bulk button — Print labels… in the inventory page header opens the picker pre-selected with every spool currently visible (i.e. matching your filters). Refine the selection in the modal.
The picker
The modal lists the spools you can choose from with checkboxes. From the top:
- Search — substring match across name, brand, and
#ID(e.g. type#42to jump to spool 42). - Material chips — narrow the visible list to a single material (PLA, PETG, …). Chips are derived from your library so you only see what you actually have.
- Select all visible / Deselect visible / Clear all — additive selection actions. Select all visible adds the currently filtered list to your selection without dropping anything you'd already picked outside the filter; Clear all wipes the entire selection. This means you can build a selection across filters: filter to PLA, click Select all visible, switch to PETG, click Select all visible again — both groups are now selected.
- Live "X selected" count in the modal title so you always know what you're about to print.
- Starting label position — the number field below the list, beside Monochrome. Choose the first unused position when printing an Avery sheet; position 1 remains the default, and single-label templates ignore it.
Template sizes
Pick the template that matches your label stock or holder:
| Template | Size | Per page | Best for |
|---|---|---|---|
| AMS holder | 30 × 15 mm | 1 | The popular Makerworld AMS Filament Label Holder (model 752566). Compact identification at-a-glance. |
| Box label | 62 × 29 mm | 1 | Brother PT/QL or Dymo small labels. Carries name, brand, material, storage location, and a QR code. |
| Avery L7160 | 38.1 × 63.5 mm | 21 | EU sheet stock — A4 paper, 21 labels per sheet (3 columns × 7 rows). |
| Avery 5160 | 25.4 × 66.7 mm | 30 | US sheet stock — Letter paper, 30 labels per sheet (3 columns × 10 rows). |
Sizes are exact — the renderer measures in points, not pixels, so Avery layouts align to <0.1 mm and don't drift across the page.
Reusing a partially used Avery sheet
Use Starting label position to leave used positions blank on the first sheet:
- Count the positions from left to right and top to bottom, beginning with 1 in the upper-left corner.
- Enter the first unused position: 1–21 for Avery L7160 or 1–30 for Avery 5160.
- Choose the matching Avery template to generate the PDF.
For example, starting at position 8 leaves positions 1 through 7 blank and places the first selected spool at position 8. Labels continue in reading order. If the selection fills the remaining positions on the first sheet, every later page begins at position 1.
The position is not remembered. The picker opens at 1 every time, so set it again each time you come back to a part-used sheet — Bambuddy has no way of knowing which labels you have peeled off since the last batch.
Sheet templates only
Starting position applies only to Avery L7160 and Avery 5160 sheets. Roll and single-label templates always begin at their normal position. Enter a number a sheet cannot hold — 25 on an L7160, say — and that sheet's own button is disabled and shows its range in place of the usual hint, while the sheet that can hold it stays available.
What's on each label
- Colour swatch — the spool's
rgba. Spools with multi-colour stops (extra_colors) render as vertical stripes in the order you saved them. - Brand · material · subtype — small text row.
- Spool name — bold; what you set in the spool form.
- Storage location — italic, only on the box-label and Avery templates (the AMS holder is too small).
- Spool ID — large bold
#N, anchored at the bottom-left. This is the killer field for telling 8 spools of "PLA White" apart in your closet, especially partials. - QR code — links to
/inventory?spool=<id>so a phone scan jumps straight to the spool's row in Bambuddy. The AMS-holder template skips the QR (no room at 30 × 15 mm) — the spool ID and swatch are enough at AMS-bay distance.
Low-resolution / thermal label printers
The QR is tuned to stay scannable on cheap 203 dpi thermal printers, including on the small 40 × 30 mm box label where earlier builds rendered it too densely and the lines bled together. If you print to a black-and-white thermal printer, tick Monochrome (black & white printer) in the print dialog — it drops the colour swatch (which prints as a meaningless grey block) and gives that space to the text; the colour is still shown as the hex code line.
What ends up in the QR
The QR encodes the URL Bambuddy can be reached at + /inventory?spool=<id>. By default this is the request's own scheme + host (https://bambuddy.your-server.local/inventory?spool=42) — if you set Settings → External URL to your public Bambuddy address, the QR uses that instead, so a phone outside your LAN can still resolve it.
Print or save
The PDF opens in a new browser tab. From there you can either print directly to a label printer / sheet of blanks, or save the PDF and print later. Since rendering is server-side via ReportLab, the output is byte-identical across browsers — no "Chrome prints differently than Firefox" surprises.
Limits
- Up to 500 spools per request. Plenty for any realistic batch (a full Avery L7160 sheet is 21, a sheet of 5160 is 30; 500 covers ~24 sheets).
- The renderer truncates names with an ellipsis if a spool name is too long for the chosen template — for the AMS-holder size in particular, the spool ID is what matters; long names get truncated. If your spool name is consistently being truncated, consider a shorter
namefield on the spool itself.
CSV Import & Export
Add spools in bulk and get your inventory back out as a spreadsheet. Two buttons sit in the inventory page header — Import CSV and Export CSV. They operate on Bambuddy's own (local) inventory; in Spoolman mode the buttons are disabled with a tooltip pointing you at Spoolman's own built-in CSV import/export, since Spoolman owns the data store.
Exporting
Export CSV downloads your current active inventory (archived spools are excluded) using the fixed column schema below. rgba is written without a leading #, and remaining is filled in for you, so the file is ready to read in a spreadsheet and re-imports cleanly — handy for backups and for migrating between Bambuddy instances.
Importing
Import CSV is a two-step, preview-first flow — nothing is written until you confirm:
- Choose a file (or drag it onto the drop zone). Bambuddy parses and validates it on the server and shows a preview table, one row per CSV line:
- valid — will be created on confirm.
- error — skipped, with the reason shown inline (e.g.
material is required,rgba must be 6- or 8-char hex). - skipped — blank lines.
- Review, then click Import N valid rows. Only the valid rows are created, in a single transaction. Invalid rows are never written — fix them in the CSV and re-upload.
A summary at the top shows the valid / error / skipped counts. The preview writes nothing to your inventory, so you can iterate on a messy file safely.
Two informational flags can appear on a valid row in the preview:
- A different-material colour — the colour was resolved from a Color Catalog entry of another material because no exact-material entry existed (see below).
- A possible duplicate — an active spool with the same
material+brand+color_namealready exists. This is a soft warning only; there's no de-duplication, so the row is still imported as a brand-new spool. It's there to catch an accidental double-click or re-upload of the same file.
Colour resolution
You don't have to supply a hex value for every row. Bambuddy resolves the colour in this order:
- If
rgbais present in the CSV, it wins. - Otherwise, if
brand+color_namematch an entry in your Color Catalog (case-insensitive), the hex,extra_colors, andeffect_typeare filled in automatically. Resolved rows are flagged with a wand icon in the preview. A catalog entry that matches your row'smaterial(or a generic entry with no material set) is used first; only if none exists does Bambuddy fall back to another material's variant of that colour, which the preview marks with the different-material flag. - Otherwise the colour is left blank.
CSV schema
The header is fixed but case- and space-tolerant — Color Name, color-name, and COLOR_NAME all map to color_name. Only material is required; every other column is optional and may be left blank or omitted.
| Column | Required | Notes |
|---|---|---|
material | ✅ | e.g. PLA, PETG, ABS. |
brand | e.g. Polymaker. Used with color_name for colour resolution. | |
subtype | e.g. Basic, Matte, Silk. | |
color_name | e.g. Jade White. | |
rgba | RRGGBB or RRGGBBAA hex, with or without #. 6-char values get an opaque alpha. | |
extra_colors | Comma-separated hex stops for multi-colour spools. | |
effect_type | sparkle, silk, gradient, … (same set as the spool form). | |
label_weight | Advertised net weight in grams. Defaults to 1000 if left blank, which affects the derived remaining — set it explicitly for 750 g (or other) spools. | |
weight_used | Grams consumed. Round-trips on export/import. Must be between 0 and label_weight. | |
remaining | Export-only, derived (label_weight − weight_used). Ignored on import. | |
cost_per_kg | Cost per kilogram. | |
nozzle_temp_min / nozzle_temp_max | Temperature overrides in °C. | |
last_used | ISO-8601 timestamp of last use. | |
note | Free-text note. | |
storage_location | Where the spool is stored (e.g. Shelf A). Round-trips on export/import. | |
category | User-defined category (e.g. Production, Prototype). Round-trips on export/import. | |
low_stock_threshold_pct | Per-spool low-stock threshold, 1–99 (%). Blank falls back to the global setting. | |
material_number | Your internal material number, up to 64 characters, trimmed. Round-trips on export/import. Import does not inherit it — a blank cell leaves the spool without a number. | |
suppliers | All assigned suppliers, separated by ; (e.g. Extrudr; Filament24). Matched against your existing supplier list by name, trimmed and case-insensitive. Import never creates suppliers: an unknown name is a warning in the preview, that assignment is dropped and the row still imports. | |
purchase_supplier | The Bought here supplier, or blank. Matched the same way; it counts as an assignment even if the suppliers cell leaves it out. |
remaining is display-only
Remaining weight is always derived from label_weight − weight_used, so it's exported for readability but ignored on import. weight_used is the single source of truth — set that to control how full a spool is.
Imported spools start their consumption history at the imported weight_used
The lifetime Total Consumed (Since tracking started) counter has its baseline set to 0 for an imported spool, so the imported weight_used is treated as already-consumed when the spool first appears. If you import partially-used spools, expect the Total Consumed card to jump by the sum of those weight_used values.
Validation mirrors the spool form exactly (the import reuses the same model), so anything the form would reject, the importer rejects too — with the offending row called out in the preview instead of failing the whole file.
Known limitation — leading-quote-plus-formula notes
To stop spreadsheets from executing fields that begin with =, +, -, @, a tab, or a carriage return, export prefixes such cells with a single quote and import strips exactly that quote back off. As a side effect, a note you authored as literally '=text (a single quote followed by one of those characters) is read back on import as =text. This is an extremely rare edge case; if you rely on such values, set them after import.
Settings
Configure the inventory system in Settings > Filament.
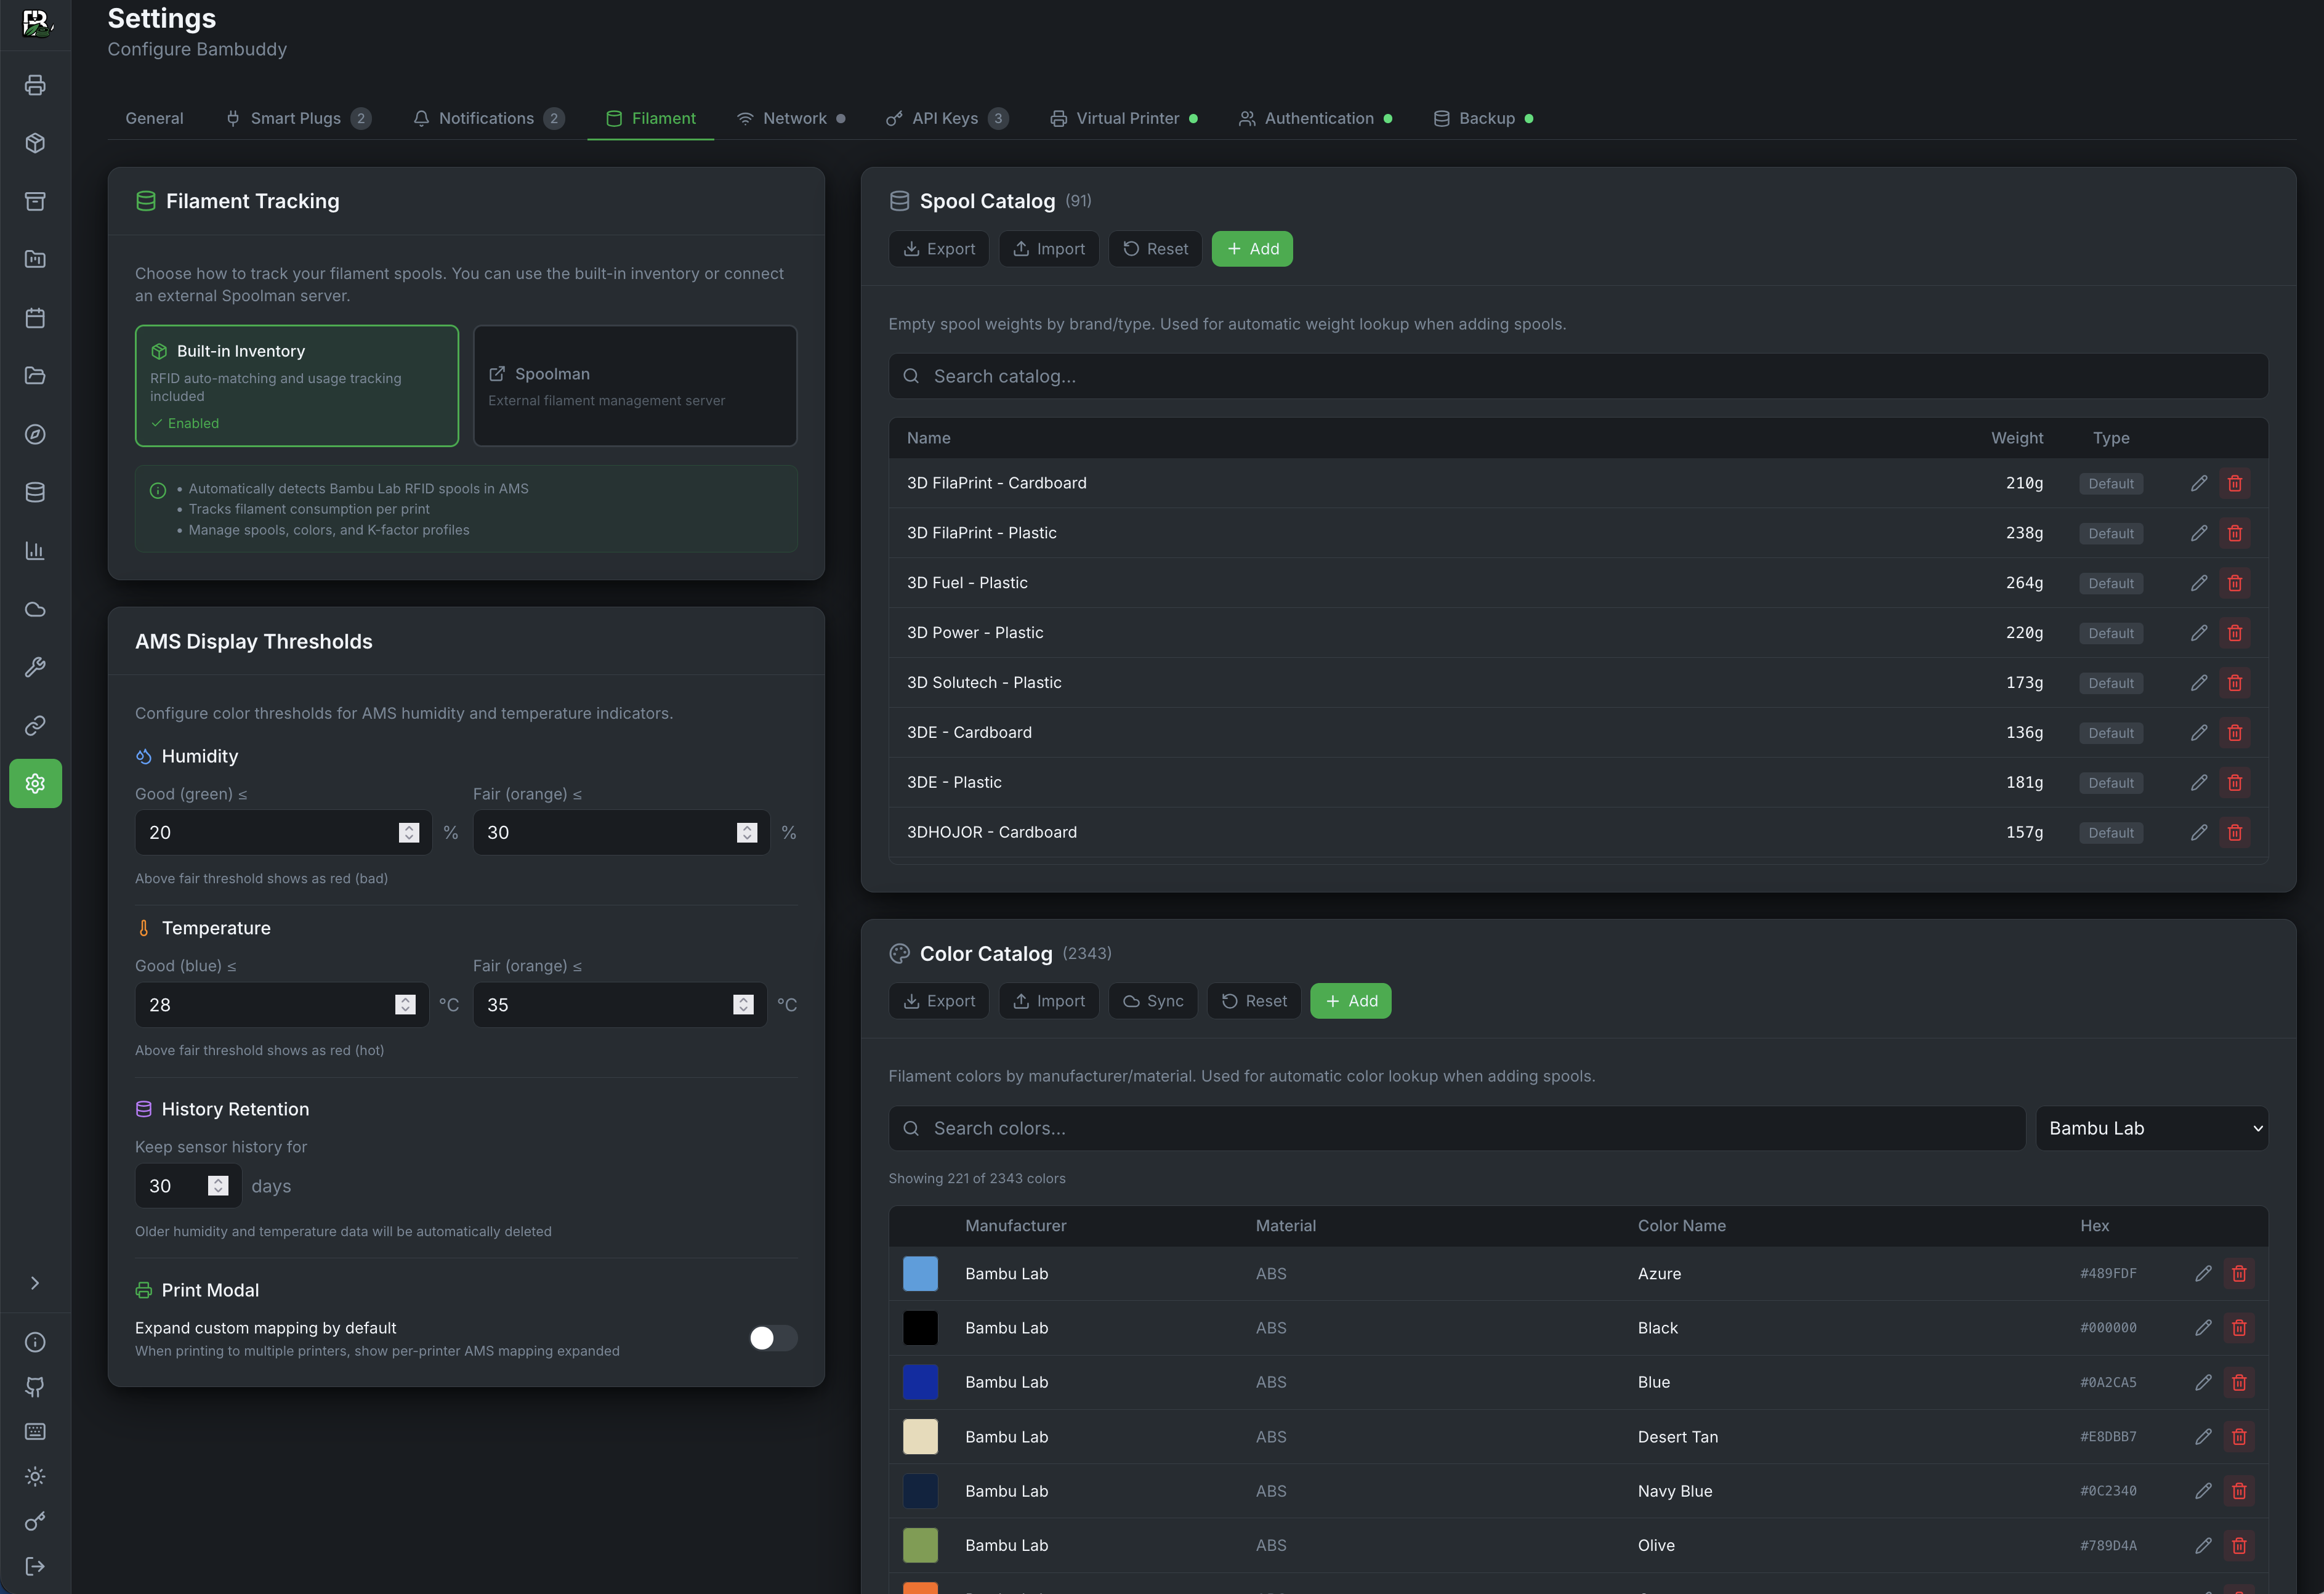
Filament Tracking
Choose between:
- Built-in Inventory — Use Bambuddy's spool management
- Spoolman — Use external Spoolman integration
Auto-add unknown RFID spools
When a spool with an RFID tag Bambuddy hasn't seen before is loaded into the AMS, Bambuddy's default behaviour is to create an inventory record automatically using the data the AMS reads from the tag (material, colour, brand). Turn this off if you prefer to pre-register new spools manually on delivery — the auto-matcher only links to a pre-existing record when material, sub-type, colour and brand match exactly, so partial matches would silently create duplicates.
With the toggle off, Bambuddy still detects the unknown spool — but instead of writing a new inventory row immediately, a confirmation modal pops up wherever you are in the app:
- Shows the printer name, AMS label (e.g.
AMS-B Slot 4), the spool's material, and a colour swatch - Add to Inventory creates the record and assigns it to the slot in one step
- Cancel dismisses the prompt for this insertion
The modal only re-appears if you physically remove the spool and re-insert it (or insert a different unknown spool). It does not nag you every few seconds.
The setting applies to both Built-in Inventory and Spoolman modes. Manual Sync AMS actions also honour it — slots that would have been auto-added are reported as skipped with the reason "Auto-add disabled; add to inventory manually".
When to turn it off
If your workflow is "weigh the empty spool, log it in Bambuddy with cost / notes / RFID tag, then load it", turning auto-add off keeps your pre-registered record intact instead of risking a duplicate row when the AMS reads the same tag.
Sync Weights from AMS
When using built-in inventory, a Sync Weights from AMS button appears below the mode selector. This force-syncs all inventory spool weights from the live AMS remain% sensor values of connected printers.
Use this to recover from corrupted weight data — for example, if a printer power-off event caused all spool fill levels to drop to zero. The sync overwrites the stored weight_used values with the current AMS readings. Printers must be online for the sync to work.
Low Resolution
AMS remain% is integer-precision (1% steps = ~10g for a 1kg spool). For precise tracking, rely on the automatic 3MF-based usage tracker during normal printing. Use AMS sync only as a recovery tool.
Spool Catalog
Pre-defined empty spool weights for quick selection when adding spools. Ships with 90+ entries covering common manufacturers.
| Button | Description |
|---|---|
| Export | Download the catalog as a JSON file for backup or sharing |
| Import | Load a JSON file to add entries. Duplicates (same name) are skipped automatically |
| Reset | Restore the built-in default catalog (overwrites all entries) |
| + Add | Manually add a new spool weight entry |
Color Catalog
Pre-defined color palettes from filament brands. Ships with 600+ colors across 20 brands. Used in the color picker when adding, editing, or copying spools, and as the single source of truth for resolving hex colors to human-readable names everywhere in the UI — the Printer tab AMS popup, the inventory list, the print modal filament override cards, the SpoolBuddy kiosk, and auto-provisioned inventory entries all look up display names from this table. If a color name shows up wrong (e.g. "Scarlet Red" instead of "Cherry Pink"), edit the offending entry or use Sync to pull the canonical name from FilamentColors.xyz.
| Button | Description |
|---|---|
| Export | Download the entire catalog as a JSON file |
| Import | Load a JSON file to add colors. Duplicates (same manufacturer + color name + material) are skipped |
| Sync | Fetch new colors from FilamentColors.xyz — a community database of measured filament colors. Only adds new entries, never modifies existing ones |
| Reset | Restore the built-in default catalog (overwrites all entries) |
| + Add | Manually add a new color entry with manufacturer, color name, hex code, and material |
Display names come from this catalog
Bambuddy resolves every spool color name by looking up the hex in this catalog (Bambu Lab entries are preferred when the same hex is registered under multiple brands). There is no hardcoded tray_id_name → name mapping in the backend or frontend — adding a color here is the supported way to correct or extend display names. Restart-free: the frontend refetches the catalog on next page load.
The same hex, two colors
A hex is not one color in Bambu's range: #FFFFFF is Jade White in PLA Basic, Ivory White in PLA Matte and plain White in six more materials, and #000000 is Charcoal in PLA Matte where it is Black everywhere else. Where the material is known — an AMS slot knows it from what the printer reports for that slot — the catalog entry for that material wins, so a white Matte spool reads Ivory White rather than the Basic name that shares its hex. Where it is not known, the priority above decides.
A slot with a spool assigned from your inventory is named after that spool instead: it is the roll you told Bambuddy is in there, so its own color name is the better answer than any lookup by hex.
When the spool has no name of its own
Most Bambu RFID tags carry no readable color name — some carry an internal code like A06-D0 instead, which is not unique across material families and is not shown. Spoolman has no color-name field at all, so a Spoolman-backed spool arrives carrying its sub-type in place of one. In both cases the catalog answer for the spool's hex is what you see, which is why a spool whose Color Name field is blank still reads Candy Red rather than blank or "Silk+". A name you typed yourself always wins over the catalog; the lookup is the fallback, not an override.
Import File Format
Both catalogs accept a JSON array. Spool catalog entries:
Color catalog entries:
[
  { "manufacturer": "eSUN", "color_name": "Silk Gold", "hex_color": "#C48E2F", "material": "PLA Silk" }
]
Community Sharing
Use Export to share your catalog with others, and Import to load shared catalogs. This is useful for adding colors from brands not yet in the default database.
FAQ
My material isn't in the dropdown (e.g., PCTG, PHA, PP)
Type the material name directly into the Material field. A green "Use custom material" option appears at the bottom of the dropdown. Custom materials work the same as built-in ones for all tracking features.
Do I need to pick a filament profile for every spool?
No. Use Quick Add (Stock) mode to add spools with just a material type — no slicer preset, brand, or subtype required. Stock spools track weight, usage, and cost just like configured spools, but they aren't linked to a printer filament profile. You can filter stock spools on the inventory page, edit them later to assign a profile, or copy a similar spool and only adjust the fields that need to change.
When adding a spool in full mode, the Slicer Preset field is required. It links the spool to a filament profile ID that the printer understands. If you're just inventorying filament for tracking purposes, pick the closest available preset — for example, use a generic "PETG Basic" preset for a third-party PETG spool. Editing or copying an existing spool never requires it.
If you have custom slicer profiles (e.g., a PCTG profile in OrcaSlicer), import them via Local Profiles so they appear in the preset dropdown.
I have different printers (P1S, H2D) and nozzles — do presets matter?
The spool inventory itself is printer-agnostic. You can add a spool once and assign it to any printer's AMS slot. Printer model filtering only applies when configuring an AMS slot (telling the printer which profile to use), not when adding spools to inventory.
When you configure an AMS slot, the preset list is automatically filtered by that printer's model — so you'll only see P1S-compatible presets when configuring a P1S slot, and H2D-compatible presets when configuring an H2D slot.
Is inventory only for loaded filaments?
No. The inventory tracks all your spools — loaded and unloaded. You can add every spool you own to the inventory, even spools sitting on a shelf. The "In Printer" summary card shows how many are currently loaded in AMS slots, but unloaded spools are tracked just the same (weight remaining, usage history, cost, etc.).
Where do the "Slicer Preset" profiles come from?
They come from three sources, checked in order:
- Your Bambu Cloud account — if you've logged in via Cloud Profiles, all your synced filament presets appear (including custom ones you've created in BambuStudio or OrcaSlicer and synced to cloud)
- Local OrcaSlicer imports — if you've imported
.orca_filament,.bbscfg, or.bbsflmtfiles via Local Profiles - Built-in fallback table — ~150 Bambu Lab filament IDs that are always available, no login needed
If you're not logged into Bambu Cloud, you'll still see local imports and the built-in table.
What's the difference between "Assign Spool" and "Configure Slot"?
| Action | What it does | Affects printer? |
|---|---|---|
| Assign Spool | Links an inventory spool to an AMS slot for tracking (weight, usage, cost) and auto-configures the slot with the spool's filament profile, color, and K-profile | Yes |
| Configure Slot | Manually sends a specific filament profile to the printer (temperatures, flow, pressure advance) | Yes |
Assigning a spool is the simplest workflow — it handles both tracking and printer configuration in one step. Use "Configure Slot" when you want to manually override settings or set up a slot without an inventory spool.
Tips
Weigh Your Spools
For the most accurate remaining weight, weigh the full spool on a kitchen scale and subtract the empty spool weight. Enter this as the remaining weight when adding a new spool.
Low Stock Alerts
Keep an eye on the "Low Stock" summary card. Spools below 20% remaining are flagged so you can reorder before running out. To be told instead, enable the Low Filament event on a notification provider; it covers spools assigned to a slot.
PA Profiles
Link K-factor profiles to your spools so the correct pressure advance settings are always associated with each filament.
Third-Party Filament Workflow
For non-Bambu filaments: 1) Add the spool to inventory (pick the closest preset, type custom material/brand) → 2) Load the spool in the AMS → 3) Assign the spool to the slot on the printer card → 4) Configure the slot with the correct filament profile. This gives you both accurate tracking and correct print settings.