Notifications
Get notified about print events via WhatsApp, Telegram, Discord, Email, Home Assistant, and more.
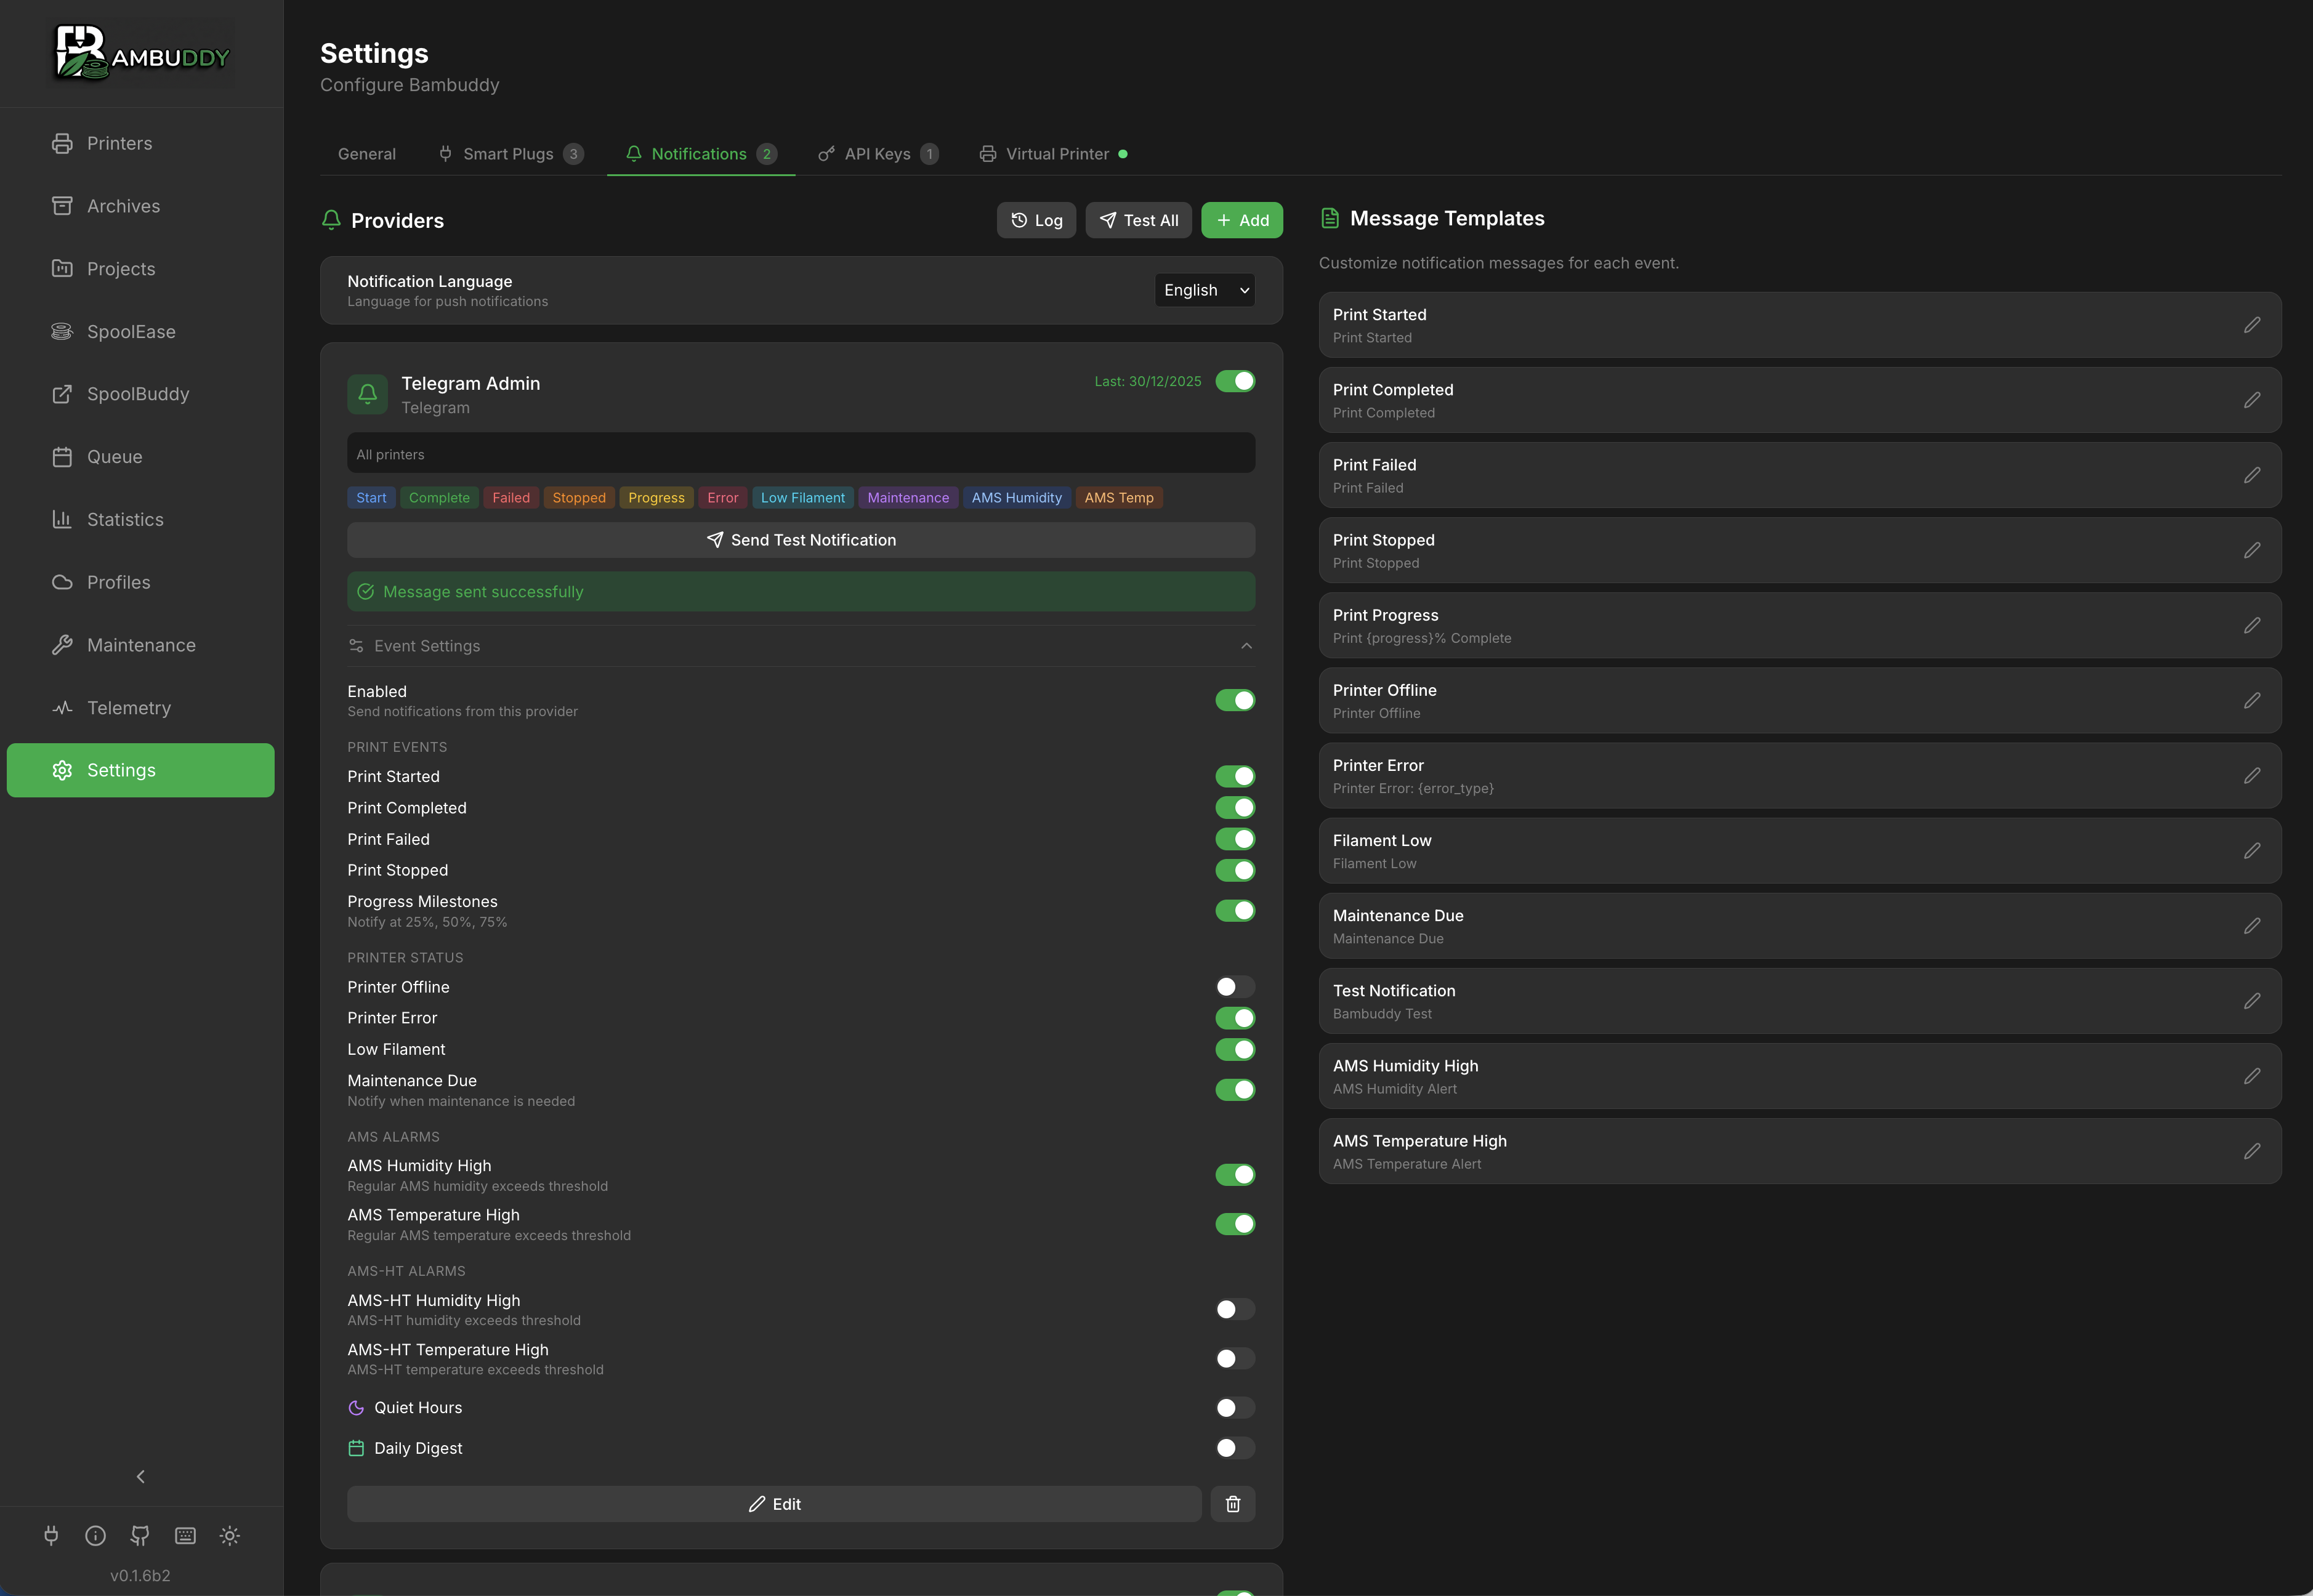
Supported Providers
| Provider | Setup | Features |
|---|---|---|
| ntfy | Easy | Free, no account needed |
| Easy | Via CallMeBot | |
| Discord | Easy | Channel webhooks |
| Pushover | Easy | Professional push service |
| Bark | Easy | iOS push, no account, self-hostable |
| Telegram | Medium | Via Telegram Bot |
| Medium | SMTP email | |
| Home Assistant | Easy | HA dashboard or mobile push via any notify service, with custom data fields |
| Webhook | Flexible | Custom HTTP POST |
Adding a Provider
- Go to Settings > Notifications
- Click Add Provider
- Select provider type
- Enter configuration
- Click Send Test to verify
- Configure event triggers
- Click Add
Provider Setup Guides
ntfy (Easiest)
Simple topic-based notifications - no account needed!
-
Choose a unique topic name (e.g.,
my-printer-xyz123) -
Subscribe on your phone:
- Install ntfy app (Android / iOS)
-
Subscribe to your topic
-
In Bambuddy, enter:
| Field | Value |
|---|---|
| Topic | Your topic name |
| Server | https://ntfy.sh (or self-hosted) |
Keep Topic Secret
Anyone who knows your topic can send you messages. Use a random string.
Per-event priority
ntfy supports a Priority header that controls how the receiving device escalates an alert (sound, vibration, do-not-disturb override, banner persistence). Bambuddy lets you map each enabled event to one of five levels:
| Priority | ntfy value | Typical use |
|---|---|---|
| Min | 1 | Diagnostics-style pings — no sound, no badge |
| Low | 2 | Informational, non-urgent (e.g. "first layer complete") |
| Default | 3 | Standard notification (the ntfy default if nothing is set) |
| High | 4 | Audible / urgent (e.g. "filament low", "AMS humidity high") |
| Urgent | 5 | Wakes the device, ignores DND (e.g. "print failed", "printer offline") |
After enabling the events you want, scroll to the ntfy Priority section in the Add / Edit Notification dialog. Each enabled event gets its own dropdown — events left at Default fall through to whatever the ntfy server is configured to send. Disabled events don't appear in the section.
Switching the provider type away from ntfy hides the section; the priorities are still saved if you switch back.
The daily digest is not covered by these priorities: it is one message summarising several events, so it goes out at the ntfy server's default.
WhatsApp (CallMeBot)
Free WhatsApp notifications:
-
Add CallMeBot to contacts: +34 644 51 95 23
-
Send via WhatsApp:
I allow callmebot to send me messages -
You'll receive an API key
-
In Bambuddy, enter:
| Field | Value |
|---|---|
| Phone Number | Your number with country code (e.g., +1234567890) |
| API Key | Key from CallMeBot |
Discord
Via channel webhooks:
- In Discord, go to channel settings
- Navigate to Integrations > Webhooks
- Click New Webhook
- Customize name/avatar
- Click Copy Webhook URL
- In Bambuddy, paste the URL
Pushover
Professional push notification service:
- Create account at pushover.net
- Install Pushover app on your device
- Create an Application in dashboard
- In Bambuddy, enter:
| Field | Value |
|---|---|
| User Key | From Pushover account |
| API Token | From your Application |
| Priority | Message priority, -2 (lowest) to 2 (Emergency). Defaults to 0 (normal). |
Emergency priority (2)
Priority 2 is Pushover's Emergency level: the notification keeps re-alerting on your device until you acknowledge it. Pushover requires two extra parameters for this, and Bambuddy exposes them only when you set Priority to 2:
| Field | Meaning | Range | Default |
|---|---|---|---|
| Emergency Retry (s) | How often Pushover re-alerts until acknowledged | 30–10800 s | 60 s |
| Emergency Expire (s) | When Pushover stops re-alerting if never acknowledged | 30–10800 s (max 3 h) | 3600 s |
Values outside the allowed range are clamped automatically. These fields have no effect at any other priority.
Bark (iOS)
Open-source push notifications for iPhone/iPad via the Bark app — no account needed, self-hostable:
- Install the Bark app from the App Store
- Copy your device key from the app (shown on the main screen)
- In Bambuddy, add a provider and select Bark:
| Field | Value |
|---|---|
| Device Key | From the Bark app |
| Server URL | Optional — defaults to the official https://api.day.app relay; enter your own bark-server URL if self-hosting |
| Group | Optional — groups notifications in the iOS notification center |
| Sound | Optional — a Bark sound name (e.g. minuet) |
| Interruption Level | Optional — Time Sensitive breaks through scheduled summaries; Critical also bypasses Silent mode and Focus (great for print failures); Passive delivers without waking the screen |
Telegram
Via Telegram Bot:
- Message @BotFather
- Send
/newbotand follow prompts - Save the Bot Token
- Message @userinfobot to get your Chat ID
- In Bambuddy, enter:
| Field | Value |
|---|---|
| Bot Token | From BotFather |
| Chat ID | Your user/group ID |
| Forum Topic ID | Optional — see below |
| Outcome verdict via | How the post-print outcome prompt is answered — buttons, a 👍 / 👎 reaction, or both. See Verdict mode |
Group Notifications
Add the bot to a group and use the group's chat ID for team notifications.
Forum Topics
If the target group has Topics enabled, Bambuddy posts to the General topic unless you tell it otherwise. Set Forum Topic ID to route the notifications into one specific topic instead — useful for giving each printer its own topic inside a single group rather than running a separate chat per printer.
To find the ID, open the topic in Telegram and copy its link. The last number is the topic ID:
The field takes a plain number and may be left empty. Two things to watch for:
- The bot needs permission to post in the group, and Topics must actually be enabled on it. Bambuddy passes the ID through unchanged and reports back whatever Telegram answers, so a wrong ID surfaces as a Telegram error.
- Deleting and recreating a topic gives it a new ID, so the notifications will need repointing.
Use Test in the provider dialog to confirm the message lands where you expect before saving.
Verdict mode
When a print that opted in to outcome confirmation completes, the Outcome Confirmation event asks for a Good / Reject verdict. Outcome verdict via in the provider dialog decides how you answer that prompt on Telegram:
| Option | How you answer |
|---|---|
| Inline buttons (link) | 👍 Good / 👎 Reject buttons under the message, each opening a one-tap verdict link. The default. Needs the External URL setting, and your phone has to be able to reach that address. |
| Reaction (👍 / 👎) | No buttons — the prompt ends with React with 👍 or 👎 to record the outcome. and you answer by reacting to the message. |
| Buttons and reaction | Both at once; use whichever is handier. The buttons still need the External URL: without it they point at APP_URL, which defaults to localhost, so only the reaction works from the phone. |
Reactions work away from the LAN
A reaction needs no inbound connectivity to Bambuddy: your phone only talks to Telegram, and Bambuddy fetches the reaction from Telegram. No External URL, port forwarding or VPN required — answer the prompt from wherever the Telegram app works.
How it works. For every bot with a provider in Reaction or Both mode, Bambuddy long-polls the Telegram Bot API (getUpdates) for reactions on the outcome prompts it sent, so a reaction is picked up within seconds. 👍 records Good, 👎 records Reject; any other emoji is ignored. Once the verdict is stored, the bot edits the prompt to confirm — ✅ marked as good or ❌ marked as reject is appended to the message, and in Both mode the buttons disappear. The first verdict wins: a later reaction, or a tap on an old link, does not overturn a decision that was already made. A reaction counts exactly as long as the prompt's links would: once the print was answered some other way, or the archive was printed again, a reaction on the old message changes nothing, and the new run asks its own question. A reject recorded by reaction carries no reason; the verdict and reason stay editable in the Edit Archive modal.
Requirements and limits
- Private chat recommended. In a group, Telegram only delivers reactions to a bot that is an administrator of that group — as a plain member the bot sees nothing and the prompt goes unanswered.
- Use a bot only Bambuddy uses. Create a separate bot with @BotFather for Bambuddy instead of sharing one with Home Assistant, Node-RED or another script. Telegram allows one
getUpdatesconsumer per bot, so a webhook or a second application polling the same bot conflicts with Bambuddy's poll. Sharing also breaks the other application quietly: Bambuddy asks Telegram for reaction updates only, and Telegram keeps that choice for the bot, so an application that polls the same bot without naming the updates it wants (Home Assistant'stelegram_botintegration, for example) then receives nothing but reactions, and that stays so even after you switch back to Inline buttons. Bambuddy's poll also marks the other application's updates as read. - Conflicts show on the provider. A conflict appears as a provider error — the red Error label on the provider card, with Telegram's message in its tooltip — and Bambuddy retries every five minutes. A wrong or deleted bot token is reported the same way. The label goes away with the next notification the provider delivers.
- One poll per bot. Several providers sharing a bot token — one per printer, say — share a single poll; each reaction is matched to the provider that sent the prompt.
- Only prompts sent in Reaction or Both mode can be answered by reacting. Prompts sent before you switched mode carry no mapping, and a prompt nobody reacts to within a week is forgotten.
- The poll starts when you save the provider and stops when you switch back to Inline buttons, disable or delete it. Nothing to restart.
Outcome Confirmation must stay enabled
The verdict mode only matters for the Outcome Confirmation event. With that event switched off for the provider, no prompt is sent and there is nothing to react to. The provider card shows a Reactions or Buttons + reactions badge while the event is on and a reaction mode is selected.
Email (SMTP)
Send via email:
| Field | Example |
|---|---|
| SMTP Server | smtp.gmail.com |
| Port | 587 (STARTTLS) or 465 (SSL) |
| Security | STARTTLS or SSL |
| Username | Your email |
| Password | App password (not regular password) |
| From Address | Sender email |
| To Address | Recipient email |
Gmail Setup
- Enable 2-Factor Authentication
- Generate an App Password
- Use:
smtp.gmail.com, Port 587, STARTTLS
Home Assistant
Zero-config notifications if Home Assistant is already connected:
- Ensure HA is configured in Settings > Network > Home Assistant
- Add a notification provider and select Home Assistant
- No additional fields needed — click Send Test to verify
Notifications appear as persistent notifications in your HA dashboard.
Push straight to your phone
Set the Home Assistant Service field to a notify service like notify.mobile_app_myphone to push directly to the HA Companion app instead of the dashboard.
Custom data fields. When targeting a notify service, the optional Data (JSON) field is forwarded as the service call's nested data object — the same place HA automations put mobile push options:
ttl: 0 + priority: high make Android pushes arrive immediately; channel creates a dedicated Android notification channel so you can give printer alerts their own sound. See the HA Companion notification docs for all supported keys. Leave the field empty when using the default persistent notification — it doesn't accept custom data.
The field is passed to Home Assistant exactly as you write it, so anything the notify service accepts works here — including nested objects and lists, not just the flat values above. Action buttons are the common case:
{
  "ttl": 0,
  "priority": "high",
  "group": "3D Printer",
  "actions": [
    {"action": "SNOOZE_PRINT_FINISHED", "title": "Snooze 20 min"},
    {"action": "BED_COOL_NOTIFY_ON", "title": "Notify on Bed Cool"}
  ]
}
Two things decide whether those buttons appear and do anything, and neither is set here:
- Pressing a button does nothing until Home Assistant listens for it. The Companion app fires a
mobile_app_notification_actionevent carrying youractionstring; you need an HA automation triggered on that event to act on it. - On iOS, a bare
actionslist is ignored. iOS renders buttons only for a notificationcategoryyou have registered in the Companion app, so send"category": "your_category"instead. Android renders the list directly.
Write it as JSON, not YAML
The examples in the HA docs are YAML. This field is JSON: keys and string values need double quotes, lists use [ ], and there are no trailing commas. Bambuddy refuses to save malformed JSON rather than sending a half-built payload, so if Save reports invalid JSON, the field content is the thing to check — nothing was dropped silently.
Webhook (Custom)
For custom integrations:
| Field | Value |
|---|---|
| URL | Your webhook endpoint |
| Headers | Optional (e.g., Authorization) |
All webhook payloads use a standardized format with title, message, timestamp, source, an event field identifying the event type, and all event-specific variables as structured fields. This makes it easy for automation tools (n8n, Node-RED, Home Assistant, etc.) to parse event data without extracting information from the message text.
Print complete example:
{
  "title": "Print Complete",
  "message": "Workshop X1C: benchy.3mf completed in 2h 15m",
  "timestamp": "2026-04-02T14:30:00.123456",
  "source": "Bambuddy",
  "event": "print_complete",
  "printer": "Workshop X1C",
  "filename": "benchy.3mf",
  "duration": "2h 15m",
  "filament_grams": "15.2",
  "filament_details": "AMS-A T1 PLA: 15.2g"
}
Failed/stopped prints include additional fields:
{
  "title": "Print Failed",
  "message": "Workshop X1C: benchy.3mf failed at 50%",
  "timestamp": "2026-04-02T15:15:00.123456",
  "source": "Bambuddy",
  "event": "print_failed",
  "printer": "Workshop X1C",
  "filename": "benchy.3mf",
  "duration": "0h 45m",
  "filament_grams": "7.6",
  "filament_details": "PLA: 7.6g",
  "progress": "50",
  "reason": "Filament runout"
}
Simpler events include fewer fields — only what's relevant:
{
  "title": "Printer Offline",
  "message": "Workshop X1C is offline",
  "timestamp": "2026-04-02T14:30:00.123456",
  "source": "Bambuddy",
  "event": "printer_offline",
  "printer": "Workshop X1C"
}
When a camera snapshot is available (e.g. First Layer Complete, Print Started, Print Completed), the payload includes a base64-encoded JPEG image in the image field:
{
  "title": "First Layer Complete",
  "message": "Workshop X1C: benchy.3mf — Layer 1/200 done",
  "timestamp": "2026-04-02T14:30:00.123456",
  "source": "Bambuddy",
  "event": "first_layer_complete",
  "printer": "Workshop X1C",
  "filename": "benchy.3mf",
  "total_layers": "200",
  "image": "/9j/4AAQSkZJRg..."
}
Decoding the image
The image field contains a standard base64-encoded JPEG. In Home Assistant automations, you can decode it with a template sensor or pass it to notify.mobile_app_* as image data. In Node-RED, use a Buffer.from(msg.payload.image, 'base64') node. The field is only present when a snapshot was captured — not all events include images.
Slack/Mattermost Format
When using the Slack payload format, only {"text": "..."} is sent — structured event fields are not included. Use the generic format for automation integrations that need structured data.
Event Triggers
Print Events
| Event | Description |
|---|---|
| Print Started | Print job begins |
| Plate Not Empty | Objects detected on build plate before print (bypasses quiet hours) |
| Print Completed | Print finishes successfully (includes filament usage) |
| Print Failed | Print fails or errors (includes scaled filament usage and progress) |
| Print Stopped | Manual cancellation (includes scaled filament usage and progress) |
| Plate Clear Required | A print reached a terminal state and the queue is gated until the build plate is confirmed clear. Off by default — it fires after every print, at the same moment as Print Completed. Also published over MQTT. |
| Outcome Confirmation | A completed print that opted in to outcome confirmation asks for its good/reject verdict. On ntfy and Telegram the notification carries Good/Reject buttons that answer it directly; every other channel, Pushover and Bark included, gets a link that opens the outcome dialog in Bambuddy. Set External URL so these links work from a phone — without it they point at APP_URL, which defaults to localhost. Telegram can take a 👍 / 👎 reaction on the message instead, which needs no External URL — see Verdict mode. The one-tap verdict links are also available as {good_url} / {reject_url} for your own templates, but the default body leaves them out, because anything that opens links in a message (a preview card, a mail scanner) would reach them. On by default — it only ever fires for prints where you enabled Ask for Outcome, so this toggle just mutes a channel. |
| Missing Spool Assignment | Print started with required AMS trays that have no assigned spool (off by default) |
| First Layer Complete | First layer finished — check adhesion remotely (includes camera snapshot) |
| Bed Cooled | Bed temperature dropped below threshold after print (configurable in Settings) |
| Progress Milestones | At 25%, 50%, 75% |
Printer Events
| Event | Description |
|---|---|
| Printer Offline | Connection lost |
| Printer Error | A new HMS fault, with the description Bambu publishes for it on your printer model. Faults Bambu publishes no text for, and notices that don't need you (such as "The top cover is open"), are not sent; see HMS Error Monitoring. |
| AI Failure Detection | Obico ML detected a possible print failure (spaghetti, layer shift, etc.). Fires only when Failure Detection is enabled and the printer crosses the configured sensitivity threshold. Off by default. |
| Printer Sensor Alert | A Home Assistant sensor bound to a printer entered its alert state — an enclosure door opened, a chamber ran hot. Fires on the transition in, not repeatedly. Off by default. Storage-location sensors have their own event, below. |
| Low Filament | A spool assigned to an AMS slot or external holder dropped below its low-stock threshold: the same global percentage (default 20 %) and per-spool override that drive the inventory's Low Stock count, so the alert and the card agree. Remaining filament comes from the spool's weight, never the AMS remain percentage. Sent once per spool and slot; it can fire again after the spool goes back above the threshold. Slots with no assigned spool never alert. Off by default. |
| Maintenance Due | Scheduled maintenance is due |
AMS Events
| Event | Description |
|---|---|
| AMS Humidity High | AMS humidity exceeds threshold |
| AMS Temperature High | AMS temperature exceeds the alarm threshold — a separate value from the Fair display band, falling back to it when unset. Silent while the unit is drying — see below. |
| AMS-HT Humidity High | AMS-HT humidity exceeds threshold |
| AMS-HT Temperature High | AMS-HT temperature exceeds the alarm threshold. Silent while the unit is drying — see below. |
| Auto-Drying Suspended | Bambuddy stopped automatically drying an AMS unit because repeated cycles brought the humidity no lower. On by default — it reports that Bambuddy has stopped acting, so silence would read as "still drying". Fires once per unit; the suspension lifts on its own when the reading falls. See the threshold floor. |
Inventory Events
| Event | Description |
|---|---|
| Storage Location Sensor Alert | A Home Assistant sensor bound to a storage location entered its alert state — a drybox got too humid, a battery ran low. Fires on the transition in, not repeatedly. Off by default. This is a separate switch from Printer Sensor Alert: a provider narrowed to one printer would otherwise receive every drybox alert as well, with no way to have one without the other. |
Temperature alerts stay quiet while an AMS is drying
Drying deliberately runs hotter than the alert threshold — 45°C for PLA, 65°C for PETG, up to 85°C on an AMS-HT, against a default threshold of 35°C. Left alone, a twelve-hour dry would send twelve notifications about a temperature you asked for.
Bambuddy holds the temperature alert back for the length of a cycle and through the cool-down that follows, using the drying state the printer reports. It starts alerting again as soon as the unit reads back at or below your threshold, so the quiet period matches how long the unit actually takes to cool rather than a fixed delay. Nothing to configure, and the suppression survives a restart.
Two deliberate exceptions. The humidity alert is unaffected — during drying that reading falling is the whole point. And a unit reporting a loss of thermal control still alerts, because that is exactly when you want to hear about it.
Print Queue Events
| Event | Default | Description |
|---|---|---|
| Job Added | Off | Job added to queue |
| Job Assigned | Off | Model-based job assigned to a printer |
| Job Started | Off | Queue job started printing |
| Job Waiting | On | Job waiting for filament (actionable) |
| Job Skipped | On | Job skipped due to previous print failure |
| Job Failed | On | Job failed to start (upload error, etc.) |
| Queue Complete | Off | All queued jobs finished |
Actionable Queue Notifications
The most important queue notifications (Waiting, Skipped, Failed) are enabled by default because they require user action - load the right filament, check why a print failed, etc.
Messages from Connected Apps
| Event | Default | Description |
|---|---|---|
| Messages from connected apps | Off | Messages another application sends through Bambuddy, e.g. Bambuddy Orders' "3 orders need you" |
An app sends its message to POST /api/v1/notifications/app-message; Bambuddy hands it to every enabled provider with this switch on. It goes through the same path as Bambuddy's own events: quiet hours, the daily digest and the notification log (listed with the event type app:<API key name>).
curl -X POST http://localhost:8000/api/v1/notifications/app-message \
  -H "X-API-Key: bb_your_key" \
  -H "Content-Type: application/json" \
  -d '{"title": "3 orders need you", "message": "#1004: print failed", "url": "http://orders.lan:8090/todo"}'
# => {"channels": 2}
- Who may send: an API key with the Send Notifications permission (API Keys), whose owner has
notifications:update; or a signed-in user withnotifications:update. - What is accepted: plain text; a title up to 120 characters, a message up to 2,000. The optional
urlmust be anhttporhttpsaddress and is added as the message's last line. - Limit: 20 messages a minute per key. More are refused with
429. - Where it arrives:
GET /api/v1/notifications/app-message/channelslists the providers that take app messages (names and types only), so an app can tell its user where its messages go.
Enable/disable each event per provider.
Quiet Hours
Suppress notifications during sleep:
- Enable Quiet Hours toggle
- Set Start Time (e.g., 22:00)
- Set End Time (e.g., 07:00)
Notifications during quiet hours are silently skipped.
Per-Printer Filtering
Limit notifications to specific printers:
- Open provider settings
- Find Printers section
- Select specific printers or "All"
Only events from selected printers trigger notifications.
Daily Digest
Batch notifications into a summary:
- Enable Daily Digest toggle
- Set Digest Time (e.g., 08:00)
How It Works
- Events are collected (not sent immediately)
- At digest time, one summary is sent
- Includes counts and details
Example Digest
Daily Print Summary (Dec 14)

✅ 3 prints completed
❌ 1 print failed
⏱️ Total time: 8h 45m
🧵 Filament used: 245g

Details:
- Benchy (2h 15m) ✅
- Phone Stand (45m) ✅
- Cable Clip (15m) ✅
- Prototype v3 (3h 30m) ❌
Message Templates
Customize notification messages:
Accessing Templates
- Go to Settings > Notifications
- Click Templates tab
- Select event type to edit
Variables
Insert dynamic content with {variable}:
Print Events:
{printer}- Printer name{filename}- Print filename{duration}- Print time{filament_grams}- Total filament used in grams (scaled by progress for failed/stopped prints){filament_details}- Per-filament breakdown (e.g., "PLA: 15.2g" or "PLA: 10.0g | PETG: 5.0g"){estimated_time}- Estimated duration (e.g., "1h 23m"){eta}- Wall-clock completion time (e.g., "15:53" or "3:53 PM"), respects your time format setting{progress}- Completion percentage (available for failed/stopped prints){reason}- Failure reason{finish_photo_url}- Camera snapshot URL (print_complete, print_failed, print_stopped). Email special-case (#1792): if your Email template references{finish_photo_url}in the body, the rendered URL also triggers an inline embed — the HTML part replaces the URL with the snapshot rendered inline at exactly that position, while the plain-text part keeps the URL as a clickable link. Place the variable WHERE you want the image to appear. If the template doesn't reference it, the email stays text-only — no surprise attachment.
Printer Events:
{printer}- Printer name{error_type}- HMS error type{error_detail}- Error description
First Layer Complete:
{printer}- Printer name{filename}- Print filename{total_layers}- Total layer count
Bed Cooled:
{printer}- Printer name{bed_temp}- Current bed temperature{threshold}- Configured threshold{filename}- Print filename
Printer Sensor Alert:
{printer}- Printer name{sensor}- Sensor display name{state}- State that triggered the alert (open,41.2 °C)
Storage Location Sensor Alert:
{location}- Storage location name (there is no{printer}here — the alert belongs to a location, not a machine){sensor}- Sensor display name{state}- State that triggered the alert (24.7 °C,43.6 %) — trimmed of trailing zeros, unlike the two-decimal form shown on the inventory page
Missing Spool Assignment:
{printer}- Printer name{missing_slots}- Comma-separated slot labels (e.g., "A1, A3"){missing_slot_details}- Per-slot breakdown with expected profile (e.g., "- A1: PLA Basic")
AMS Events:
{printer}- Printer name{slot}- AMS slot (e.g. "A1", "HT-A", "Ext-L"){remaining_percent}- Filament left{color}- Colour name of the spool (Low Filament only){humidity}- Humidity level{ams_label}- Which unit (e.g. "AMS-A"){threshold}- The configured threshold the reading is measured against{cycles}- Drying cycles that ended above the threshold (Auto-Drying Suspended only)
Outcome Confirmation:
{printer}- Printer name{filename}- Print filename{confirm_url}- Link that opens the outcome dialog for this print in Bambuddy (used by the default template){good_url}/{reject_url}- Single-use links that record Good or Reject after a confirmation click. Keep them out of channels that build link previews or scan links; see What a One-Tap Link Does{finish_photo_url}- Finish photo, when one was taken
Common:
{timestamp}- Event time{app_name}- "Bambuddy"
Reset to Default
Click reset to restore original template.
Finish Photos
A camera snapshot can reach your notification either as a link you click or as an image attached to the message itself. Which one you get depends on the channel, not on a setting — see the table below.
Both paths are gated on Settings > General > Archive Settings > Capture finish photo. With that off, no snapshot is taken and nothing is attached or linked.
Attached image
ntfy, Pushover, Telegram and Discord receive the photo as a real attachment whenever one was captured — you do not need {finish_photo_url} in the template for this, and no External URL is required, because the image bytes are uploaded with the message.
| Channel | Snapshot delivery |
|---|---|
| ntfy | Attached. If your ntfy server has attachments disabled, Bambuddy retries automatically and sends the text alone. |
| Pushover | Attached. |
| Telegram | Attached — sent as a photo with the message as its caption. |
| Discord | Attached and shown inline in the embed. |
| Webhook | Base64-encoded JPEG in the payload's image field (generic format only — the Slack format carries text alone). |
Inline, but only when the template references {finish_photo_url} — see below. | |
| Home Assistant, CallMeBot, Bark | Link only. Use {finish_photo_url} in the template. |
Attachments are capped at 2.5 MB. A larger snapshot is skipped and the message is sent as text — the reason is written to the log.
Snapshots are not limited to completed prints: Print Started, Print Progress, First Layer Complete and printer-error notifications capture a live frame at the moment they fire.
Linked URL
{finish_photo_url} is available on the print_complete, print_failed and print_stopped events, and needs a reachable server address:
- Go to Settings > Network
- Set External URL to your Bambuddy server's address (e.g.,
http://192.168.1.100:8000) - Edit your template to include
{finish_photo_url}
External URL Required
The External URL setting is required for the linked form to work. This is auto-detected from your browser when you first visit the Network settings page.
Example template:
Print completed!
Printer: {printer}
File: {filename}
Filament: {filament_details}
Photo: {finish_photo_url}
For Email, that same variable also switches the message to an inline embed — the photo is rendered at exactly the position you placed the variable. See the {finish_photo_url} entry under Variables for the details.
Testing
Always test before relying on notifications:
- Configure provider
- Click Send Test
- Verify you receive the message
- Check message formatting
Quick Disable
Quickly disable all notifications:
- Find the Quick Disable button
- Click to toggle all notifications off
- Click again to re-enable
Useful during maintenance or troubleshooting.
Tips
Start with ntfy
ntfy is the simplest setup - no account needed, just pick a topic.
Use Quiet Hours
Avoid middle-of-night alerts with quiet hours.
Multiple Providers
Set up multiple providers for redundancy.
Progress for Long Prints
Enable progress milestones for prints over a few hours.
Customize Templates
Personalize messages to include only info you need.
Test Regularly
Periodically test notifications to ensure they still work.
Bed Cooled Threshold
Configure the bed cooled temperature threshold in Settings > Notifications. Default is 35°C. The notification fires as soon as the printer reports the bed at or below the threshold — no timeout.
Plate Not Empty Bypasses Quiet Hours
Plate detection notifications are always sent immediately, even during quiet hours or when digest mode is enabled. This ensures you're alerted to potential issues before a print starts.
:material-account-bell: Per-User Email Notifications
When Advanced Authentication is enabled, individual users can receive email notifications for their own print jobs. This is separate from the provider-based notification system above — it sends emails directly to the user who submitted the print.
Requirements
- Advanced Authentication must be enabled
- SMTP must be configured
- "User Notifications" must be enabled in Settings → Notifications
- User must have an email address on their account
- User must have the
notifications:user_emailpermission (Administrators and Operators by default)
Supported Events
| Event | Description |
|---|---|
| Print Started | Your print job has begun |
| Print Completed | Your print job finished successfully |
| Print Failed | Your print job encountered an error |
| Print Stopped | Your print job was cancelled |
Setup
- Enable User Notifications in Settings → Notifications
- Click Notifications in the sidebar
- Toggle each event type on or off
- Click Save
See Authentication → Per-User Email Notifications for full details.