Print Queue
Queue and schedule prints with drag-and-drop ordering, timed starts, batch grouping, a Gantt timeline, and smart plug automation.
Every print Bambuddy starts now flows through the queue
File Manager prints, archive reprints, printer-card upload-and-print, and scheduled queue items all share the same code path. That means every print is visible on this page, attributable to the user that started it, deficit-checked against the filament you've loaded, and cancellable from one place — even when the dispatch is "ASAP" (immediate). No more "stealth prints" that bypassed the queue.
For admins: the immediate-print actions now require the queue:create permission alongside the existing printers:control. If you've granted printers:control via custom groups or API keys without queue:create, add it now or those actions will return 403. See Permissions.
Queue Overview
The Queue page has three tabs along the top:
| Tab | What it shows |
|---|---|
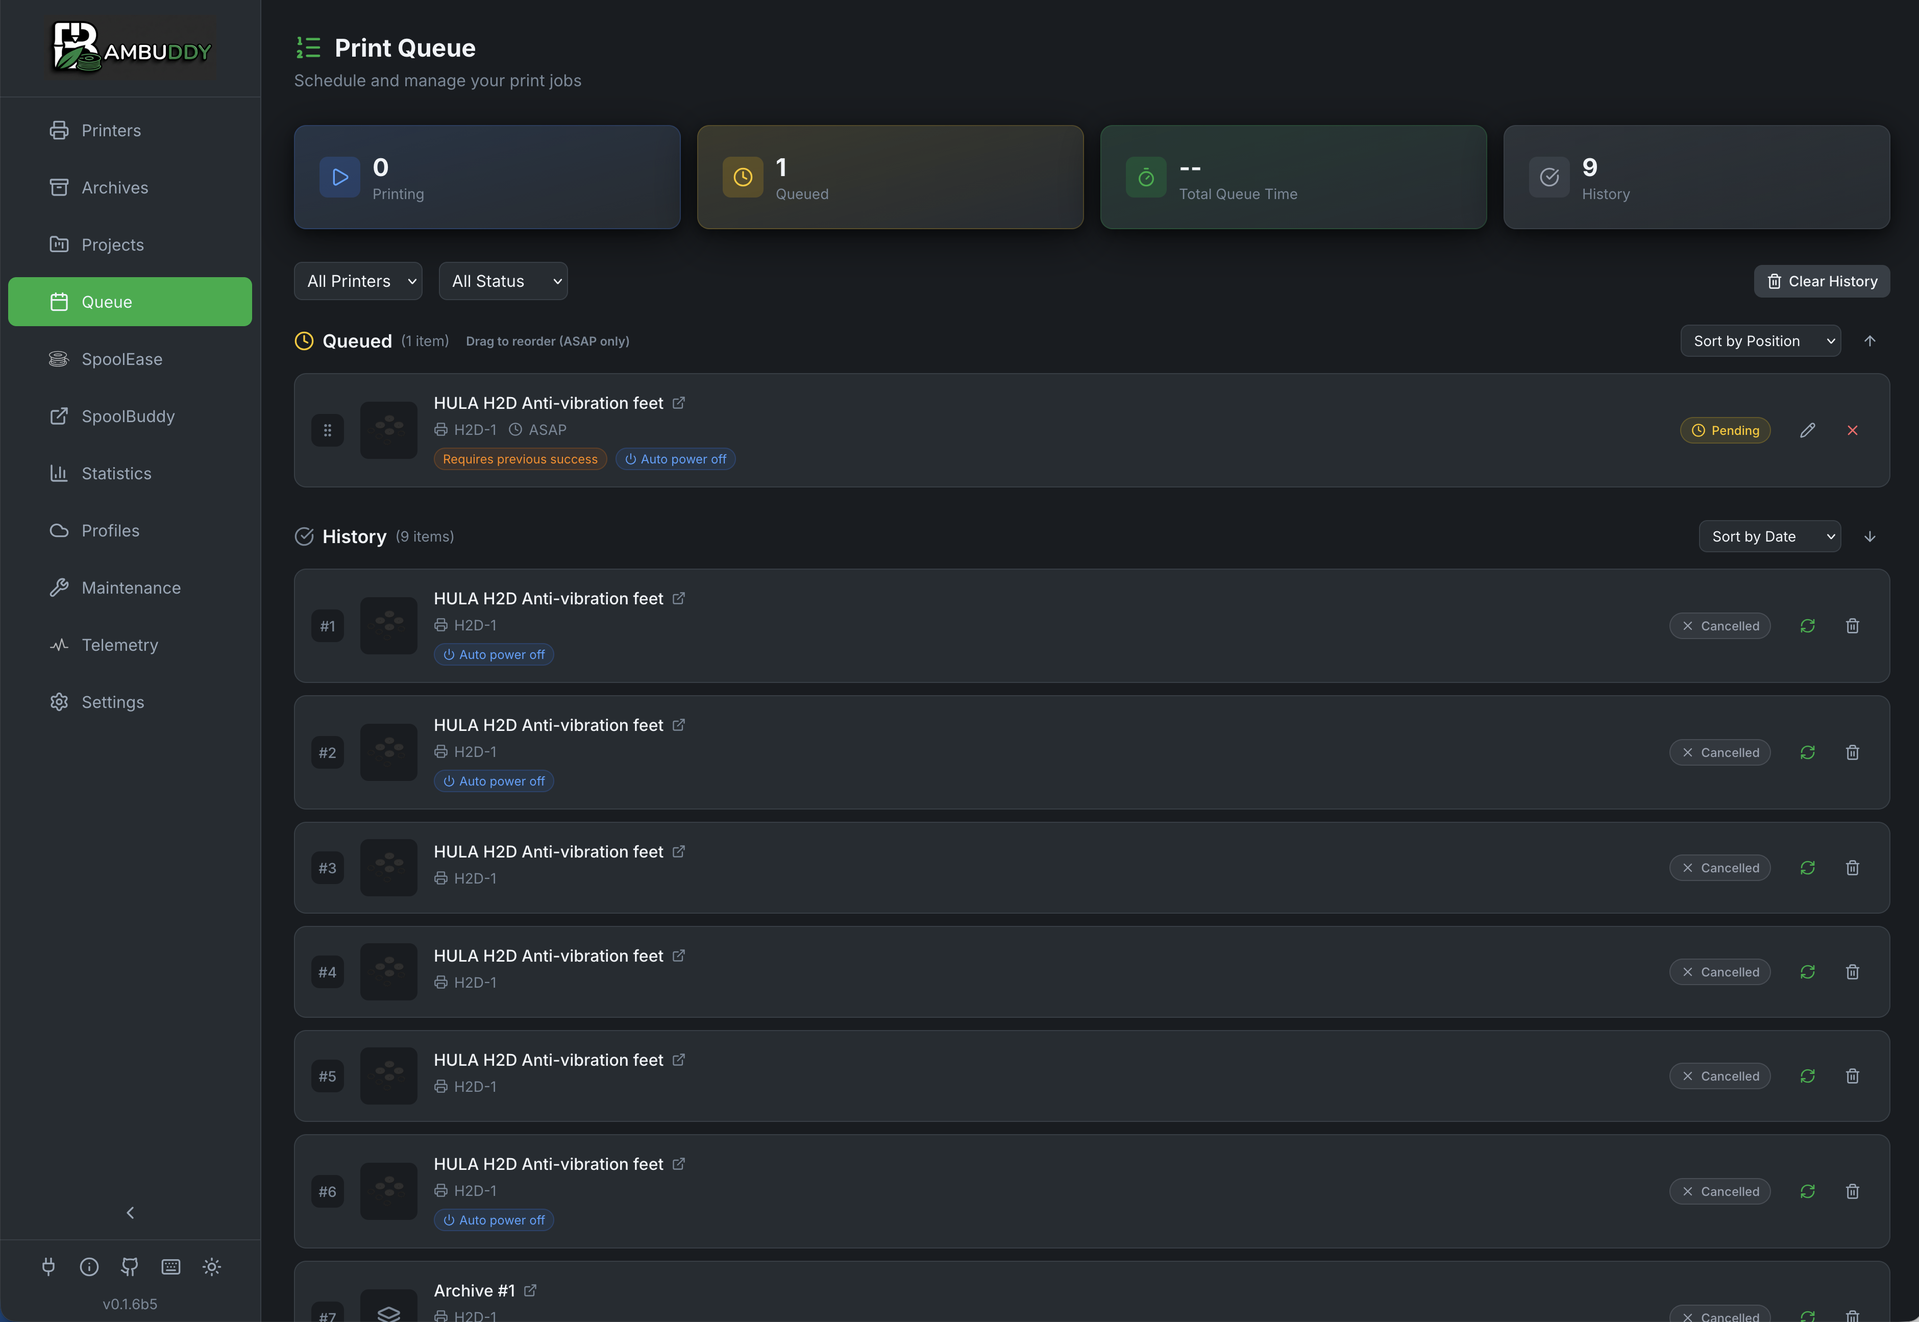
| Queue | The live print order — pending, scheduled, printing, and waiting items. Layout toggle switches between a flat list and per-printer section cards (each with aggregate item count, total time, and total filament weight). |
| History | Past prints in a responsive 1 / 2 / 3-column grid. Two-line rich rows with filament color swatch, weight, type, user attribution, and inline error message on failed / skipped rows. Hover any thumbnail to see the full image at 192×192 next to it. |
| Timeline | A Gantt swimlane — one row per printer (plus per target_model and unassigned) with bars positioned by start time and sized by duration. Live NOW marker; 24-hour rolling window with 12-hour step buttons. Only committed schedules are rendered (see Timeline View below). |
The active tab is remembered across reloads.
The Queue tab lets you:
- Queue prints from your archive, file manager, library, or virtual printer
- Group as batch — multi-plate prints auto-group; any 2+ selected items can be grouped manually
- Multi-drag — pick N items, the whole block moves together
- Schedule specific start times
- Automate with smart plug integration
SD Card Required
An SD card must be inserted in your printer for the print queue to work. Files are transferred to the printer's SD card when prints start.
Adding to Queue
From Archive
- Go to Archives page
- Click Print on the archive card
- Choose the target printer, plate, dispatch option, and any filament mapping
- Optionally configure filament mapping (see below)
- Print is added to queue
Quick Access
The Print button appears directly on archive cards for sliced files, opening the same print modal used throughout Bambuddy.
From File Manager
- Go to File Manager page
- Select sliced files (
.gcodeor.gcode.3mf) - Click Print in the toolbar or context menu
- Choose the target printer, plate, dispatch option, and any filament mapping
- Files are archived and queued automatically
From Queue Page
- Go to Queue page
- Click Print
- Browse and select an archive
- Choose the target printer, plate, dispatch option, and any filament mapping
- Submit the print
From Virtual Printer
When a virtual printer is set to Print Queue mode, prints sent from your slicer are automatically archived and added to the queue. The virtual printer's Auto-dispatch setting controls what happens next:
- Enabled (default): Incoming prints start automatically when a printer is available
- Disabled: Prints are added to the queue but require manual dispatch
AMS Filament Mapping
When adding multi-color prints to the queue, you can configure which AMS slot to use for each filament:
- Expand the Filament Mapping section
- View auto-matched filaments (type + color)
- Click any dropdown to manually select a different AMS slot
- Color names shown for easy identification (decoded from Bambu filament codes)
- Mapping is stored with the queued print
Dual-Nozzle Printers (H2D/H2D Pro):
On dual-nozzle printers, filament matching is nozzle-aware. Each filament requirement shows an L or R badge indicating which nozzle the slicer assigned it to. Auto-match prefers trays on the slicer-assigned nozzle via ams_extruder_map. Since 0.2.5 (#1722) the dropdown also shows trays on the other extruder so you can manually pick a cross-extruder slot when you've loaded the required filament there on purpose — the L/R badge stays as a hint, but it doesn't hide options. The printer's firmware decides at start-print whether the resulting ams_mapping is physically valid.
Stored Mappings
AMS mappings are saved when you add a print to the queue. When the print starts, Bambuddy uses your configured mapping instead of auto-matching again.
Prefer Lowest Remaining Filament:
When multiple AMS spools match the same type and color, the auto-matcher normally picks the first one by slot order. Enable Prefer lowest remaining filament in Settings → Filament to instead select the spool with the least filament remaining. This helps consume partial spools before starting new ones, avoiding a buildup of nearly-empty rolls.
- Applies to queue scheduling, print modal pre-selection, and multi-printer mapping
- Unknown remain values (e.g. external spools without sensors) are treated as full and sorted last
- The matching priority chain is unchanged (tray_info_idx > exact color > similar color > type-only) — sorting only affects which spool wins within the same tier
- Disabled by default to preserve existing behavior
Plate Selection (Multi-Plate 3MF)
For 3MF files with multiple plates:
- Click Edit on a queued item
- Scroll to Plate Selection section
- Browse plates with thumbnails and print times
- Click to select the plate to print
- Filament requirements update to show selected plate's filaments
Select Multiple Plates
When adding a multi-plate 3MF file to the queue, each plate has a checkbox for multi-select. Click individual plates to toggle them, or use the "Select All / Deselect All" button to quickly select every plate. Each selected plate is added as a separate queue entry (one per plate per selected printer), individually editable after creation. Multi-select is only available in add-to-queue mode — reprint and edit modes remain single-select.
Single Plate per Queue Item
Each queue item prints one plate. To print multiple plates from the same file, select multiple plates when adding to queue, or add the file multiple times and select different plates each time.
Print Options
Configure printer settings for each queued print:
- Click Edit on a queued item
- Expand Print Options section
- Toggle options as needed:
| Option | Description | Default |
|---|---|---|
| Bed Levelling | Auto-level bed before print | On |
| Flow Calibration | Calibrate flow before print | Off |
| Vibration Calibration | Reduce vibration artifacts | On |
| Layer Inspect | Enable AI first layer inspection | Off |
| Timelapse | Record timelapse video | Off |
| Use AMS | Use AMS system for filament | On |
Configurable Default Print Options
You can change the default values for print options so that every new print dialog starts with your preferred settings. Individual prints can still be overridden as needed.
- Go to Settings → Workflow
- Toggle defaults for each option:
| Setting | Description | Factory Default |
|---|---|---|
| Bed Levelling | Auto-level bed before print | On |
| Flow Calibration | Calibrate flow before print | Off |
| Vibration Calibration | Reduce vibration artifacts | On |
| First Layer Inspection | Enable AI first layer inspection | Off |
| Timelapse | Record timelapse video | Off |
These defaults apply to:
- The Print dialog
- All new queue items
Per-Print Override
Defaults are just starting values. You can still toggle any option on or off for each individual print before submitting.
Batch Grouping
Bambuddy groups related queue items into a single collapsible row with aggregate stats. Three ways to create a batch:
Auto-grouping: Multi-plate prints
When you queue multiple plates from one source 3MF in a single submission (multi-plate selection or model-based assignment to a single printer), Bambuddy automatically creates a batch named e.g. MyModel - 3 plates and assigns every queued plate to it.
Auto-grouping: Batch print quantity
- Open the Print dialog
- Set the Quantity field to the number of copies (default: 1)
- Submit — Bambuddy creates one queue item per copy, all in the same batch
Batch Behavior
- Every copy is inserted into the queue and handled by the scheduler
- ASAP copies are added at the top of the queue
- Queue copies are added at the end of the queue
- Schedule copies wait in the queue until their scheduled time
- Manual Start items stay staged until you release them
- Batch items appear on the queue page with a batch badge showing the group
- In direct print mode, the first copy prints immediately and the remaining copies are queued under the batch
- In queue/schedule mode, all copies are added to the queue together
- Combined with multi-printer selection, quantity applies per printer
Manual grouping: Group as batch
Pick any unrelated items and stitch them together as a batch:
- Select 2 or more pending items that are NOT already in a batch (checkboxes on the left of each row)
- The selection bar at the top of the queue gains a Group as batch action
- Click it — an empty batch is created, every selected item is assigned to it, and they collapse into one parent row
How a batch looks
- The batch parent row shows the source file name, aggregate item count, total estimated time, total filament weight, and a chevron to collapse / expand the children
- Children are indented under the parent with a cyan left border
- Inside an expanded batch, children remain individually draggable, but only within the batch (you can't drag a child out without ungrouping first)
- Per-batch collapse state is persisted in
localStorageso it survives reloads
Moving a batch in the queue
The batch parent row has its own drag handle (next to the collapse chevron). Grab it to reorder the entire group as one unit — the drop ghost shows the batch name and copy count, and every child item lands contiguously at the new position. Works while the batch is collapsed or expanded; collapsed batches no longer act as obstacles for adjacent items.
Ungroup
To break a batch back into individual items:
- Click the Ungroup action on the batch parent row
- All items the caller owns lose their batch association and become independent queue items again
- If no members remain, the batch row itself is deleted
You can also cancel an entire batch at once via the API (see API Access below).
History batches
Sibling history rows from the same batch collapse into one parent with status-rollup chips — e.g. 3 OK / 1 failed — and the latest activity timestamp. The chips link straight to the per-archive Print Log for the underlying file.
Shortest Job First (SJF)
Prioritize shorter print jobs so more jobs complete sooner.
Enabling SJF
- Go to the Queue page
- Click the SJF badge in the pending queue header (next to the sort dropdown)
- The badge turns green when active
How It Works
When SJF is enabled, the scheduler picks the shortest pending print for each printer instead of following FIFO order:
- Jumped items first — jobs that were previously skipped get top priority (starvation guard)
- Shortest duration next — among remaining items, the shortest print time wins
- Position as tiebreaker — equal-duration items use their original queue position
The queue page automatically reorders to show the scheduler's actual execution order when SJF is active.
Starvation Guard
Without protection, a long job could be postponed indefinitely as shorter jobs keep arriving. SJF includes an automatic fairness mechanism:
- When a shorter job jumps ahead of a longer one, the longer job is flagged as "jumped"
- A jumped job cannot be skipped again — it moves to the front of the queue on the next cycle
- This guarantees every job eventually prints, regardless of duration
Requirements
- Print duration must be available in the 3MF metadata (the
predictionfield inslice_info.config) - Items without a known print time are sorted last
- SJF applies independently per printer — each printer's queue is sorted separately
When to Use
SJF is ideal for print farms with a mix of short and long jobs. If your queue has ten 8-hour prints and someone adds a 20-minute job, SJF moves it to the front instead of waiting 80+ hours.
Auto-Print G-code Injection
Inject custom G-code at the start and/or end of prints for third-party bed-clearing systems like Farmloop, SwapMod, AutoClear, and Printflow 3D.
Configuring Snippets
- Go to Settings → Workflow
- Find the G-code Injection card
- For each printer model you use, enter:
- Start G-code — injected at the end of the printer's startup block, immediately before the first print move (matches where a slicer-side custom-start-gcode would land)
- End G-code — appended after the last line of the print's G-code
- Changes save automatically when you click out of the text field
Only printer models that you have connected appear in the list.
Placeholders
Snippets can reference values from the print's 3MF header using {name} placeholders. These are resolved per print, so a snippet that drops the head to the top of the model works regardless of how tall the model is:
| Placeholder | Resolves to | Example |
|---|---|---|
{max_layer_z} | Top-layer Z height of the print, in mm | G1 Z{max_layer_z} F600 → G1 Z16.00 F600 |
{max_print_height} | Alias for {max_layer_z} | same |
{total_layer_number} | Total number of layers | ; layers={total_layer_number} → ; layers=80 |
{total_layers} | Alias for {total_layer_number} | same |
{total_filament_weight} | Total filament weight in grams | ; weight={total_filament_weight}g → ; weight=36.55g |
{total_filament_length} | Total filament length in mm |
Beyond the named placeholders above:
- Any header key works — any key from the 3MF's
; HEADER_BLOCK_STARTblock is addressable directly (lowercased, spaces → underscores,[units]suffixes stripped) - Typos stay verbatim — unknown placeholders are left in the snippet as-is and a warning is logged; a typo never silently expands to an empty string
Always use {max_layer_z} for Z moves
Hard-coding G1 Z1 (or worse, leaving Z parameter empty) at end-of-print can damage prints, the print head, or push the AMS up off the printer when the model is taller than expected. Always use {max_layer_z} for end-of-print park moves.
Enabling Per Queue Item
- Open the Print dialog or edit an existing queue item
- Check Inject auto-print G-code
- Submit — the queue item shows a green G-code badge
When the scheduler dispatches the print:
- Looks up the G-code snippets for the target printer's model
- Resolves any
{placeholder}values from the 3MF header - Creates a temporary copy of the 3MF with the snippets injected at the anchors below
- Uploads the modified copy via FTP
- Cleans up the temporary file after upload
Where the snippets land:
| Snippet | Inserted at | Why there |
|---|---|---|
| Start | Just before ; MACHINE_START_GCODE_END | Runs after the printer's own startup block — the same spot a slicer-side custom-start-gcode would land |
| End | Just before ; EXECUTABLE_BLOCK_END | Keeps the snippet inside the executed block, so the printer doesn't ignore G-code placed after this marker |
Original Files Unchanged
Injection never touches your archive or library files — all of this happens on a throwaway temporary copy that exists only for the upload. On that copy, the plate's .gcode.md5 sidecar is recomputed to match the new bytes, so firmware that validates the checksum still accepts the file.
Enabling Per Virtual Printer
For Virtual Printer queue-mode setups you don't tick each queue item by hand — opt the whole VP in instead:
- Open the virtual printer card (queue mode)
- Turn on G-code injection (off by default)
From then on:
- Every Bambu Studio Send / VP upload to that VP is queued with injection enabled — the per-model start/end snippets fire without any per-item edits
- It's a no-op when no snippets are configured for the target printer's model
Quantity
When reprinting with quantity > 1, what happens depends on the Inject auto-print G-code checkbox:
- Unticked — the first copy prints immediately and the remaining copies are queued.
- Ticked — all copies are queued instead, so every one is injected by the scheduler. This matters for auto-eject: a directly-dispatched first copy would skip injection and stay stuck on the plate, blocking the copies queued behind it.
Re-tick injection when you repeat a print
The injection setting is not carried over when you reprint or re-queue a finished print — the Inject auto-print G-code checkbox starts unchecked every time. (Only editing a still-pending queue item keeps its existing setting.) So if you repeat a print straight from the queue and want injection again, remember to tick the box once more in the dialog.
Drag and Drop Ordering
Reorder prints in the queue:
- Hover over a queued print
- Grab the drag handle
- Drag to new position
- Release to reorder
Prints execute in order from top to bottom.
Multi-drag
Move several items as a contiguous block:
- Tick the checkboxes on 2 or more pending items
- Grab the drag handle on any one of the selected items
- A +N ghost follows the cursor showing how many items are moving
- Release at the target position — the whole selection lands as a contiguous block in selection order
Multi-drag works across batches and unrelated items; the batch parent stays with its children (a batched child can only be moved within its batch, see Batch Grouping).
Scheduling
Immediate Prints
Add to queue without a schedule - prints start when:
- Printer is idle
- Previous prints complete
- No scheduled prints are pending
Scheduled Prints
Set a specific start time:
- Click Schedule on queued print
- Choose date and time
- Print starts at scheduled time
Schedule Priority
Scheduled prints take priority:
- Check for scheduled prints at scheduled time
- If none, check immediate queue
- Start next print
Queue (Staged Prints)
Stage prints without automatic scheduling:
- In the Print dialog, select Queue
- Print shows with purple Staged badge
- Print won't start automatically
- Click Play button to release to queue
Use Queue Only to:
- Prepare print batches before activating
- Stage prints across multiple printers
- Review and approve before printing starts
- Build a queue without immediate execution
Batch Workflow
Add multiple prints with Manual Start, review the order, then release them one by one or all at once.
Preheat & Heat Soak
Heat the bed (and the chamber, on supported printers) and hold at temperature before each queued print starts. Useful for engineering filaments — PA, ABS, PC, PETG-CF — where adhesion and warp depend on a warm chamber.
Bambuddy waits between the FTP upload and the start_print command, so the heat-soak runs while the printer is otherwise idle rather than burning print time. M191 (wait-for-chamber-temp) is silently ignored by Bambu firmware, so slicer-side "wait for chamber" lines in start G-code do not work — orchestrating this from the queue side is the only place it works.
Global defaults
Settings → Workflow → Queue & Dispatch → Preheat & Heat Soak card.
| Setting | Default | Range | Purpose |
|---|---|---|---|
| Enable preheat & soak | Off | — | Default for new queue items. Per-print override flips the decision per item — see below. |
| Per-filament chamber target (°C) | per-type defaults | 0–60 each | Map of filament type → chamber temperature. Bambuddy picks the max across the loaded AMS slots at dispatch time, so a mixed PA + PLA load chooses PA's 50, not PLA's 0. PLA-only prints derive 0 and skip the chamber phase automatically. |
| Max wait (seconds) | 900 | 60–3600 | Hard cap on the chamber warm-up phase before falling through to the soak phase. Stops a cold room from stalling the queue indefinitely. |
| Soak (seconds) | 300 | 0–1800 | Hold time at temperature after the chamber reaches the target (or max-wait elapses). 0 = no soak. |
The bed target is read from the print file's bed_temperature metadata — no manual override. Prints whose file has no parseable bed temperature skip the preheat stage entirely and start immediately.
Bundled per-filament defaults
| Filament | Chamber °C | Notes |
|---|---|---|
| PLA, PETG, TPU, PVA | 0 | No chamber preheat needed; warm chamber can hurt PLA. |
| PETG-CF | 40 | Modest warm-up improves layer adhesion. |
| ABS, ASA | 45 | Warm-up reduces warping on enclosed printers. |
| PA, PC, PC-FR | 50 | Engineering filaments — chamber warmth is load-bearing. |
| PA-CF | 55 | Carbon-filled nylon prefers a hotter chamber than plain PA. |
| Other / unmapped | 0 | Default fallback for filament types not in the map. |
Edit any row to retune for your local conditions; the Reset button reverts to these bundled values.
Per-print override
The Print Options panel in any print / queue-edit dialog has a Preheat & Heat Soak sub-section:
| Override | When to use |
|---|---|
| Inherit (default) | Use the global master toggle. The most common case. |
| On | Force preheat for this print even when the global is off — useful for a one-off ABS print on an otherwise PLA-only farm. |
| Off | Force preheat off for this print even when the global is on — useful for a quick PLA test or a print where you've already pre-warmed the printer manually. |
The Chamber target override field (shown when override ≠ Off) accepts an explicit °C target that bypasses the per-filament map. Leave blank to use the per-filament derivation. Setting it to 0 explicitly disables the chamber phase for this print while keeping the bed phase + soak timer active.
Per-printer behaviour
Bambu printers have three distinct hardware tiers for chamber heat, and the preheat stage branches on the connected printer's model:
| Printer | Chamber sensor | Chamber heater | What happens |
|---|---|---|---|
| H2C, H2D, H2D Pro, H2S, X2D | yes | yes (with cooling/heating airduct) | The airduct flap is flipped to match the resolved chamber target (heating for engineering filaments, cooling for PLA-style prints) before M141 is dispatched. Then M141 fires, the stage waits for the chamber sensor to reach the target (within 2 °C) or for max-wait to elapse, then soaks. |
| X1E | yes | yes (no airduct flap) | M141 is dispatched directly — X1E has the chamber heater but no flap toggle, the warm-air recirculation is fixed. Same wait + soak logic as the H-series. |
| X1C | yes | no | No M141 (it has no effect — these printers cannot actively heat the chamber). The bed is the only heat source; the stage polls the chamber sensor and considers the phase satisfied when the sensor reaches the target via bed radiation. Radiant warm-up on a cold X1C to ABS-friendly temps is 20–30 min — the max-wait cap is a hard ceiling, the stage falls through to soak when it elapses. |
| P2S | yes | no (but has cooling/heating airduct) | Same as X1C — bed radiation only, no M141. The airduct flap is still flipped to match the chamber target so the right airflow is in place during the radiant warm-up + soak. |
| P1S, P1P, A1, A1 Mini | no | no | No chamber sensor exists on these models — the chamber_temper MQTT field they report is meaningless and is ignored. The stage heats the bed and runs the soak timer; the soak duration is the only control that matters for these printers. |
Airduct flap (H2C / H2D / H2D Pro / H2S / X2D / P2S)
These printers have a motorised airduct flap with two positions: cooling (open exhaust, vents heat — right for PLA / PETG / TPU) and heating (closed exhaust, recirculates warm air — right for ABS / ASA / PC / PA / PETG-CF). Bambu's firmware does NOT auto-switch the flap when M141 fires; whatever mode you (or the printer's own start-G-code from a previous print) left it in, it stays.
The preheat stage flips the flap before dispatching M141, based on the resolved chamber target:
| Chamber target | Flap moves to | Why |
|---|---|---|
| > 0 (any engineering filament) | heating | Otherwise the open exhaust actively vents the heat M141 is trying to produce; the chamber crawls toward target and often never converges. |
| 0 (PLA-only print, or per-item override disables chamber) | cooling | Otherwise a previously-warm flap stuck in heating mode recirculates ABS-leftover heat through a PLA print, causing under-extrusion and pillow defects. |
The flap is only moved when its current state differs from the desired state — no MQTT chatter or unnecessary flap-motor cycling when it's already where it needs to be. After the print finishes, Bambuddy leaves the flap where the preheat set it (the print itself wants the same airflow); the next preheat decision flips it for the next print.
What you'll see in the queue
While the preheat stage is running:
- The queue item shows as In Progress (the dispatch is committed; this is the printer's pre-print phase, not a queue stall).
- The printer card's bed (and chamber, if active) temperatures rise toward target.
- The print itself starts the moment the soak timer elapses — no second click needed.
If the printer drops MQTT during the wait, the stage exits gracefully and the normal upload + start path still fires (best-effort: a printer that goes offline mid-soak should not turn a queue item into a failed print).
Tips
- Keep the soak short for printers in the chamber sensor only tier (X1C / P2S): the bed warms the chamber slowly, so most of your "real" soak time is already happening during the max-wait phase. 300 s on top is usually plenty.
- For printers with an active chamber heater (H2 series, X2D, X1E), the chamber reaches target in a few minutes; treat the soak as the actual heat-soak interval. ABS prefers 10–15 min (600–900 s) of soak after target.
- For printers with no chamber sensor (P1S etc.), there's no way to verify chamber temp, so soak is your only lever. Try 600 s for ABS, less for PETG.
Smart Plug Automation
Combine with smart plugs for full automation:
Auto Power On
When a queued print is ready:
- Bambuddy checks if printer is on
- If off and smart plug configured, powers on
- Waits for printer to boot
- Starts the print
Auto Power Off
After print completes:
- Print completes
- Cooldown period (configurable)
- Check if more prints queued
- If no more prints, power off
Configuration
- Go to Settings > Smart Plugs
- Configure plug for printer
- Enable Auto Power On and Auto Power Off
- Set cooldown temperature and time
Queue Status
Print States
| State | Icon | Description |
|---|---|---|
| Queued | Waiting in queue | |
| Scheduled | Waiting for scheduled time | |
| Starting | Sending to printer | |
| Printing | Currently printing | |
| Completed | Successfully finished | |
| Failed | Print failed | |
| Cancelled | Manually removed |
Queue Card
Each queued print shows:
- Thumbnail (shows the selected plate's thumbnail for multi-plate files)
- Print name
- Target printer
- Estimated duration
- Scheduled time (if set)
- Status
- Added by (username who queued the print, when authentication is enabled)
Timeline View
The Timeline tab renders the upcoming and active fleet as a true Gantt swimlane — one horizontal row per printer (plus per target_model and unassigned) with jobs as colored bars positioned by start time and sized by duration. It's a forecast view: if a lane is empty, that printer / model has nothing committed to render.
Layout
- One swimlane per active printer, plus extra lanes for each active
target_model(e.g. "Any X1C") and an "unassigned" lane - Hour axis at the top with ticks every 2 hours
- NOW marker — a vertical red line at the current time
- 24-hour rolling window starting at the current hour, with ±12h step buttons to scroll forward or back
- Bar colors: blue for currently printing, cyan for queued-within-batch, green for queued
- Idle stretches show diagonal stripes so it's clear when a printer is free
What renders
The Timeline only shows committed schedules so it reads as a real forecast:
| Status | Renders? | Why |
|---|---|---|
| Currently printing | Yes | Real start time, real progress |
Pending with scheduled_time | Yes | Explicit start commitment |
| Pending ASAP, behind an active print | Yes | Chained ETA from current print's end time |
| Pending ASAP, on an idle printer | No | No commitment to render — would be misleading |
Staged ("Queue Only" / manual_start) | No | Awaiting manual release |
Waiting (waiting_reason set) | No | Blocked on filament / printer state |
A lane is dropped entirely if it has no active print AND no scheduled item that meets these criteria. If the whole fleet is idle with nothing committed, the tab shows an empty-state notice instead of a misleading blank Gantt.
Per-bar tooltip
Hover any bar to see:
- Source file name
- Start — scheduled or estimated
- End — computed from print duration
- Progress percentage (for actively printing items)
- Batch name (for batched items)
Interactions
- Click a queued bar to edit the item
- Click an active bar to open the printer card
ETA chaining
Pending ASAP items behind an active print chain after it: if Printer 1 finishes at 14:00 and has two queued items of 1h each, the second renders at 14:00–15:00 and the third at 15:00–16:00. Scheduled items respect their fixed time and may leave gaps in the lane.
Managing Queue
Remove from Queue
- Click the X on any queued print
- Confirm removal
- Print is removed (not deleted from archive)
Deleting the archive removes its queue items too
The reverse path also cleans up: deleting an archive in the Archives page removes every queue item linked to that archive (with a confirmation showing how many will go). Deletion is blocked when any of those items is currently printing. See Linked queue items are removed with the archive in the Archives docs.
Cancel Running Print
- Find the currently printing item
- Click Cancel
- Print stops on printer
- Marked as cancelled in queue
Clear Plate Confirmation
When a print finishes or fails and more items are queued for the same printer, the next print does not start automatically. Instead, the printer card shows a "Clear Plate & Start Next" button.
- Remove the finished print from the build plate
- Click Clear Plate & Start Next on the printer card
- The scheduler starts the next queued print within 30 seconds
This prevents prints from starting on a dirty plate. The button appears whenever the printer is awaiting a plate-clear acknowledgment — which is set when a print finishes or fails and cleared only when you tap the button or the scheduler dispatches the next job.
Survives restarts and Auto Off power cycles
The pending confirmation is persisted to the database, so it survives Bambuddy restarts and printer power cycles. This matters specifically when Auto Off cuts printer power at the end of a print and the smart plug immediately re-powers the printer because another job is queued: the printer boots back into Idle with no memory of the previous finish, but the confirmation prompt still shows and the queue stays gated until you acknowledge — no more auto-starting on an uncleared plate after a power cycle.
Disabling Plate-Clear Confirmation
If you want the scheduler to start the next queued print automatically without waiting for manual plate-clear confirmation:
- Go to Settings → Queue
- Disable Require plate-clear confirmation
- The scheduler will now start queued prints automatically on printers with finished or failed jobs
This is useful for print farms or workflows where you trust the plate is cleared between prints (e.g., with auto-eject or flexible build plates). The default is enabled, preserving the existing behavior of requiring manual confirmation.
Use With Caution
Disabling plate-clear confirmation means prints may start on a plate with a previous print still attached. Only disable this if you have a workflow that ensures the plate is cleared between prints.
Permission Required
The Clear Plate button requires the Printers Control permission when authentication is enabled.
Clear Queue
Remove all queued prints:
- Click Clear Queue button
- Confirm action
- All pending prints removed
Running Print Not Affected
Clear Queue only removes pending prints, not the currently active print.
Bulk Editing
Edit multiple queued items at once:
Selecting Items
- Look for checkboxes on pending queue items
- Click checkbox to select/deselect individual items
- Use Select All / Deselect All in the toolbar
Bulk Edit Modal
When items are selected, click Edit Selected to open the bulk edit modal:
| Setting | Description |
|---|---|
| Printer | Reassign all selected items to a different printer |
| Staged | Toggle manual start (Queue Only) mode |
| Auto power off | Toggle auto power off after print |
| Require previous success | Toggle conditional execution |
| Bed levelling | Toggle bed levelling |
| Flow calibration | Toggle flow calibration |
| Vibration calibration | Toggle vibration calibration |
| First layer inspection | Toggle AI inspection |
| Timelapse | Toggle timelapse recording |
| Use AMS | Toggle AMS usage |
Tri-State Toggles
Each setting has three states:
| State | Symbol | Meaning |
|---|---|---|
| Unchanged | — | Don't modify this setting |
| Off | Off | Set to disabled on all selected items |
| On | On | Set to enabled on all selected items |
Only settings you explicitly change are applied - other settings remain as they were.
Bulk Cancel
Click Cancel Selected to cancel all selected pending items at once.
Quick Reassignment
Use bulk edit to quickly reassign multiple prints to a different printer when one becomes unavailable.
Multi-Printer Queue
Queue prints across multiple printers:
Per-Printer Queues
Each printer has its own queue:
- Filter by printer to see specific queue
- Prints wait for their assigned printer
- Different printers can print simultaneously
Multi-Printer Selection
Send the same print to multiple printers at once:
- Open the Print modal
- Select multiple printers using checkboxes
- Use Select all / Clear buttons for quick selection
- Configure filament mapping (default applies to all printers, or use per-printer mapping)
- Click submit to send to all printers
Print Farms
Multi-printer selection is ideal for print farms. Use the default mapping for printers with identical filament configurations, or enable per-printer mapping for mixed setups.
Staggered Batch Start
When sending a print to multiple printers, you can stagger the starts to avoid power spikes from simultaneous bed heating — especially useful for larger farms (10+ printers).
Staggering is available in the Print dialog whenever multiple printers are selected.
- Select multiple printers in the Print dialog
- A Stagger printer starts checkbox appears automatically when multiple printers are selected
- Enable the checkbox, then set the Group size (how many printers start at once) and Interval (minutes between groups)
- A preview shows the schedule: e.g., "6 printers → 3 groups of 2, starting every 5 min (total: 10 min)"
- Submit — the first group starts immediately (ASAP) or at the scheduled time, subsequent groups start at computed intervals
| Setting | Description | Default |
|---|---|---|
| Group size | Number of printers to start simultaneously | 2 |
| Interval | Minutes between each group starting | 5 min |
Default values can be configured in Settings → Queue → Staggered Start and overridden per batch in the Print dialog.
How It Works
Staggering is implemented using the scheduled_time field on queue items. The first group starts ASAP or at the selected scheduled time, while subsequent groups get computed future timestamps. The scheduler skips items whose scheduled time has not arrived yet.
Power Management
Combine staggered starts with smart plug auto-off for full power management: stagger prevents peak draw at start, auto-off cuts idle power at finish.
Per-Printer AMS Mapping
When multiple printers are selected, you can configure filament slot mapping individually for each printer:
- Select multiple printers
- Under each printer, check Custom mapping to enable per-printer configuration
- The mapping section expands showing:
- Required filaments with color indicators
- Dropdown to select AMS slot for each requirement
- Match status: exact, type-only, missing
- Click Auto to auto-configure using RFID data
- Click Re-read to refresh the printer's loaded filaments
| Control | Description |
|---|---|
| Custom mapping checkbox | Enable per-printer slot configuration |
| Auto button | Auto-match filaments using RFID data |
| Re-read button | Refresh loaded filaments from printer |
| Match indicator | Shows (X/Y matched) status |
Default Expanded
Go to Settings → Filament and enable Expand custom mapping by default to automatically expand per-printer mapping for all printers when multi-selecting.
Auto-Configure
The Auto button reads RFID data from loaded spools and matches them to required filaments by type and color. It prioritizes exact matches, then similar colors, then type-only matches.
Choosing a Printer
When adding to queue:
- Select one or more target printers
- Prints join each printer's queue
- Different archives can go to different printers
Load Balancing
Manually distribute prints:
- Add long prints to less-used printers
- Queue time-sensitive prints on fastest printer
- Keep specific materials on specific printers
- Use multi-printer selection for batch production
Model-Based Queue Assignment
Queue prints to "any printer of matching model" for automatic load balancing across identical printers.
How It Works
- When you add a print to the queue, select Any [Model] instead of a specific printer
- Optionally select a Location to further filter available printers (e.g., "Any X1C in Workshop")
- Bambuddy extracts the printer model from the sliced 3MF file (e.g., "X1C", "P1S")
- The scheduler automatically assigns the print to the first idle printer of that model (and location, if specified)
- If filament validation is enabled, it only assigns to printers with the required filaments loaded
Adding Model-Based Queue Items
- Open the Print modal
- In the printer selection, choose Any X1C, Any P1S, etc.
- Optionally select a Location from the dropdown to filter by printer location
- Configure other options as usual
- Submit - the print joins the queue without a specific printer
Location Filtering
When you have multiple printers of the same model in different locations:
- Choose Any [Model] for the printer
- Select a Location from the dropdown (shows all locations from your printers)
- The scheduler only considers printers at that location
- Queue items show the target location (e.g., "Any X1C - Workshop")
Filtering Queue by Location
On the Queue page, use the Location dropdown filter to view only jobs for a specific location.
Filament Validation
When a model-based queue item has required filaments:
- Scheduler checks each printer of the matching model
- Only printers with all required filament types loaded (in AMS or external spool) are considered
- Jobs wait until a compatible printer becomes available
- The Waiting status (purple badge) shows why a job is waiting
Filament Override
When using model-based assignment, you can override the filament colors and types from the original 3MF file:
- Select Any [Model] for the printer
- The Filament Override section appears showing each filament slot from the sliced file
- For each slot, a dropdown shows all compatible filaments loaded across printers of the selected model
- Select an override to change the color or type for that slot
- Click the reset button to revert to the original 3MF value
The scheduler uses the overridden values when matching filaments:
- Color preference: Printers with exact color matches for your overrides are preferred
- Type filtering: Only filaments of the same type are shown in the dropdown (e.g., PLA slots only show PLA)
- Nozzle-aware (auto-match): On dual-nozzle printers (H2D), the scheduler prefers filaments on the slicer-assigned extruder when matching. The manual override dropdown shows slots on either extruder so you can pick cross-extruder when intentional — the firmware validates the final mapping at start-print.
Use Case
You sliced a model in black PLA but want to print it in white PLA instead. Rather than re-slicing, override the filament color in the queue and the scheduler will find a printer with white PLA loaded.
Waiting Status
Model-based queue items show detailed status:
| Status | Description |
|---|---|
| Pending | Ready to start, waiting for idle printer |
| Waiting | Blocked - shows reason (e.g., "Waiting for filament: Printer1 (needs PLA)") |
| Printing | Assigned to printer and running |
The waiting reason tells you exactly what's needed:
- Waiting for filament: Which printers are missing which filament types
- Busy: Which printers are currently printing
- Offline: Which printers are disconnected
Compatibility Warnings
When queuing to a specific printer that doesn't match the sliced model:
- A warning shows "File was sliced for X1C, but printing on P1S"
- This helps avoid issues from mismatched print profiles
Print Farm Load Balancing
Model-based assignment is ideal for print farms with multiple identical printers. Queue prints to "Any X1C" and let Bambuddy distribute work automatically.
Queue Notifications
Get notified about queue events. Configure these in Settings → Notifications under "Print Queue":
| Event | Default | Description |
|---|---|---|
| Job Added | Off | Job added to queue |
| Job Assigned | Off | Model-based job assigned to a printer |
| Job Started | Off | Queue job started printing |
| Job Waiting | On | Job waiting for filament (actionable) |
| Job Skipped | On | Job skipped due to previous print failure |
| Job Failed | On | Job failed to start (upload error, etc.) |
| Queue Complete | Off | All queued jobs finished |
Actionable Notifications
The most important notifications (Waiting, Skipped, Failed) are enabled by default because they require user action. Enable others based on your monitoring needs.
Queue History
The History tab shows completed, failed, cancelled, and skipped prints in a responsive 1 / 2 / 3-column grid that adapts to viewport width, so a long history uses available horizontal space instead of one row per line.
What each history row shows
- Status icon and colored left border (green for completed, red for failed, orange for skipped, grey for cancelled)
- Source file name and small thumbnail
- Relative time (e.g. "2h ago"), with the absolute timestamp on hover
- Filament color swatch + weight + type when known
- User attribution — who started the print (when authentication is enabled)
- Print duration
- Inline error message on failed / skipped rows, so you don't need to expand the row to see why it failed
- Re-queue and Remove actions
Thumbnail hover preview
Hover any small thumbnail to pop out a 192×192 preview next to it. Desktop only; touch devices skip this affordance.
Batch parents in history
Sibling rows from the same batch collapse into one parent row with status-rollup chips (e.g. 3 OK / 1 failed) and the latest activity timestamp. Click the parent to expand and see each child individually.
History helps you:
- Track throughput
- Identify patterns
- Debug issues
API Access
Manage queue programmatically:
# Add to queue (accepts an optional batch_id to attach to an existing batch)
POST /api/v1/queue

# Get queue status
GET /api/v1/queue

# Remove from queue
DELETE /api/v1/queue/{id}

# List all batches
GET /api/v1/queue/batches

# Get a batch
GET /api/v1/queue/batches/{batch_id}

# Create a batch — empty, or with existing pending item_ids to group manually
POST /api/v1/queue/batches

# Ungroup a batch — clear batch_id from every owned member; delete the batch row when empty
POST /api/v1/queue/batches/{batch_id}/ungroup

# Cancel a batch
DELETE /api/v1/queue/batches/{batch_id}
See API Reference for details.
Background Print Dispatch
When the scheduler starts a queued print, the FTP upload and print-start command run in the background. The UI responds immediately and you can continue browsing while the file transfers.
Progress Tracking
A persistent toast notification shows real-time dispatch progress:
- Upload progress bar for each active job
- Status badges: Dispatched → Processing → Completed / Failed / Cancelled
- Cancel button to abort an in-progress upload (cleans up partial files on the printer)
- Batch progress (e.g., "⅔ complete") when dispatching to multiple printers
How It Works
- You click Print and Bambuddy creates queue item(s) through
POST /api/v1/queue/ - When a queue item is ready, the scheduler creates a dispatch job
- The background dispatcher picks up the job and starts the FTP upload
- Progress updates stream to all connected clients via WebSocket
- After upload completes, the dispatcher sends the print-start command to the printer
- If you cancel mid-upload, the partial file is deleted from the printer's SD card
Per-Printer Queuing
Each printer can only have one active dispatch at a time. If you send a second print to the same printer, it waits until the first completes. Different printers run concurrently.
Tips
Overnight Prints
Schedule longer prints to start overnight - wake up to finished prints!
Smart Plug Combo
Combine scheduling with auto power-off for hands-free operation.
Queue Batch Jobs
Queue multiple small prints for efficient batch production.
Priority Management
Move urgent prints to the top of the queue with drag-and-drop.
Estimated Times
Check estimated durations when scheduling to avoid printer conflicts.
Auto-Drying Between Prints
Enable queue auto-drying to automatically dry filament during idle gaps between scheduled prints. For printers without scheduled prints, ambient drying keeps filament dry on any idle printer automatically. Multi-material setups can configure a per-filament humidity threshold so Nylon, PLA, and ASA each trigger drying at their own level.