Sensors
Bambuddy can bind read-only Home Assistant sensors — a door contact, a thermometer, a humidity/battery sensor — to either a printer or a storage location. Both work the same way: pick an entity, optionally set an alert condition, and the reading shows up where it's relevant, with alerts and notifications on top.
Printer Sensors
Sensors are things you read: an enclosure door contact, a chamber thermometer, a smoke detector. Bind them to a printer and their state appears on that printer's card.
Sensors use the same Home Assistant URL and token as Smart Plugs, so if plugs already work there is nothing else to set up. If Home Assistant is not connected yet, the sensor dialog says so and the entity list stays empty until it is.
Adding a Sensor
- Go to Settings > Sensors
- Under Home Assistant Sensors (Printers), click Add Sensor
- Pick the printer
- Pick the entity — the list offers every
binary_sensorplus thesensorentities that carry a reading - Give it a display name (prefilled from Home Assistant's friendly name)
- Optionally set an alert condition
- Save
Supported entities:
| Domain | Example | Shown as |
|---|---|---|
binary_sensor | binary_sensor.enclosure_door | Open / Closed |
binary_sensor | binary_sensor.workshop_smoke | Detected / Clear |
sensor | sensor.enclosure_temp | 41.2 °C |
sensor | sensor.workshop_humidity | 48 % |
The wording follows Home Assistant's own device class, so a door reads "Open" rather than "On". Entities with no device class fall back to On / Off.
Alert Conditions
An alert condition is what "needs attention" means for that sensor:
- Binary sensors — alert when the sensor is on, or when it is off. A door contact alerts when open; a "fan running" contact alerts when it stops.
- Numeric sensors — alert above a value, below a value, or both.
A sensor with no alert condition is display-only, which is the default.
When a sensor is alerting, its pill on the printer card turns red, and two further options become available.
Notify on Alert
Sends a notification the moment the sensor enters its alert state. Enable Printer Sensor Alert on the notification provider in Settings > Notifications as well — the per-sensor switch decides which sensors speak, the provider decides where.
The notification fires on the transition into the alert state, not repeatedly while it lasts, and a sensor that drops off the network and comes back while still alerting does not re-announce itself.
Hold Prints While Alerting
Holds queued jobs for that printer while the sensor is alerting — the reason this feature exists, for the enclosure door you meant to shut before starting a print from your phone.
A hold, never a failure
Held jobs stay in the queue with a reason you can read on the Queue page ("Waiting on Enclosure Door") and start by themselves as soon as the sensor clears. Nothing is cancelled.
For a job queued as "Any \<model>", a held printer is simply passed over: the job runs on a sibling printer whose sensors are clear rather than waiting.
Home Assistant must be reachable
A sensor Bambuddy cannot read holds nothing and alerts on nothing. If Home Assistant is down, the queue keeps running as though the interlock were not configured — a printer farm that stops because an unrelated service went offline would be worse than the problem being guarded against.
Polling
Sensors are read every 15 seconds, and the printer cards serve that cached reading, so the cost to Home Assistant does not grow with the number of browser tabs you have open.
Storage Location Sensors
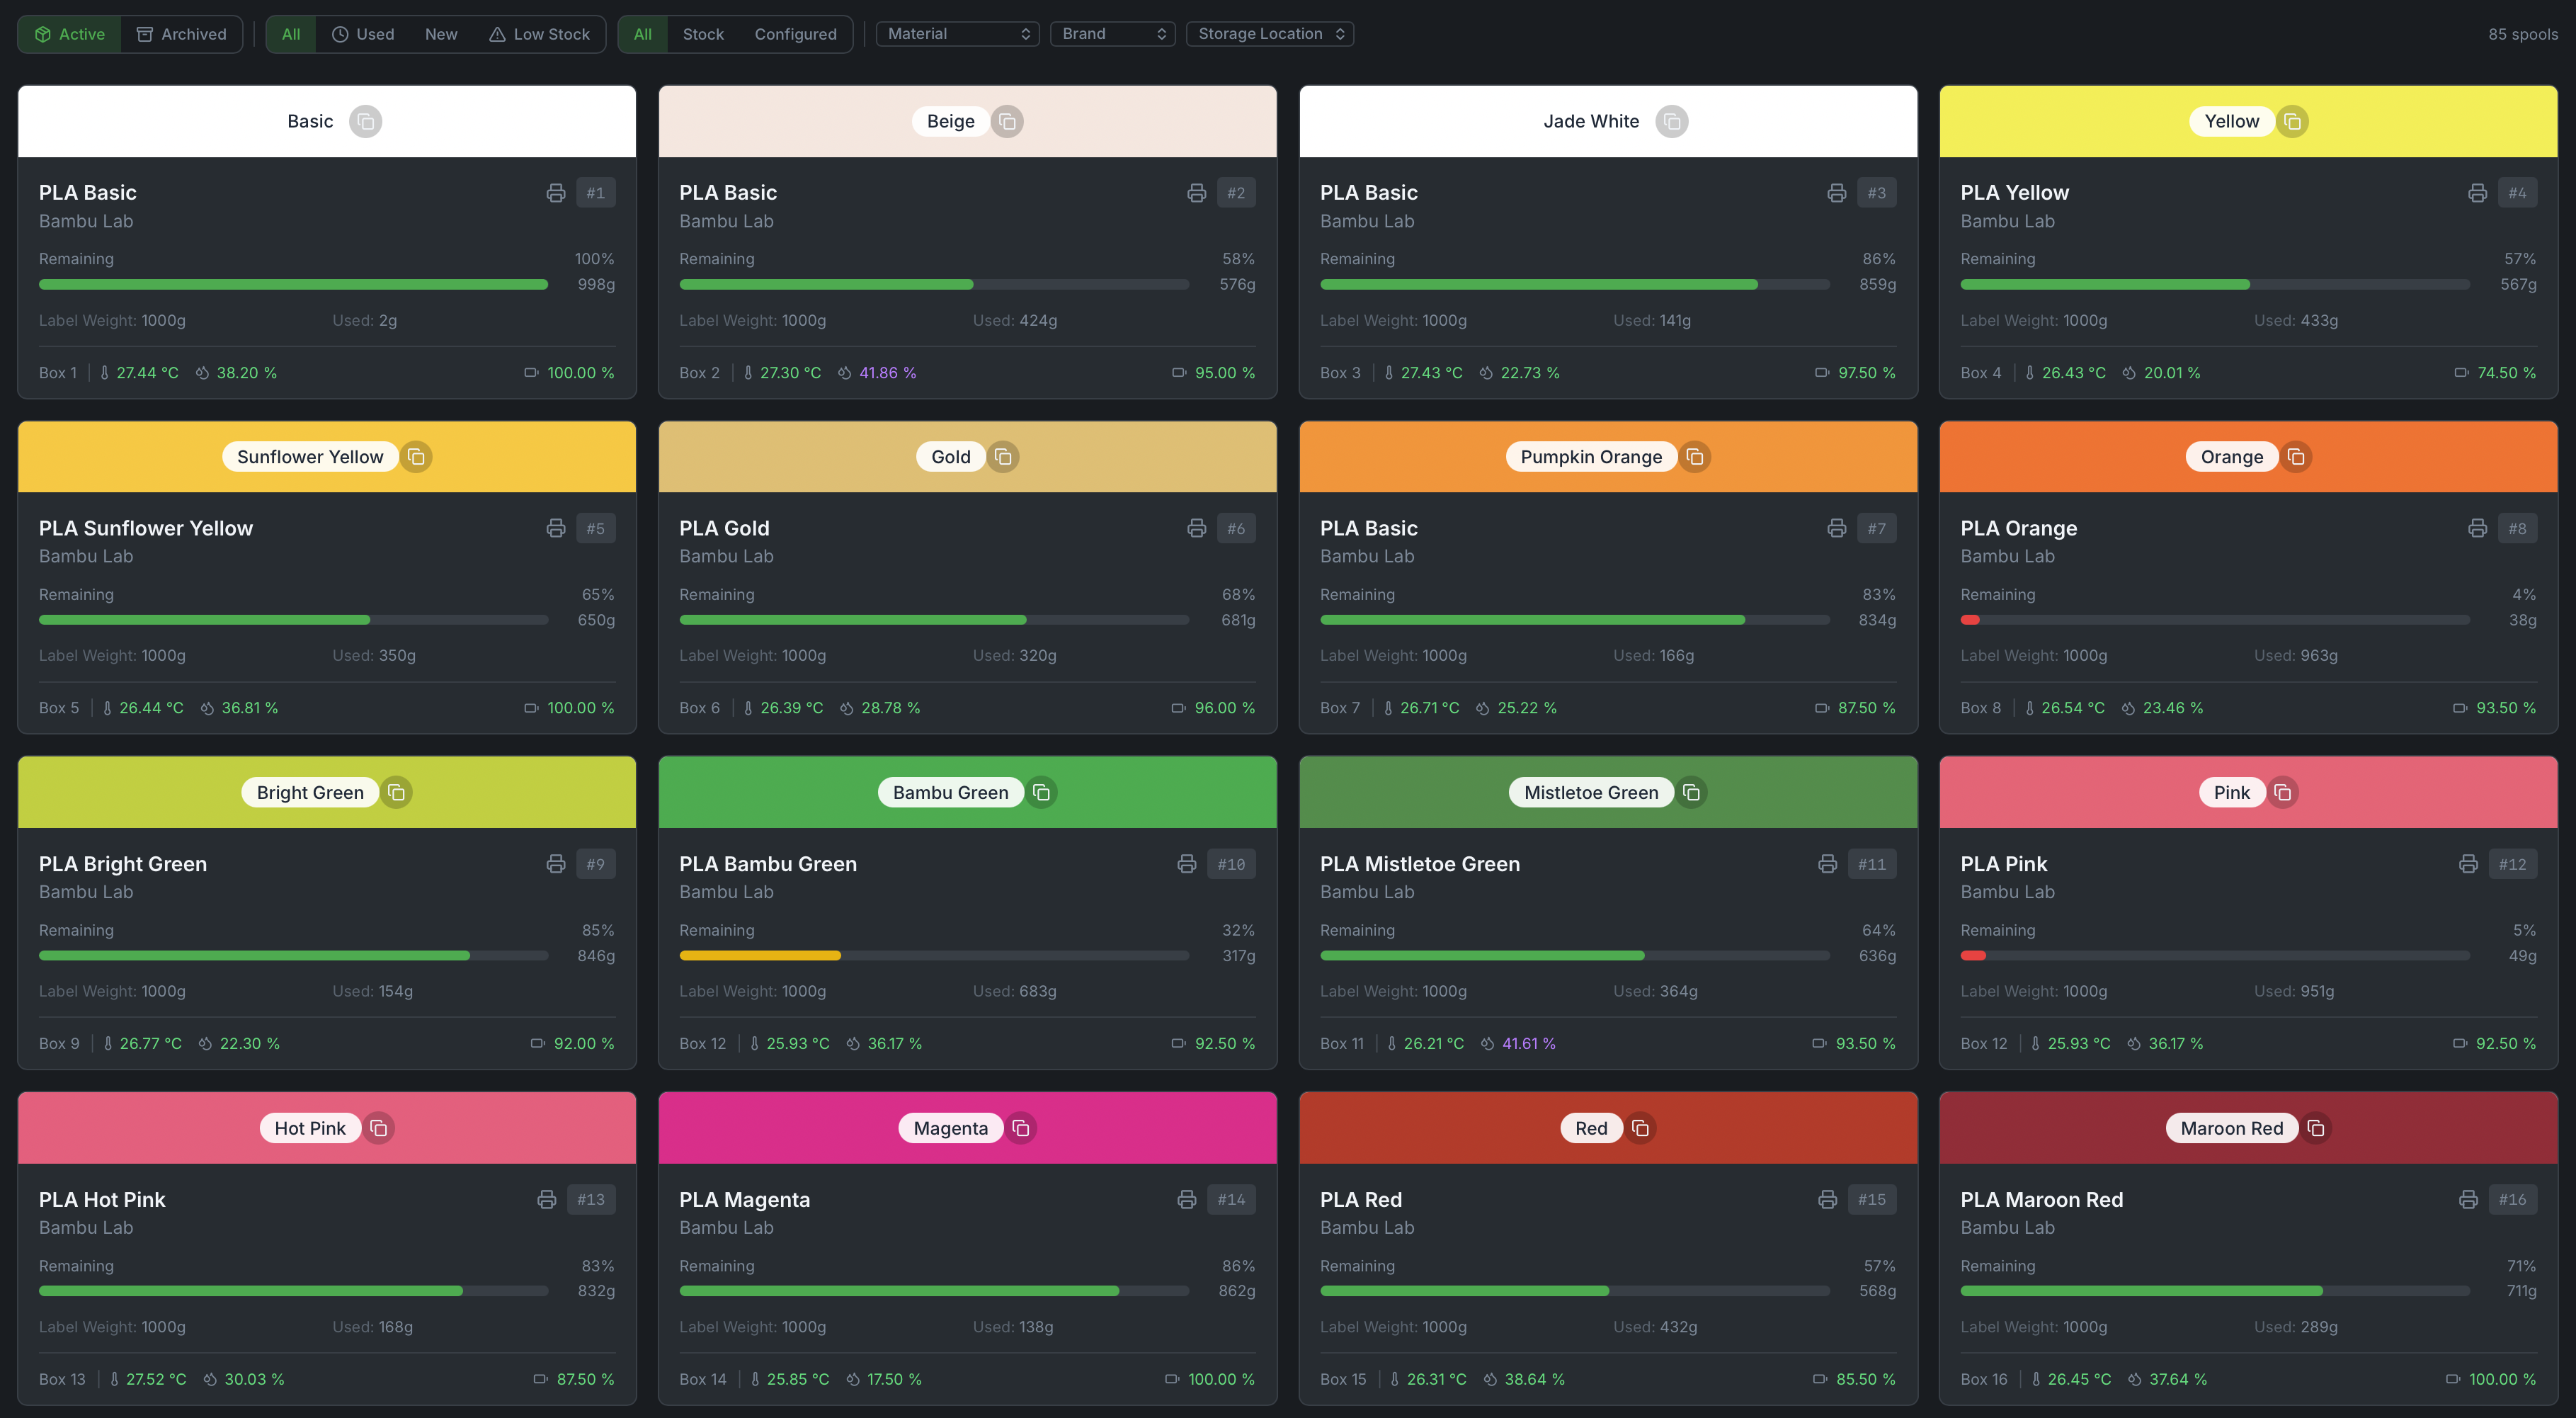
Bind a Home Assistant temperature, humidity, or battery sensor to a storage location — a drybox, a bin, a shelf — and its reading shows up on the filament card and in the inventory table for every spool stored there. This works much like Printer Sensors above — bind an entity, set an alert condition, get a notification when it trips — with two deliberate differences. The entity list is narrower: only temperature, humidity and battery entities are offered, where a printer will take any sensor. And there is no Hold Prints While Alerting: a location is not a machine, so there is no queue to hold, and a humid drybox is something to be told about rather than something that should stop a printer which may not even be using it.
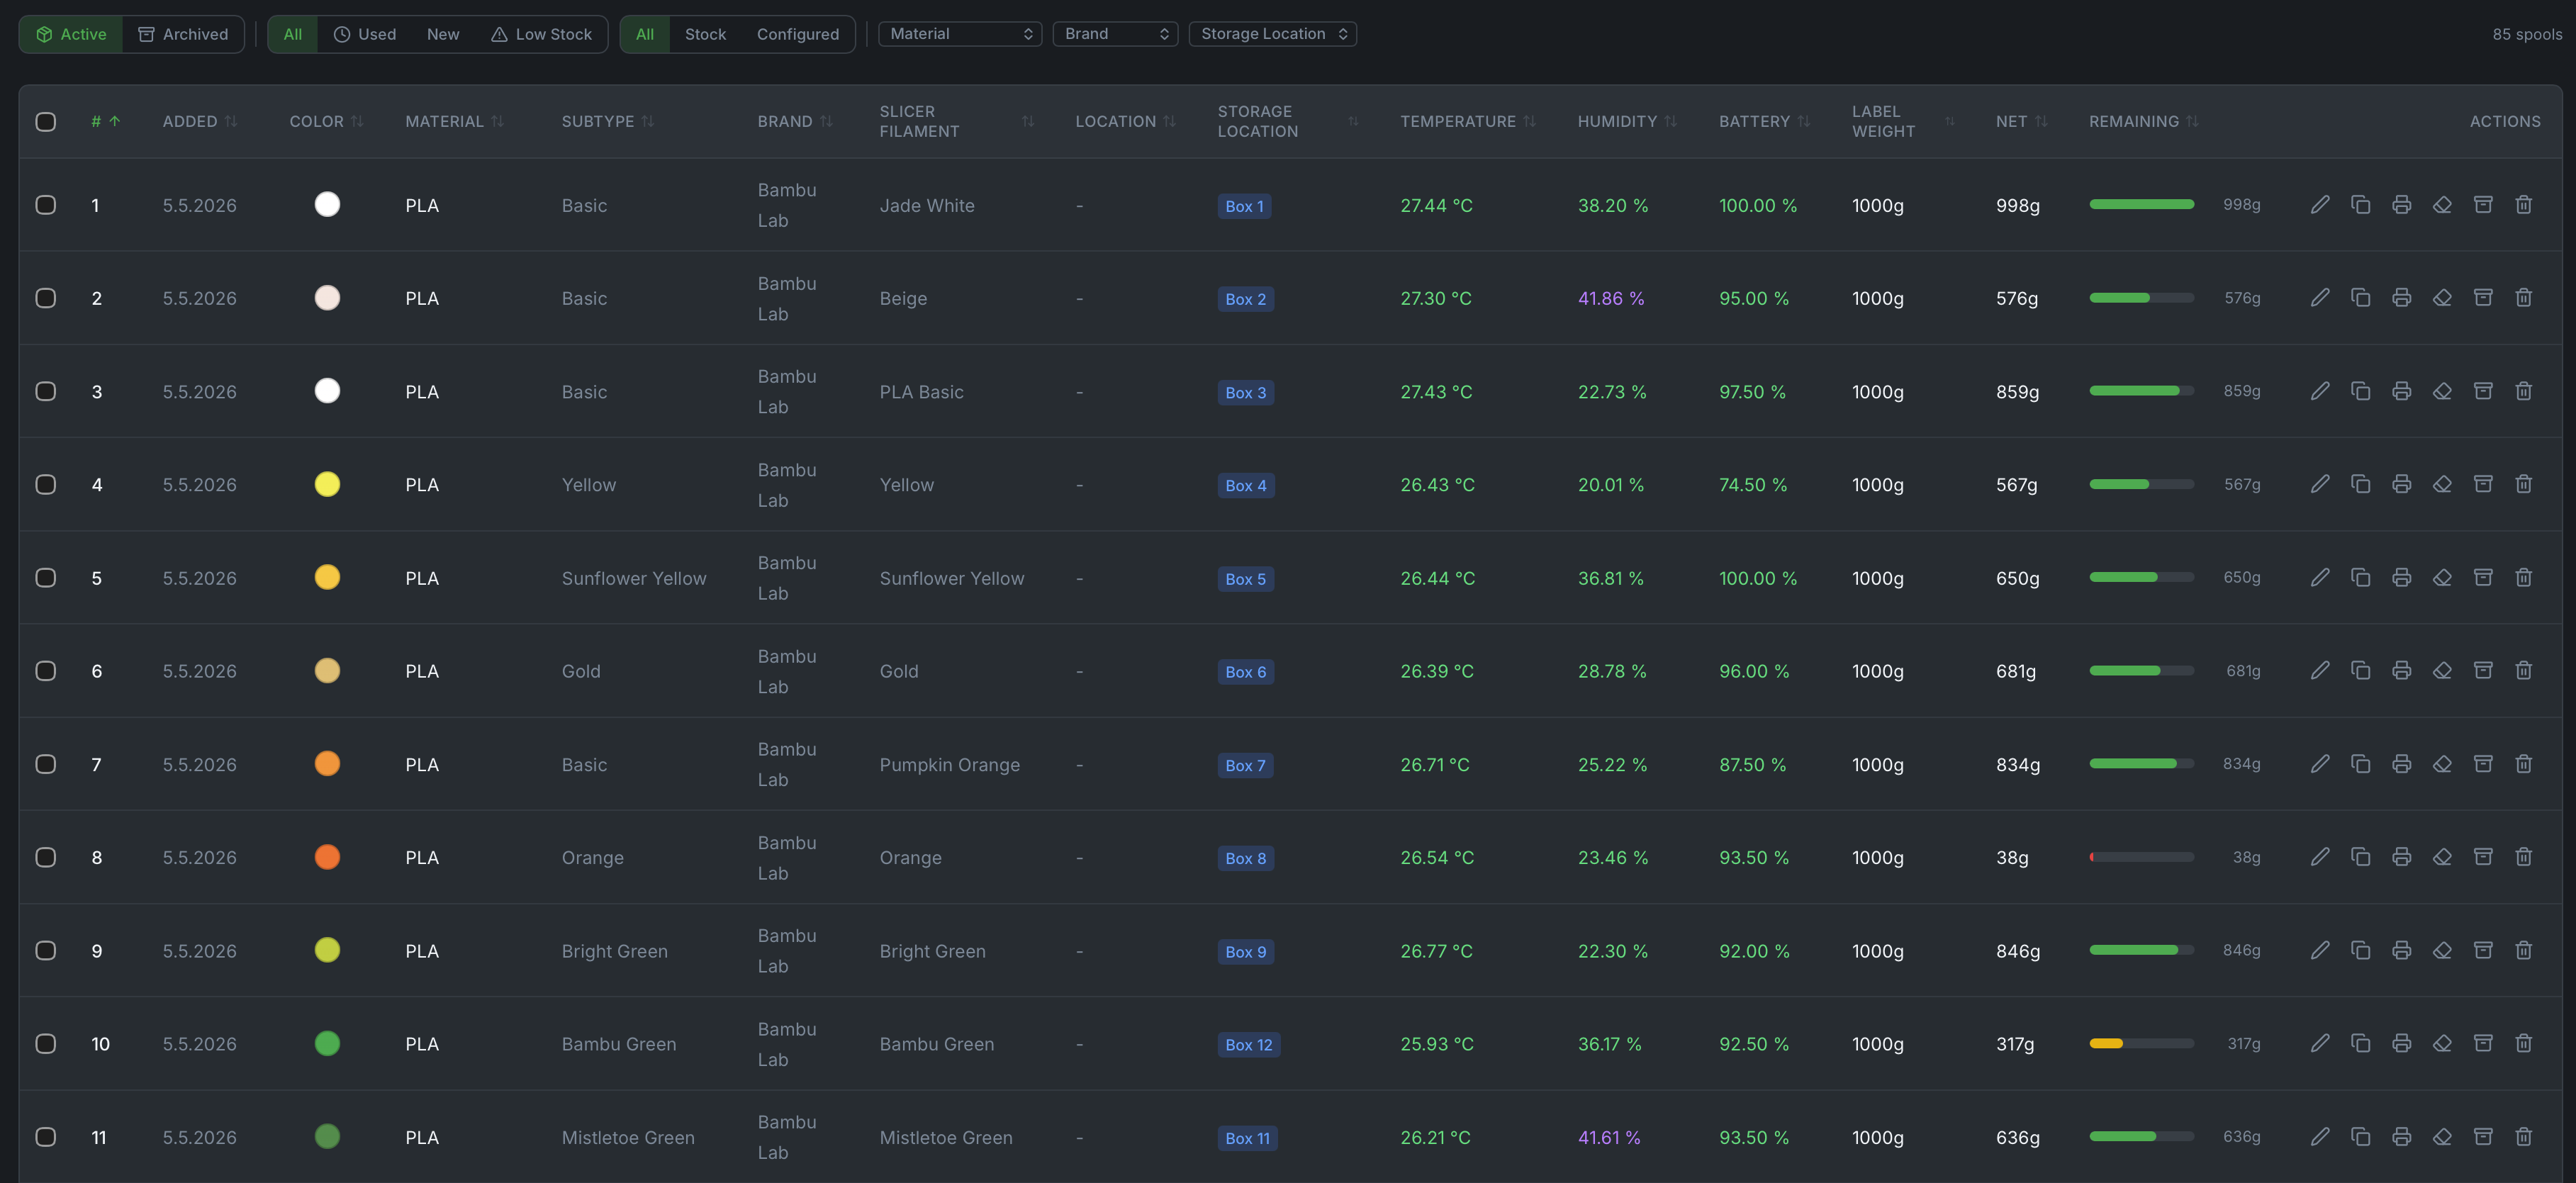
The inventory table gains sortable Temperature, Humidity, and Battery columns, colorized the same way as the filament card:
Adding a Sensor
- Go to Settings > Sensors
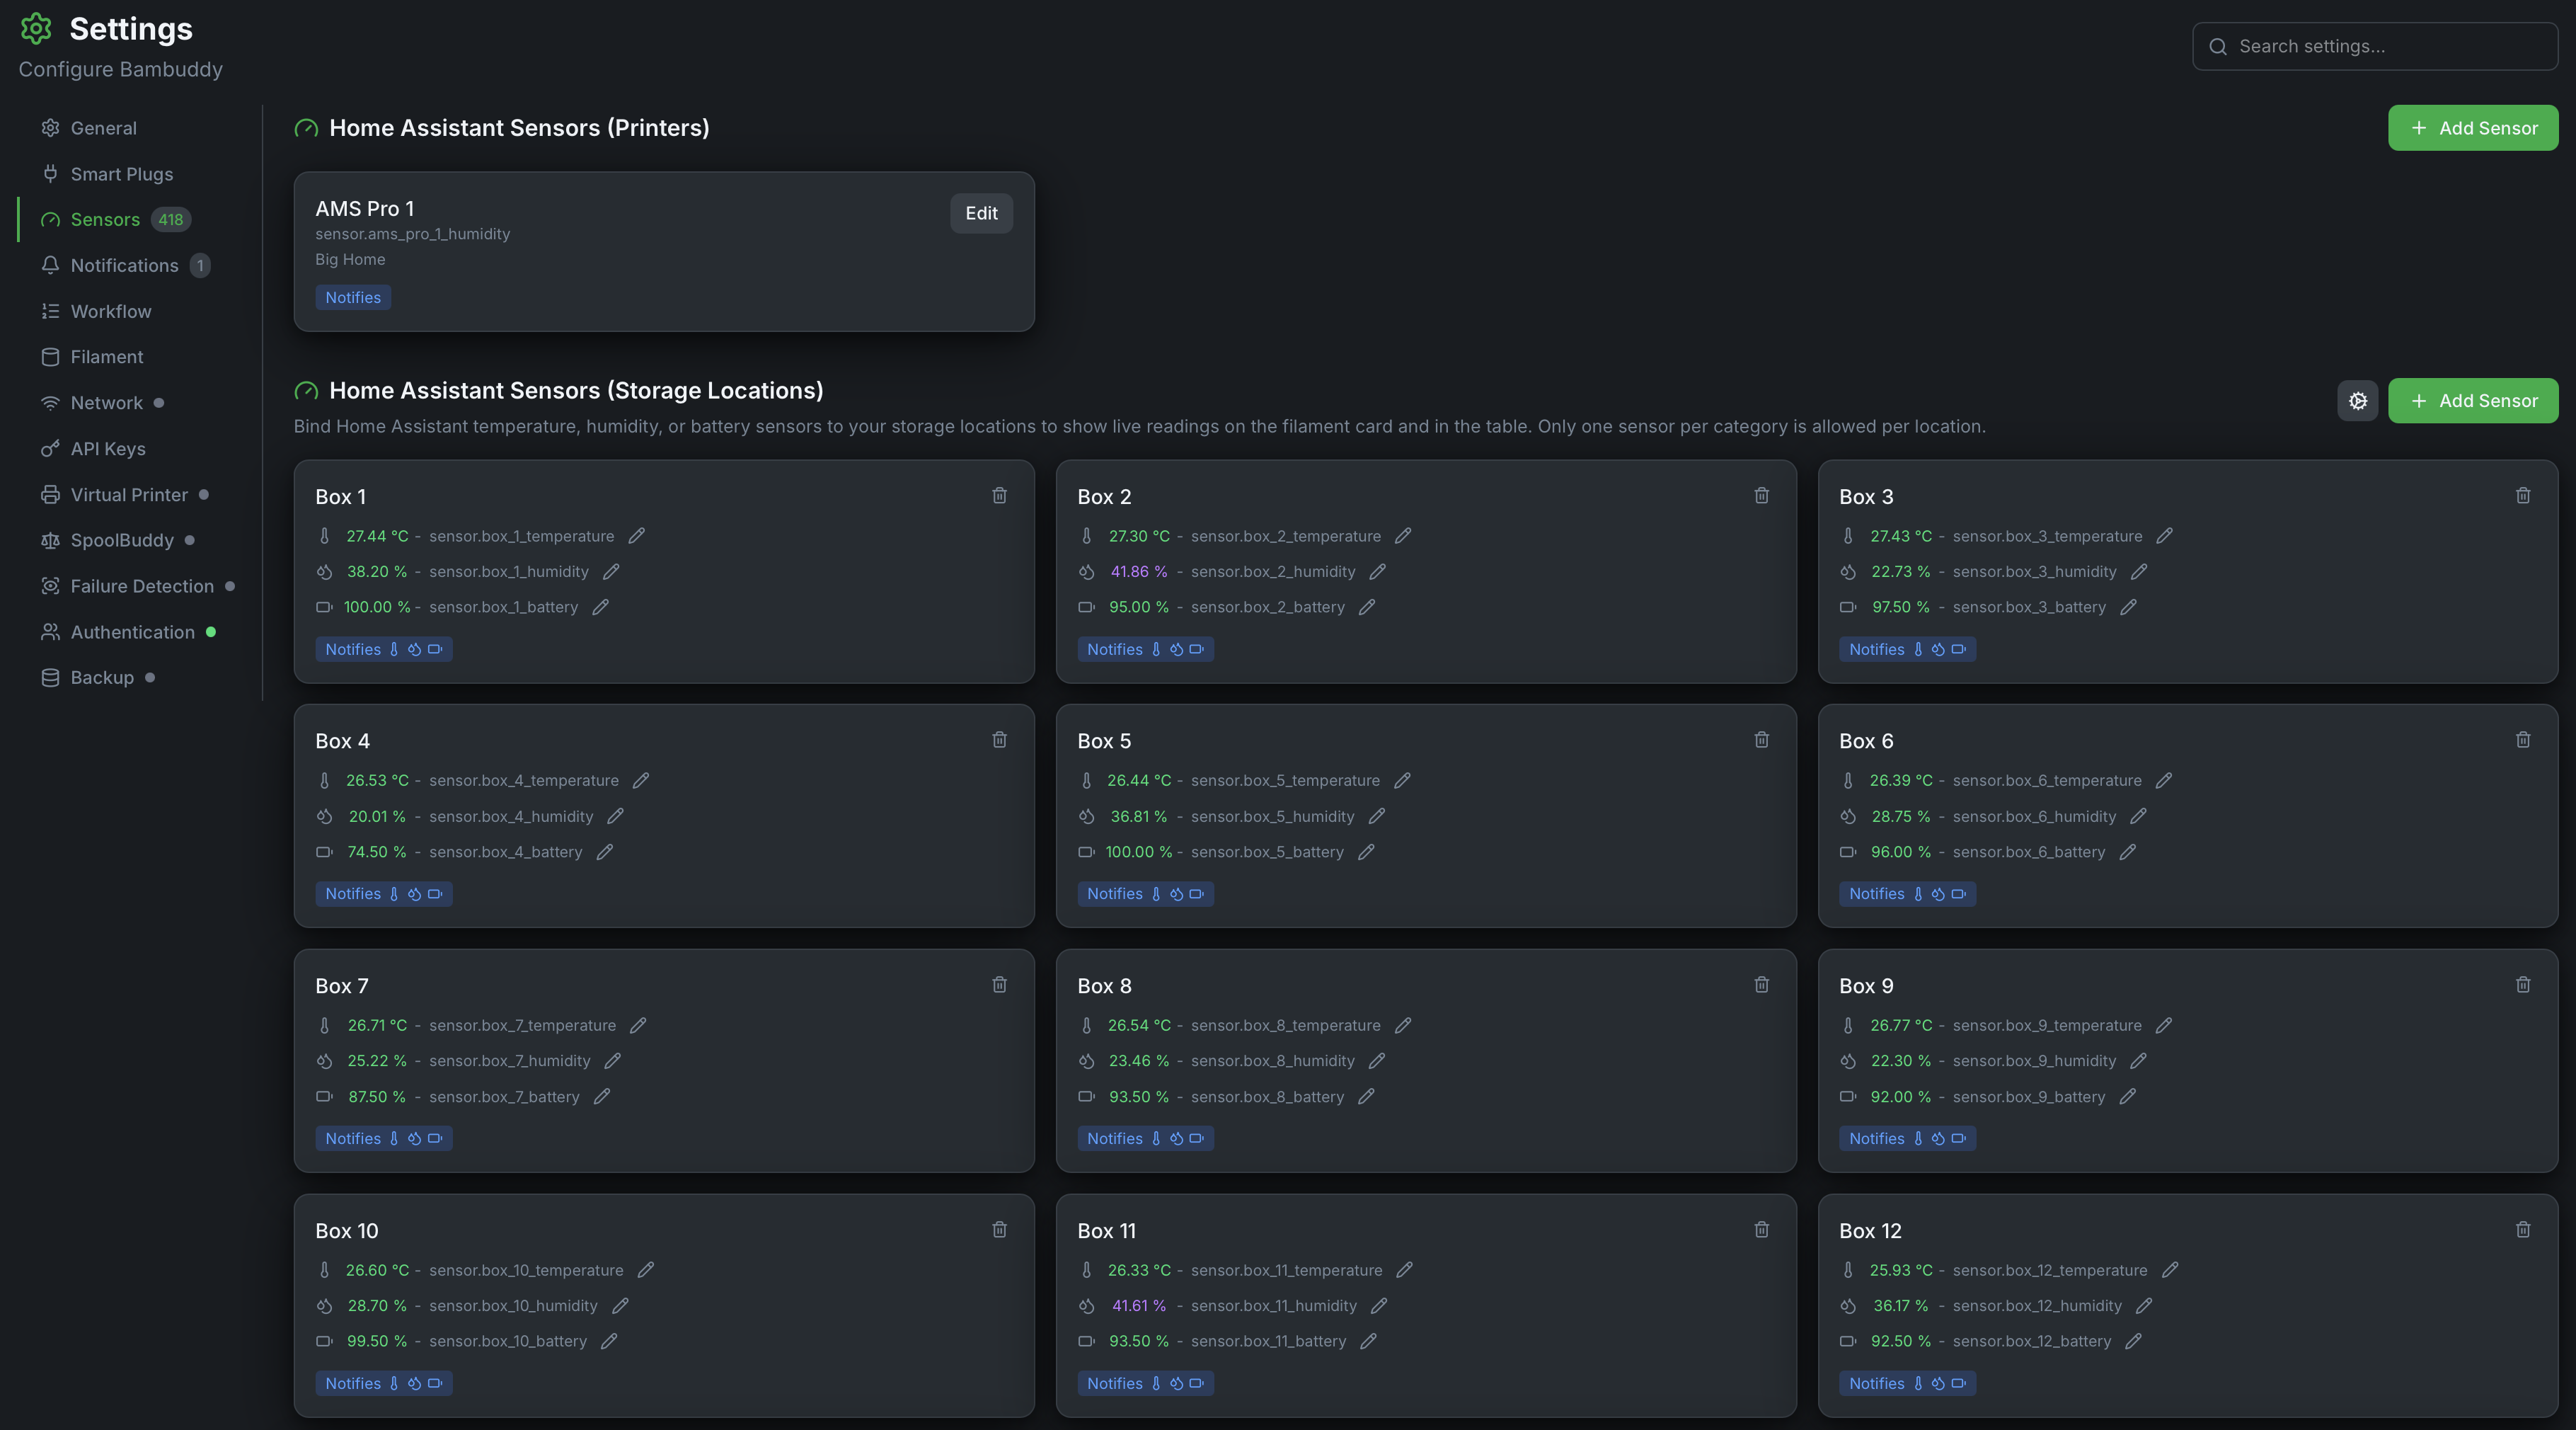
- Under Home Assistant Sensors (Storage Locations), click Add Sensor
- Pick the storage location
- Pick the entity — the list offers
sensorentities carrying a temperature, humidity, or battery reading - Optionally set an alert threshold and enable Notify on alert
- Leave Show on filament card on to surface the reading on spool cards at that location; turn it off to keep the binding for alerts only
- Save
Supported entities:
| Domain | Example | Shown as |
|---|---|---|
sensor | sensor.drybox_1_temperature | 24.70 °C |
sensor | sensor.drybox_1_humidity | 43.60 % |
sensor | sensor.drybox_1_battery | 78.10 % |
The entity's device class determines which category it's treated as (temperature, humidity, or battery) and which unit is shown.
Why isn't my leak sensor in the list?
Home Assistant reports water/leak detectors as device class moisture, which sounds like humidity but is not: it is a binary wet/dry state, not a percentage. It is deliberately left out of the location picker, because treating it as humidity put "wet" in a column formatted for percentages and let a leak detector occupy the one humidity slot that a real hygrometer needed. Bind a leak detector to a printer instead, where binary sensors are at home and it can even hold prints.
One sensor per category per location
Each storage location can hold at most one temperature, one humidity, and one battery sensor. Binding a second sensor of the same category prompts to replace the existing one.
Auto-Adding Related Sensors
Many drybox sensors report temperature, humidity, and battery as three separate entities named alike — sensor.drybox_1_temperature, sensor.drybox_1_humidity, sensor.drybox_1_battery. Binding all three by hand is three trips through the dialog, so when you bind the first sensor for a location Bambuddy offers the other two, each with its own checkbox, ticked by default.
The match is built from the name rather than searched for. Bambuddy takes the entity you picked, strips the trailing temperature, humidity or battery off it, and looks for the exact ids that the two remaining words would make:
| You pick | It looks for |
|---|---|
sensor.drybox_1_temperature | sensor.drybox_1_humidity, sensor.drybox_1_battery |
Because those ids are constructed rather than pattern-matched, an unrelated entity that merely starts the same way — sensor.drybox_1_pressure — is never offered.
Your naming has to end in one of the three words
This is the flip side of the exactness above, and the usual reason nothing is offered: if the entity you pick does not end in temperature, humidity or battery, there is no prefix to build from and Bambuddy says so ("No matching temperature, humidity, or battery sensors found for this location") rather than guessing. sensor.drybox_1_temp and sensor.temperature_drybox_1 both fall outside it. Bind the rest by hand, or rename the entities in Home Assistant.
Matching on the name is not a shortcut — Home Assistant's state API does not say which physical device an entity belongs to, so the name is the only link between the three.
Choosing Only this one binds the sensor you actually picked and skips the siblings; it does not abandon the dialog.
Sensor Options
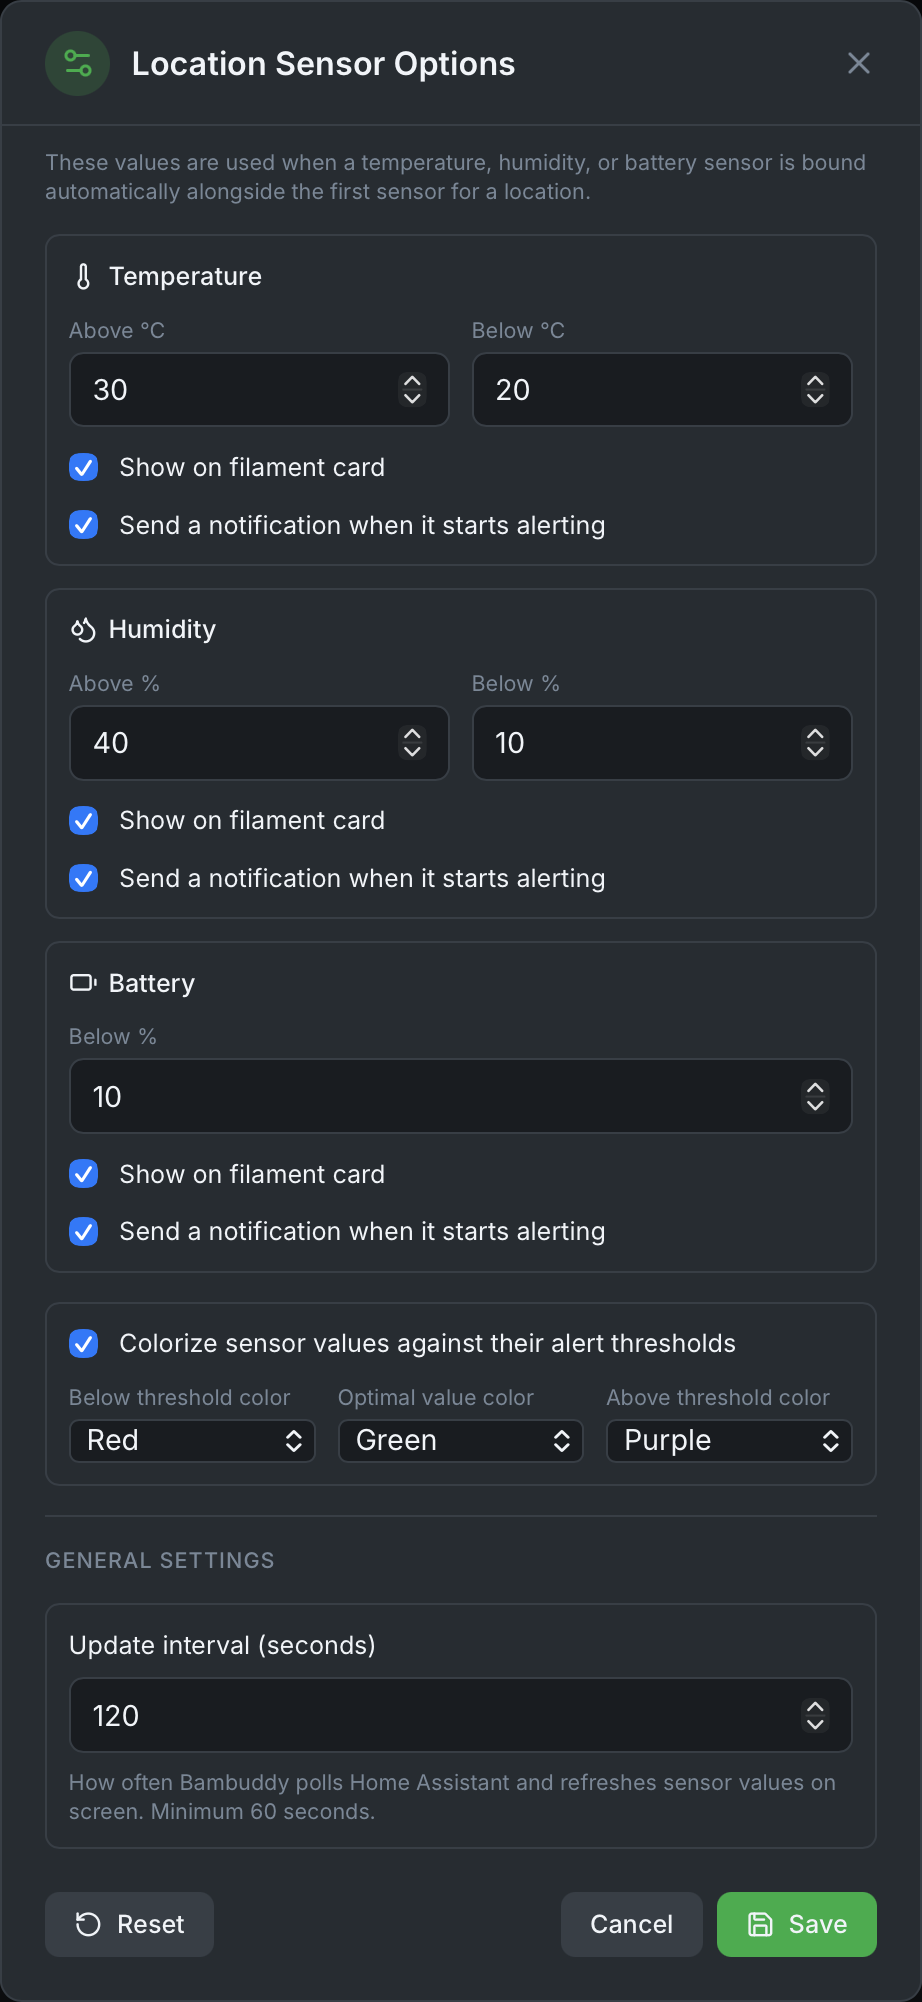
Click the gear icon next to Add Sensor to open Location Sensor Options:
| Setting | Description | Default |
|---|---|---|
| Temperature above / below | Default alert thresholds prefilled for every newly bound temperature sensor, whether you picked it yourself or accepted it as an auto-added sibling | 30 °C / 20 °C |
| Humidity above / below | Default alert thresholds for humidity | 30% / 10% |
| Battery below | Default low-battery threshold (batteries have no "above" threshold) | 10% |
| Colorize sensor values | Color a reading against its threshold — one color above, one below, one within range | On |
| Update interval | How often Bambuddy polls Home Assistant and refreshes values on screen | 120s (minimum 60s) |
Reset rewrites every existing location sensor
The Reset button in this dialog is not just a way to save the values above — it applies them to every storage-location sensor already bound, each one taking its own category's values. That overwrites their alert thresholds, their Notify on alert setting and their Show on filament card setting, and restores each sensor's name to its Home Assistant friendly name, so a binding you renamed by hand loses that name. Printer sensors are not touched, and it cannot be undone. It is the right button after tightening a threshold across a rack of dryboxes at once; it is the wrong one if you only meant to change the defaults for sensors you add next — use Save for that. With many sensors bound it takes a moment.
Notifications
Alerts use the same notification providers as other Bambuddy alerts (Settings > Notifications) with the Storage Location Sensor Alert event enabled. A notification fires on the transition into the alert state only, not repeatedly while it lasts, and not immediately on restart for a sensor that was already alerting before Bambuddy started up.
A separate switch from the printer one
Printer Sensor Alert and Storage Location Sensor Alert are two independent toggles, both off by default. Turning on the printer one does not deliver drybox alerts, and vice versa — a provider narrowed to a single printer would otherwise receive every location alert as well, with no way to have one without the other.
Polling
Sensors are read on the interval configured above (120 seconds by default), and the poller runs once immediately on startup so a restart doesn't leave the reading blank until the first cycle finishes.
Storage locations don't change nearly as fast as a running print, so there's no need to poll as often as printer sensors do — a drybox's temperature and humidity drift slowly, which is why the default interval here is far longer than the fixed 15-second cadence used for printer sensors.