Smart Plugs
Control your printers with Tasmota, Home Assistant, REST/Webhook, or MQTT smart plugs for power monitoring, automation, and energy tracking.
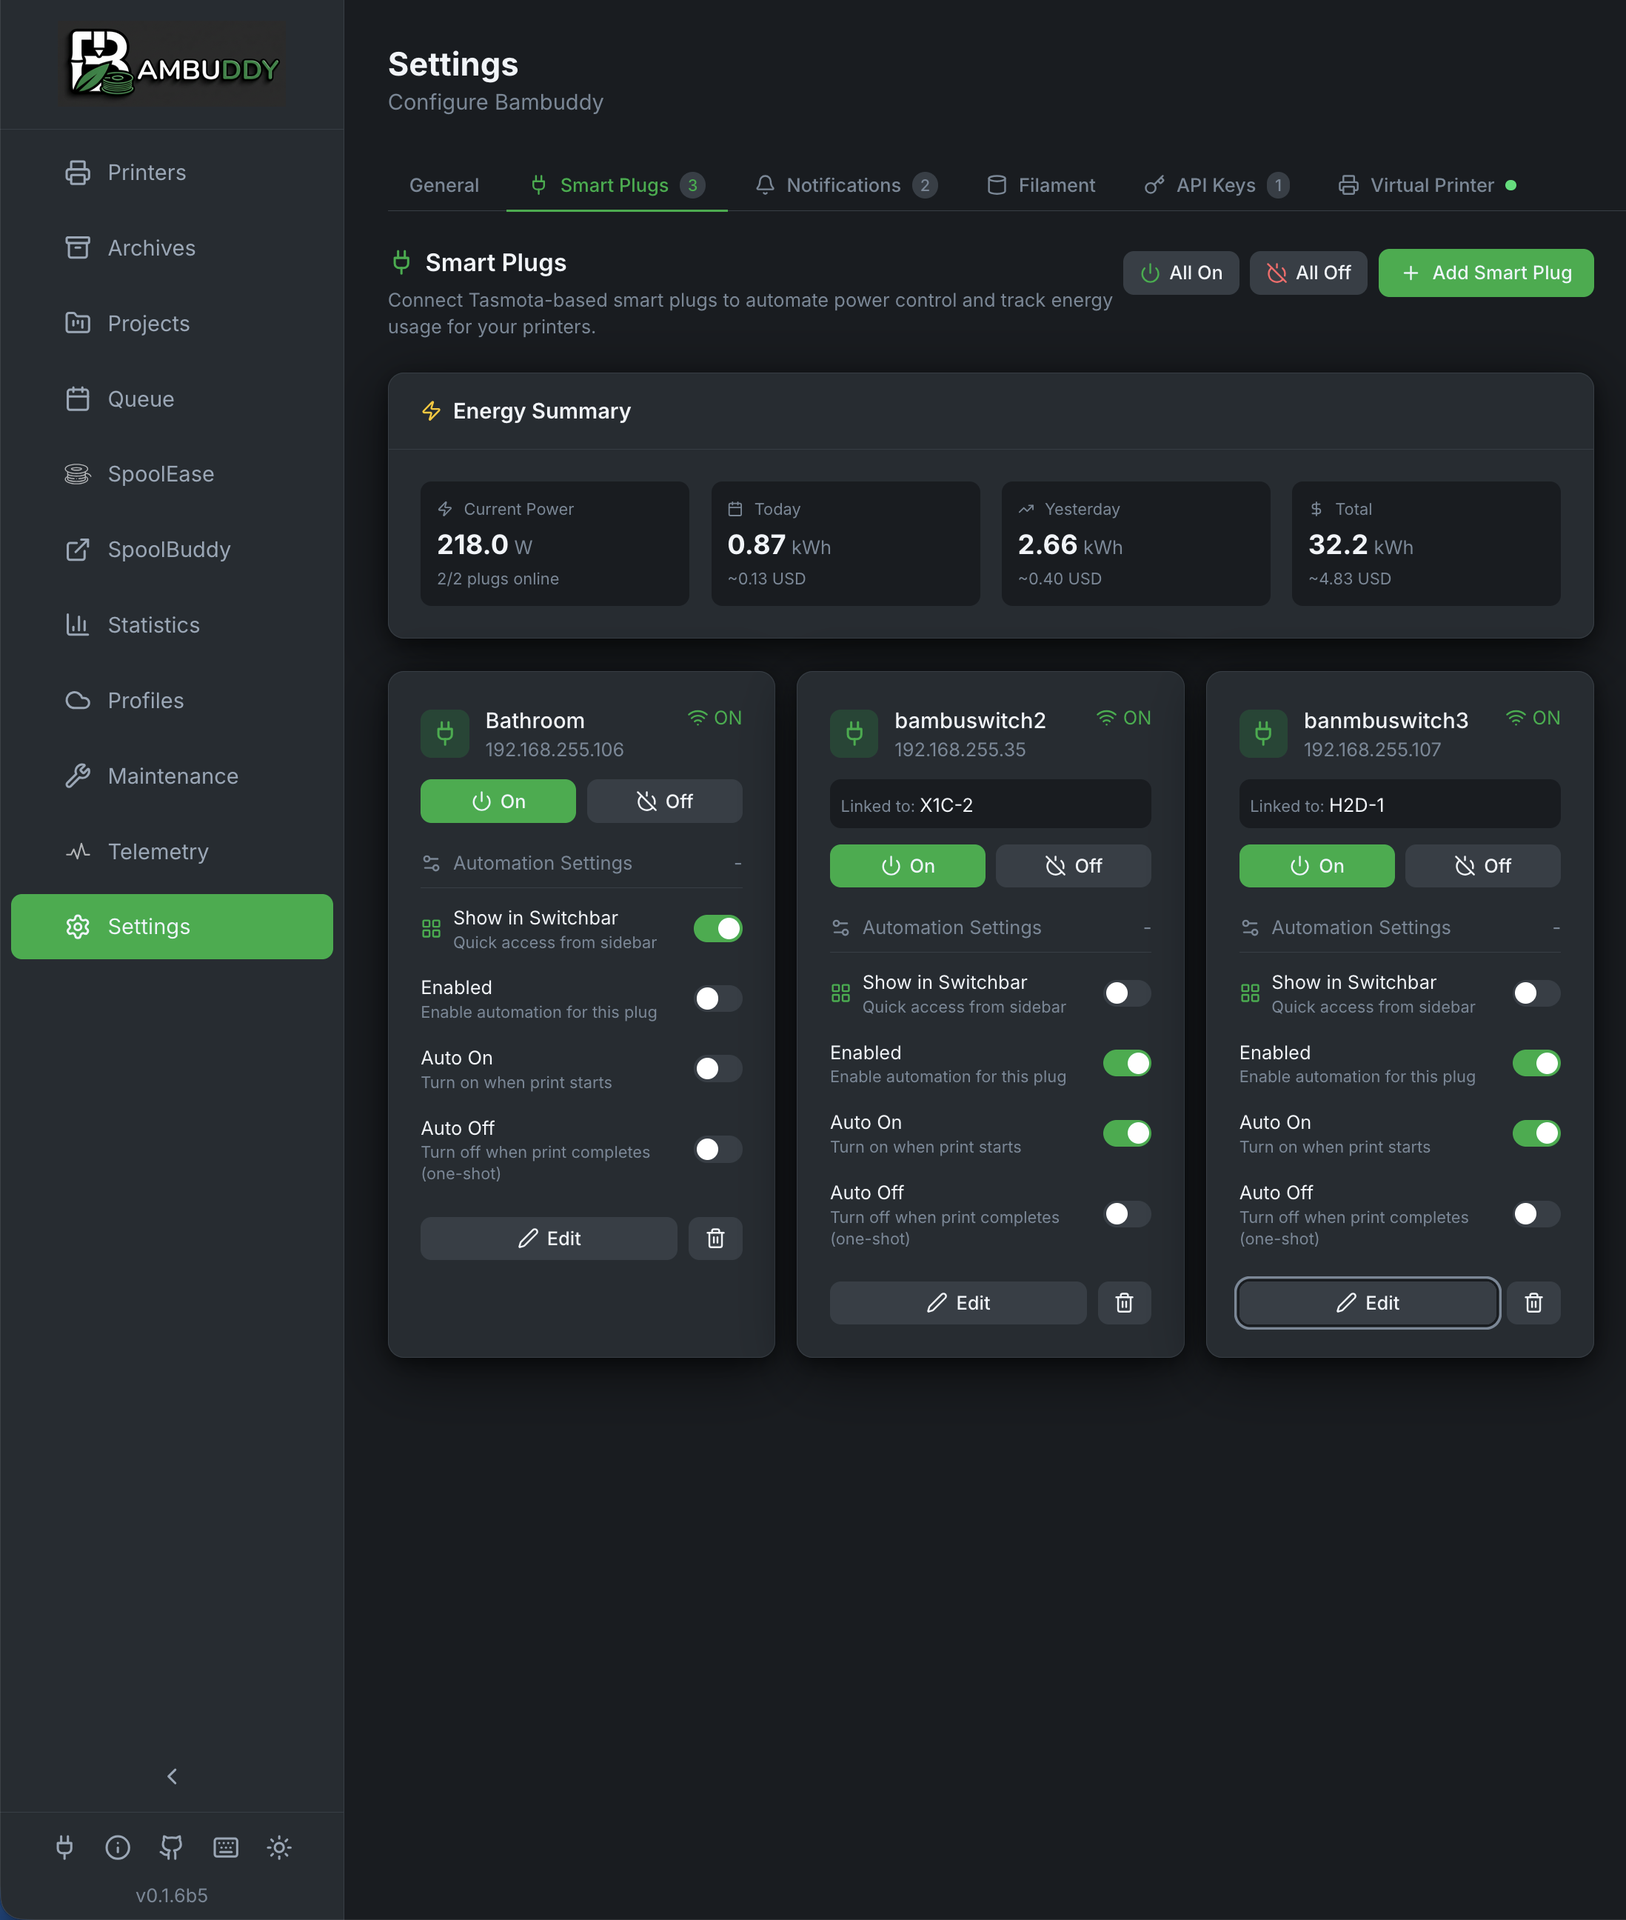
Overview
Smart plug integration enables:
- Power control - Turn printers on/off remotely
- Energy monitoring - Track power consumption
- Auto power-on - Start printer before scheduled prints
- Auto power-off - Shut down after cooldown
- Automation - Hands-free print scheduling
Requirements
Bambuddy supports four types of smart plug integrations:
Option 1: Tasmota
Direct control of Tasmota-flashed smart plugs:
| Feature | Required? |
|---|---|
| Tasmota firmware | Yes |
| Power monitoring | Recommended |
| HTTP API access | Yes |
Popular Options:
- Sonoff S31 - Compact, power monitoring
- Gosund SP111 - Affordable, power monitoring
- Athom Plugs - Pre-flashed with Tasmota
- Shelly Plug S - High quality, Tasmota compatible
Pre-flashed Plugs
Buy plugs pre-flashed with Tasmota to avoid the flashing process. Athom and some others sell them ready to use.
Option 2: Home Assistant
Control any switch/light entity through Home Assistant:
| Feature | Required? |
|---|---|
| Home Assistant instance | Yes |
| Long-Lived Access Token | Yes |
| Network access to HA | Yes |
Supports:
- Zigbee - Plugs via ZHA or Zigbee2MQTT
- Z-Wave - Plugs via Z-Wave JS
- Matter - Matter-compatible devices
- WiFi - Any WiFi plug integrated with HA
- ESPHome - Custom ESP-based devices
Flexible Integration
Home Assistant integration lets you use any device HA supports, including cloud-connected plugs that don't have local APIs.
HA Scripts for Multi-Device Control
Want to control multiple devices together (e.g., printer + enclosure fan)? Use Home Assistant scripts:
- Create a script in HA that turns on/off multiple devices
- Add the script entity (e.g.,
script.turn_on_printer_setup) as a smart plug in Bambuddy - Link it to a printer
- Configure automation triggers (optional)
- When triggered, the script executes your automation
Script Automation Options:
| Option | Description |
|---|---|
| Run when printer turns on | Automatically execute script when the main power plug is switched on |
| Run when printer turns off | Automatically execute script when the main power plug is switched off |
| Show on Printer Card | Display a quick-run button on the printer card |
Scripts appear in a dedicated row on printer cards with "Run" buttons for quick access.
Use Case: Enclosure Fan
Create two HA scripts: one to turn on printer + fan, another to turn off both. Link them to your printer with "Run when printer turns on/off" enabled. Now when you control the main plug, both devices respond automatically.
Script Behavior
Scripts can only be triggered ("Run"), not toggled on/off like regular plugs. They execute once when triggered and complete immediately.
Option 3: REST / Webhook
Control any device with an HTTP API using custom REST requests:
| Feature | Required? |
|---|---|
| HTTP-accessible device/service | Yes |
| Power control | Yes (via custom URLs) |
| Status monitoring | Optional |
| Energy monitoring | Optional |
Supports:
- openHAB - REST API for item control
- ioBroker - Simple REST API
- FHEM - HTTP command interface
- Node-RED - Custom HTTP endpoints
- Any REST API - Any system with an HTTP interface
Universal Integration
The REST/Webhook type is a catch-all for any home automation system or device that exposes an HTTP API. If your system isn't directly supported by the Tasmota or Home Assistant options, REST/Webhook can likely control it.
Option 4: MQTT (Monitor-Only)
Subscribe to MQTT topics for energy monitoring from any MQTT-enabled device:
| Feature | Required? |
|---|---|
| MQTT broker | Yes |
| Device publishing JSON data | Yes |
| Control capability | No (monitor-only) |
Supports:
- Zigbee2MQTT - Any Zigbee energy monitor
- Shelly - Via native MQTT or Zigbee2MQTT
- Tasmota Discovery - Subscribe to Tasmota sensor topics
- ESPHome - ESP devices publishing to MQTT
- Any MQTT source - Any device publishing JSON with power data
Monitor-Only
MQTT plugs are monitor-only for energy tracking. They cannot be turned on/off through Bambuddy. Use your MQTT broker, Home Assistant, or other automation to control them.
Adding a Smart Plug
Adding a Tasmota Plug
Automatic Discovery
The easiest way to add Tasmota plugs is with automatic discovery:
- Go to Settings > Smart Plugs
- Click Add Smart Plug
- Select the Tasmota tab
- Click Discover Tasmota Devices
- Wait for the network scan to complete
- Click on a discovered device to select it
- Fill in remaining details and Save
Network Auto-Detection
Bambuddy automatically detects your local network and scans all 254 addresses. Works with password-protected devices too!
Manual Entry
If discovery doesn't find your plug:
- Go to Settings > Smart Plugs
- Click Add Smart Plug
- Select the Tasmota tab
- Enter configuration:
| Field | Description |
|---|---|
| Name | Friendly name |
| IP Address | Plug's network IP |
| Printer | Associated printer |
| Powers the printer | On when this plug feeds the printer itself; off for accessories (see Powers the printer) |
- Click Save
- Click Test to verify connection
Adding a Home Assistant Plug
Initial Setup (One-Time)
Before adding HA plugs, configure the connection:
- Go to Settings > Network
- Find the Home Assistant section
- Enter your Home Assistant URL (e.g.,
http://192.168.1.100:8123) - Enter your Long-Lived Access Token
- Click Test Connection to verify
- Enable Enable Home Assistant toggle
Creating an Access Token
In Home Assistant: Profile > Long-Lived Access Tokens > Create Token. Copy the token immediately - it won't be shown again!
Using self-signed CA certificates
If you are not running Bambuddy as a Home Assistant Add-on and you are using self-signed CA certificates you will need to add your CA certificate to the System Trust Store. Refer to details in Getting Started -> Docker.
Automatic Configuration (Home Assistant Add-on)
When running Bambuddy as a Home Assistant add-on, the integration is automatically configured using environment variables provided by the Home Assistant supervisor:
How it works:
- The add-on sets
HA_URLandHA_TOKENenvironment variables automatically - Bambuddy detects these and configures the integration on startup
- The connection is established to
http://supervisor/coreusing the supervisor-provided token - No manual configuration needed!
In the UI:
When environment variables are active, you'll see:
- Lock icons on the URL and Token fields (read-only)
- "(Environment Managed)" labels
- "Automatically enabled via environment variables" badge on the toggle
- The integration is automatically enabled
Zero Configuration
The Home Assistant add-on automatically configures the integration - no need to create access tokens or enter URLs manually!
Manual Override Disabled
When environment variables are active, you cannot edit the URL or token through the UI. To use different values, configure them in the add-on settings or use the standard installation method.
Adding the Plug
- Go to Settings > Smart Plugs
- Click Add Smart Plug
- Select the Home Assistant tab
- Select an entity from the dropdown (shows all switch/light/input_boolean entities)
- Enter a friendly name
- Select the associated printer
- Turn Powers the printer off if this entity drives an accessory rather than the printer itself — a chamber filter, a light, an enclosure heater (see Powers the printer)
- (Optional) Configure energy sensor entities (see below)
- Click Save
Entity Selection
The dropdown shows the entity's friendly name and current state. Already-configured entities are filtered out.
Adding a REST / Webhook Plug
REST plugs let you control any device by sending HTTP requests to custom URLs.
Adding the Plug
- Go to Settings > Smart Plugs
- Click Add Smart Plug
- Select the REST / Webhook tab
- Configure the control settings:
Control (at least one URL required):
| Field | Description | Example |
|---|---|---|
| Turn ON URL | URL to turn device on | http://openhab:8080/rest/items/MyPlug |
| Turn OFF URL | URL to turn device off | http://openhab:8080/rest/items/MyPlug |
| HTTP Method | Request method | GET, POST, PUT, or PATCH |
| ON Request Body | Body sent with ON request | ON |
| OFF Request Body | Body sent with OFF request | OFF |
Headers (Optional):
| Field | Description | Example |
|---|---|---|
| Custom Headers | JSON object of headers | {"Authorization": "Bearer your-token"} |
Status Monitoring (Optional):
| Field | Description | Example |
|---|---|---|
| Status URL | GET endpoint to check state | http://openhab:8080/rest/items/MyPlug/state |
| State JSON Path | Dot notation path to state value | state or data.power.status |
| ON Value | String that means device is ON | ON, true, 1 |
Energy Monitoring (Optional):
Each value (power, energy) can use its own URL or fall back to the shared Status URL. This is useful when your system exposes individual endpoints for each data point (e.g., ioBroker simple-api).
| Field | Description | Example |
|---|---|---|
| Power URL | Separate endpoint for power data (uses Status URL if empty) | http://iobroker:8087/get/shelly.0.Power |
| Power JSON Path | Path to power value in response | val or power or data.power_w |
| Power Multiplier | Multiply raw value (default 1) | 0.001 to convert mW → W |
| Energy URL | Separate endpoint for energy data (uses Status URL if empty) | http://iobroker:8087/get/shelly.0.Energy |
| Energy JSON Path (today) | Path to a counter that resets at midnight | val or energy.today |
| Energy Multiplier | Multiply raw value (default 1) | 0.001 to convert Wh → kWh |
| Energy JSON Path (lifetime) | Path to a cumulative counter that never resets | aenergy.total |
| Lifetime Multiplier | Multiply raw value (default 1) | 0.001 to convert Wh → kWh |
Today and lifetime are different counters — don't mix them up
This is the single most common REST misconfiguration.
Most plugs, every Shelly among them, expose only a cumulative counter: a number that climbs forever and never resets. Put it in the lifetime field, not the today field.
Put a lifetime counter in the today field and it looks fine at first — the number goes up. But it never drops back to zero at midnight, so "Today" silently reports your all-time usage, while Yesterday and Total stay at zero forever (and so does the energy figure on the Statistics page).
Fill in the lifetime field and Bambuddy works out Today and Yesterday for you, by comparing the counter now against its value at the last local midnight. Those two figures need a day or two of hourly readings to appear — Today shows up after the first midnight the install lives through, Yesterday after the second. Total is correct immediately.
When to use separate URLs
If your system returns all data in a single response (like Tasmota, openHAB, or any Shelly Gen2+), just set the Status URL and use JSON paths — no separate URLs needed. Use separate Power/Energy URLs when your system requires individual requests per data point.
- Click Save
openHAB Example
- Turn ON URL:
http://openhab:8080/rest/items/MyPlug - Turn OFF URL:
http://openhab:8080/rest/items/MyPlug - HTTP Method:
POST - ON Body:
ON - OFF Body:
OFF
ioBroker Example
- Turn ON URL:
http://iobroker:8087/set/0_userdata.0.plug?value=true - Turn OFF URL:
http://iobroker:8087/set/0_userdata.0.plug?value=false - HTTP Method:
GET - (No body needed for GET requests)
ioBroker with Energy Monitoring (separate URLs)
- Turn ON URL:
http://iobroker:8087/set/shelly.0.Relay0.Switch?value=true - Turn OFF URL:
http://iobroker:8087/set/shelly.0.Relay0.Switch?value=false - HTTP Method:
GET - Status URL:
http://iobroker:8087/get/shelly.0.Relay0.Switch - State JSON Path:
val - ON Value:
true - Power URL:
http://iobroker:8087/get/shelly.0.Relay0.Power - Power JSON Path:
val - Energy URL:
http://iobroker:8087/get/shelly.0.Relay0.Energy - Energy JSON Path:
val - Energy Multiplier:
0.001(converts Wh to kWh)
Shelly Plug S Gen2 / Gen3 (direct, no bridge)
A Shelly answers everything from one RPC endpoint, and its only energy figure is the lifetime counter aenergy.total, in watt-hours.
- Turn ON URL:
http://<shelly-ip>/rpc/Switch.Set?id=0&on=true - Turn OFF URL:
http://<shelly-ip>/rpc/Switch.Set?id=0&on=false - HTTP Method:
GET - Status URL:
http://<shelly-ip>/rpc/Switch.GetStatus?id=0 - State JSON Path:
output - ON Value:
true - Power JSON Path:
apower - Power Multiplier:
1(Shelly reports watts already) - Energy JSON Path (today): leave empty — a Shelly has no daily counter
- Energy JSON Path (lifetime):
aenergy.total - Lifetime Multiplier:
0.001(converts Wh to kWh)
Bambuddy derives Today and Yesterday from the lifetime counter. Give it a couple of days to fill in.
FHEM Example
- Turn ON URL:
http://fhem:8083/fhem?cmd=set%20MyPlug%20on - Turn OFF URL:
http://fhem:8083/fhem?cmd=set%20MyPlug%20off - HTTP Method:
GET
Node-RED Example
- Turn ON URL:
http://nodered:1880/plug/on - Turn OFF URL:
http://nodered:1880/plug/off - HTTP Method:
POST - Headers:
{"Content-Type": "application/json"} - ON Body:
{"state": "on"} - OFF Body:
{"state": "off"}
JSON Path
The JSON path uses dot notation to navigate nested objects. For a response like {"data": {"power": {"status": "ON"}}}, the path would be data.power.status.
Adding an MQTT Plug
MQTT plugs subscribe to topics and extract power/energy data from JSON payloads. Each data type (power, energy, state) can use a different MQTT topic with its own settings.
Prerequisites
Configure your MQTT broker in Settings > Network (same broker used for MQTT Publishing).
Adding the Plug
- Go to Settings > Smart Plugs
- Click Add Smart Plug
- Select the MQTT tab
- Configure each data source:
Power Monitoring:
| Field | Description | Example |
|---|---|---|
| Topic | MQTT topic for power data | zigbee2mqtt/shelly/power |
| JSON Path | Path to power value in JSON | power_l1 or data.power |
| Multiplier | Unit conversion | 1.0 or 0.001 for mW→W |
Energy Monitoring (Optional):
| Field | Description | Example |
|---|---|---|
| Topic | MQTT topic for energy data | zigbee2mqtt/shelly/energy |
| JSON Path | Path to energy value in JSON | energy_l1 |
| Multiplier | Unit conversion | 1.0 or 0.001 for Wh→kWh |
State Monitoring (Optional):
| Field | Description | Example |
|---|---|---|
| Topic | MQTT topic for state data | zigbee2mqtt/shelly/state |
| JSON Path | Path to on/off state in JSON | state_l1 |
| ON Value | What value means "ON" | ON, true, 1 (auto-detected if empty) |
- Click Save
Separate Topics
Each data type can subscribe to a different MQTT topic. This is useful when your device publishes power, energy, and state to separate topics.
Same Topic Example
If your device publishes everything to one topic:
- Power Topic:
zigbee2mqtt/shelly-working-room - Power Path:
power_l1 - Energy Topic:
zigbee2mqtt/shelly-working-room - Energy Path:
energy_l1
Separate Topics Example
If your device publishes to different topics:
- Power Topic:
sensors/power/shelly - Power Path:
value - Energy Topic:
sensors/energy/shelly - Energy Path:
total_kwh
JSON Path Examples
For JSON {"power_l1": 150, "energy_l1": 2.5}:
- Power path:
power_l1 - Energy path:
energy_l1
For nested JSON {"data": {"power": 150}}:
- Power path:
data.power
Finding Your Topic
Use an MQTT client like MQTT Explorer to browse your broker and find the topic your device publishes to.
Custom ON Value
Some devices report state as true/false instead of ON/OFF. Set the ON Value to match your device (e.g., true, 1, on). Leave empty for auto-detection of common values.
Energy Sensor Configuration
Many Home Assistant smart plugs expose energy data as separate sensor entities rather than as attributes on the switch entity. Common examples include:
- Tapo P110M -
sensor.tapo_power,sensor.tapo_today_energy,sensor.tapo_total_energy - IKEA plugs via Zigbee2mqtt -
sensor.ikea_plug_power,sensor.ikea_plug_energy - Shelly plugs -
sensor.shelly_power,sensor.shelly_energy
To enable energy tracking for these plugs:
- After selecting the switch entity, expand Energy Monitoring (Optional)
- Select the appropriate sensor for each field:
- Power Sensor (W) - Current power consumption
- Energy Today (kWh) - Today's energy usage
- Total Energy (kWh) - Lifetime energy usage (used for per-print tracking)
Sensor Selection
The dropdowns show all HA sensors with power/energy units (W, kW, kWh, Wh). You can select sensors from any device - they don't need to match the switch entity.
Per-Print Energy Tracking
The Total Energy sensor is required for per-print energy tracking. Bambuddy records the total at print start and end to calculate energy used.
Home Assistant Sensors
Read-only Home Assistant sensors (door contacts, thermometers, and similar) can be bound to a printer to show their state on the printer's card, with alerts and notifications — see Sensors → Printer Sensors for the full guide. Sensors use the same Home Assistant URL and token configured here for smart plugs.
Switchbar Quick Access
Add frequently-used plugs to the sidebar for quick access:
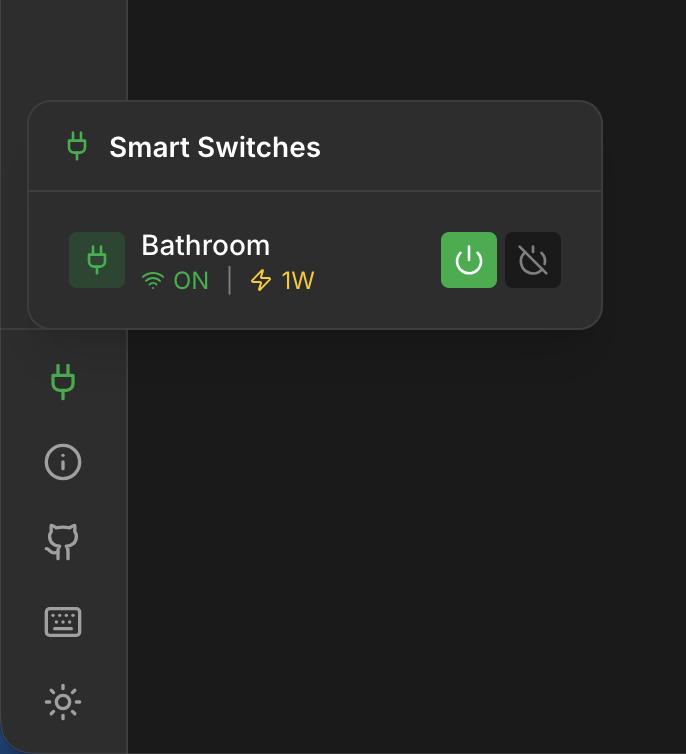
- In Settings > Smart Plugs, expand a plug's settings
- Enable Show in Switchbar
- A plug icon appears in the sidebar footer
- Hover to see status and control all switchbar plugs
The switchbar shows:
- Current power state (ON/OFF)
- Power consumption (if available)
- Quick on/off toggle buttons
Multiple Plugs
Add multiple plugs to the switchbar for one-click access to your entire printer farm.
Admin Link (Tasmota Only)
Each Tasmota smart plug card includes a direct link to the Tasmota web interface:
- Click the Admin link on the plug card
- Opens Tasmota interface in a new tab
- Auto-login if username/password configured in Bambuddy
Quick Configuration
Use the admin link for quick access to Tasmota settings like power reporting, schedules, and firmware updates.
Home Assistant, REST, and MQTT Plugs
HA, REST/Webhook, and MQTT plugs don't have an admin link. Manage them through their respective interfaces.
Finding Plug IP Address (Tasmota Only)
From Tasmota Interface
- Access your plug's web interface
- Go to Information
- Note the IP Address
From Router
- Log into your router
- Find connected devices
- Locate the plug by name or MAC
Static IP (Recommended)
Assign a static IP to prevent changes:
- Go to plug web interface
- Configuration > Configure WiFi
- Enter static IP settings
Create a DHCP reservation for the plug's MAC address.
Power Control
Manual Control
Toggle power from Bambuddy:
- Go to printer card
- Click the power icon
- Select On or Off
Or from Settings > Smart Plugs:
- Click the power toggle for any plug
Power Status
| Icon | Status |
|---|---|
| On | |
| Off | |
| Unreachable |
Automation
Powers the printer
Linking a plug to a printer serves two different purposes, and Bambuddy needs to know which one you mean:
- The plug feeds the printer — switching it off really does take the printer down.
- The plug feeds an accessory that follows the print cycle — a filter fan, a chamber light, an enclosure heater. The printer stays on.
The Powers the printer toggle appears on the plug (card and add/edit dialog) as soon as a printer is linked, and is on by default:
| Setting | Effect when the plug switches off |
|---|---|
| On (default) | The printer is immediately shown as offline, without waiting for its connection to time out |
| Off | The printer's status is left alone — only the plug switches off |
Turn it off for accessory plugs. Otherwise their auto-off marks the printer offline, which shows the printer as Unknown and stops the queue from dispatching to it.
The setting also decides which plug the queue power-cycles when it needs to bring an offline printer back: if several plugs are linked, the one marked Powers the printer is used for the boot wait, and the rest are switched on afterwards.
Which plug the printer card shows
A printer card has one Power row — a plug name, its current draw, and the auto-off and on/off buttons. When several plugs are linked to the same printer, Bambuddy picks the one for that row in this order:
- The plug can be switched — a Home Assistant script can only be run, and an MQTT plug is monitor-only, so neither answers the on/off button
- Powers the printer is on
- The plug is enabled
- Show on Printer Card is on
- The plug can report watts, so the row shows a figure rather than
-- - Oldest plug, if several are still equal
Every one of these is a preference, and none of them excludes a plug: a printer whose only plug is an accessory, is disabled, is hidden, or is monitor-only still gets its Power row, because that row is where the on/off button lives. Powers the printer ranks above Show on Printer Card deliberately — hiding the plug that really feeds the printer should not hand the power buttons to a filter fan.
Whether a plug can report watts is read from its configuration — a Home Assistant plug with a Power Sensor entity, an MQTT plug with a power topic, a REST plug with a power path, or any Tasmota device. It is approximate on purpose, since asking every plug for a live reading would slow down every card: a Home Assistant plug with no power sensor may still report a figure from the switch entity's own attributes, and a Tasmota device without energy metering is counted as though it had it. It only ever breaks a tie between plugs that are equal on everything above.
The plug in the Power row is not repeated in the Home Assistant button row below it. A printer whose only entities are scripts is the exception: it falls back to showing one of them in the Power row, and that script keeps its one-click button in the row underneath.
Existing plugs
Plugs configured before this setting existed are treated as Powers the printer, which is the behaviour they already had. Only change it where the plug really is an accessory.
Auto Power On
Automatically turn on printer before prints:
- Enable Auto Power On for the plug
- When a queued print is ready:
- Bambuddy turns on the plug
- Waits for printer to boot
- Starts the print
This works for a job pinned to one printer and for a job queued against a printer class (Any X1C, a Slicer Pipeline whose target type is Printer class). For a class job, Bambuddy first looks for a printer of that class that is already on and free; only if there is none does it switch one on.
Which printer it picks:
- Printers that are waiting for a plate-clear acknowledgment are passed over. Switching one on would only leave it idling behind the plate-clear gate. If every candidate is waiting on that, nothing is switched on and the job's waiting reason says the printers are offline. The acknowledgment does not need the printer switched on — clear the plate from the printer card while it is still powered down and the next queue check can wake it.
- Printers whose file is not compatible with the class are never switched on.
- Printers whose loaded filament cannot print the job are passed over. A printer keeps its last reported AMS and external-spool trays after the power goes, so Bambuddy can tell that the machine at the other end of the farm is the one holding the colour the job asks for, and switches on only that one. A printer it has never heard from -- one that has been off since Bambuddy last started -- is still switched on, because no reading is not the same as no filament.
- One printer per queue check. With several class jobs queued and several printers off, they come up one per check rather than all at once.
A printer with no enabled Auto Power On plug is never switched on. When that is why a job is waiting, its waiting reason says so explicitly -- Offline, no Auto On smart plug: X1C-2 -- rather than the plain Offline: used for printers Bambuddy can bring back itself.
Auto Power Off
Automatically turn off after prints:
- Enable Auto Power Off for the plug
- Set Cooldown Temperature (e.g., 40°C)
- Set Cooldown Time (e.g., 5 minutes)
- After print completes:
- Wait for bed to cool below threshold
- Wait additional cooldown time
- Turn off the plug
By default, auto-off is one-shot — it disables itself after each print and must be re-enabled manually. To keep auto-off active between prints, enable the Keep Enabled toggle under the Auto Off settings. This is useful for accessories like chamber filters (e.g., BentoBox on a Home Assistant switch) that should always power off when a print completes.
Auto Off After AMS Drying
Cut power automatically after an AMS filament drying cycle (immediate, scheduled, or automatic) completes. Independent of the print-finish Auto Off above — drying-finish has its own toggle and its own delay because the AMS chamber stays warm longer than the hotend after a dry cycle.
- On the smart plug card, enable Auto Off After Drying
- Set Drying delay (minutes) — the default is 10 minutes to give the AMS time to cool off before power is cut
- After any AMS attached to the linked printer finishes drying:
- Wait the configured number of minutes
- Turn off the plug
Bambuddy detects drying completion at the MQTT layer by watching for the AMS dry_time field falling from a positive value to 0, so the toggle fires for:
- Queue-triggered auto-drying
- Ambient (humidity-threshold) auto-drying
- Manually-started drying from the printer card
Per-AMS routing
The trigger is plug-vs-printer-level, not per-AMS. If your printer has multiple AMS units on one plug, the auto-off fires whenever any of them finishes a cycle. Per-AMS targeting (separate plug for AMS only, or different plugs for AMS 0 vs AMS 1 on dual-AMS printers) is not currently supported.
Safety Checks
Auto power-off includes safety checks:
- Only triggers after successful prints
- Waits for cooldown
- Checks for queued prints
- Verifies printer is idle
Energy Monitoring
Track power consumption:
Real-time Data
| Metric | Description |
|---|---|
| Power (W) | Current draw |
| Voltage (V) | Line voltage |
| Current (A) | Amperage |
| Energy (kWh) | Cumulative |
Per-Print Tracking
Enable energy tracking to record:
- Energy per print
- Electricity costs
- Efficiency comparisons
Power Dashboard
View power statistics:
- Current power draw
- Energy over time
- Cost calculations
- Peak usage
Tasmota Commands (Technical Reference)
Bambuddy uses these Tasmota HTTP commands for direct Tasmota integration:
| Action | Command |
|---|---|
| Turn On | http://{ip}/cm?cmnd=Power%20On |
| Turn Off | http://{ip}/cm?cmnd=Power%20Off |
| Status | http://{ip}/cm?cmnd=Status%200 |
| Energy | http://{ip}/cm?cmnd=Status%208 |
Testing Manually
# Turn on
curl "http://192.168.1.100/cm?cmnd=Power%20On"

# Get status
curl "http://192.168.1.100/cm?cmnd=Status%200"
Safety Considerations
Don't Cut Power Mid-Print
Auto power-off is safe because:
- Only triggers after print completion
- Waits for cooldown
- Checks printer state
Never manually power off during printing!
Surge Protection
Consider adding surge protection:
- Protects printer electronics
- Protects smart plug
- Especially important for unstable power
Fire Safety
Smart plugs have current limits:
- Most handle 10-15A
- 3D printers typically draw 3-8A
- Check your plug's rating
Troubleshooting
Tasmota: Plug Not Responding
- Check plug is powered
- Verify IP address is correct
- Ensure plug is on same network
- Check if Tasmota web interface loads
- Verify no firewall blocking
Home Assistant: Plug Shows Offline
- Check HA connection in Settings > Network
- Click Test Connection to verify
- Ensure the access token hasn't expired
- Verify HA is reachable from Bambuddy's network
- Check if entity exists in HA
Home Assistant: Entities Not Loading
- Verify HA URL is correct (include port if needed)
- Check access token has correct permissions
- Try regenerating the access token
- Ensure HA integration is enabled
REST/Webhook: Plug Not Responding
- Test the URL directly with
curl: - Verify the URL is reachable from Bambuddy's network
- Check that headers are valid JSON (if configured)
- Ensure the HTTP method matches what the target API expects
- Check the target service's logs for errors
REST/Webhook: Status Not Updating
- Verify the Status URL returns valid JSON
- Test the JSON path against the actual response:
- Ensure the ON Value matches exactly what the API returns (case-sensitive)
- Check that the State JSON Path correctly navigates to the state field
Auto Power-Off Not Working
- Check feature is enabled
- Verify cooldown settings
- Ensure print completed successfully
- Check for queued prints (won't power off if more queued)
Power Data Incorrect
- Not all plugs have power monitoring
- For Tasmota: Calibrate in Configuration > Configure Other
- For HA: Check if entity has power attributes or configure separate energy sensors
- Check plug specifications
Home Assistant: No Energy Data
Many HA plugs expose energy data as separate sensor entities, not as switch attributes:
- When adding/editing the plug, expand Energy Monitoring (Optional)
- Select the appropriate power sensor (W)
- Select energy today and total sensors (kWh) if available
- The sensors should appear in the dropdown if they have power/energy units
Tips
Start Simple
Start with manual power control before enabling automation.
Test Cooldown
Monitor a few prints to find the right cooldown temperature for your printer.
Label Plugs
If you have multiple plugs, label them physically to match Bambuddy names.
Dedicated Circuit
If possible, put printers on a dedicated circuit to avoid tripping breakers.
Energy Baseline
Track energy for a week to establish your typical consumption baseline.