Virtual Printer
Send prints to Bambuddy directly from Bambu Studio or OrcaSlicer — even when your real printer is busy, offline, or doesn't exist yet.
-
Print Archiving
Send prints to Bambuddy for archiving without starting them.
-
Queue Building
Build up a print queue before your printer is available.
-
Print Farm Prep
Prepare jobs to distribute across multiple printers.
-
Remote Slicing
Slice on one computer, send to Bambuddy running elsewhere.
-
Remote Printing
Print from anywhere via Proxy Mode.
Overview
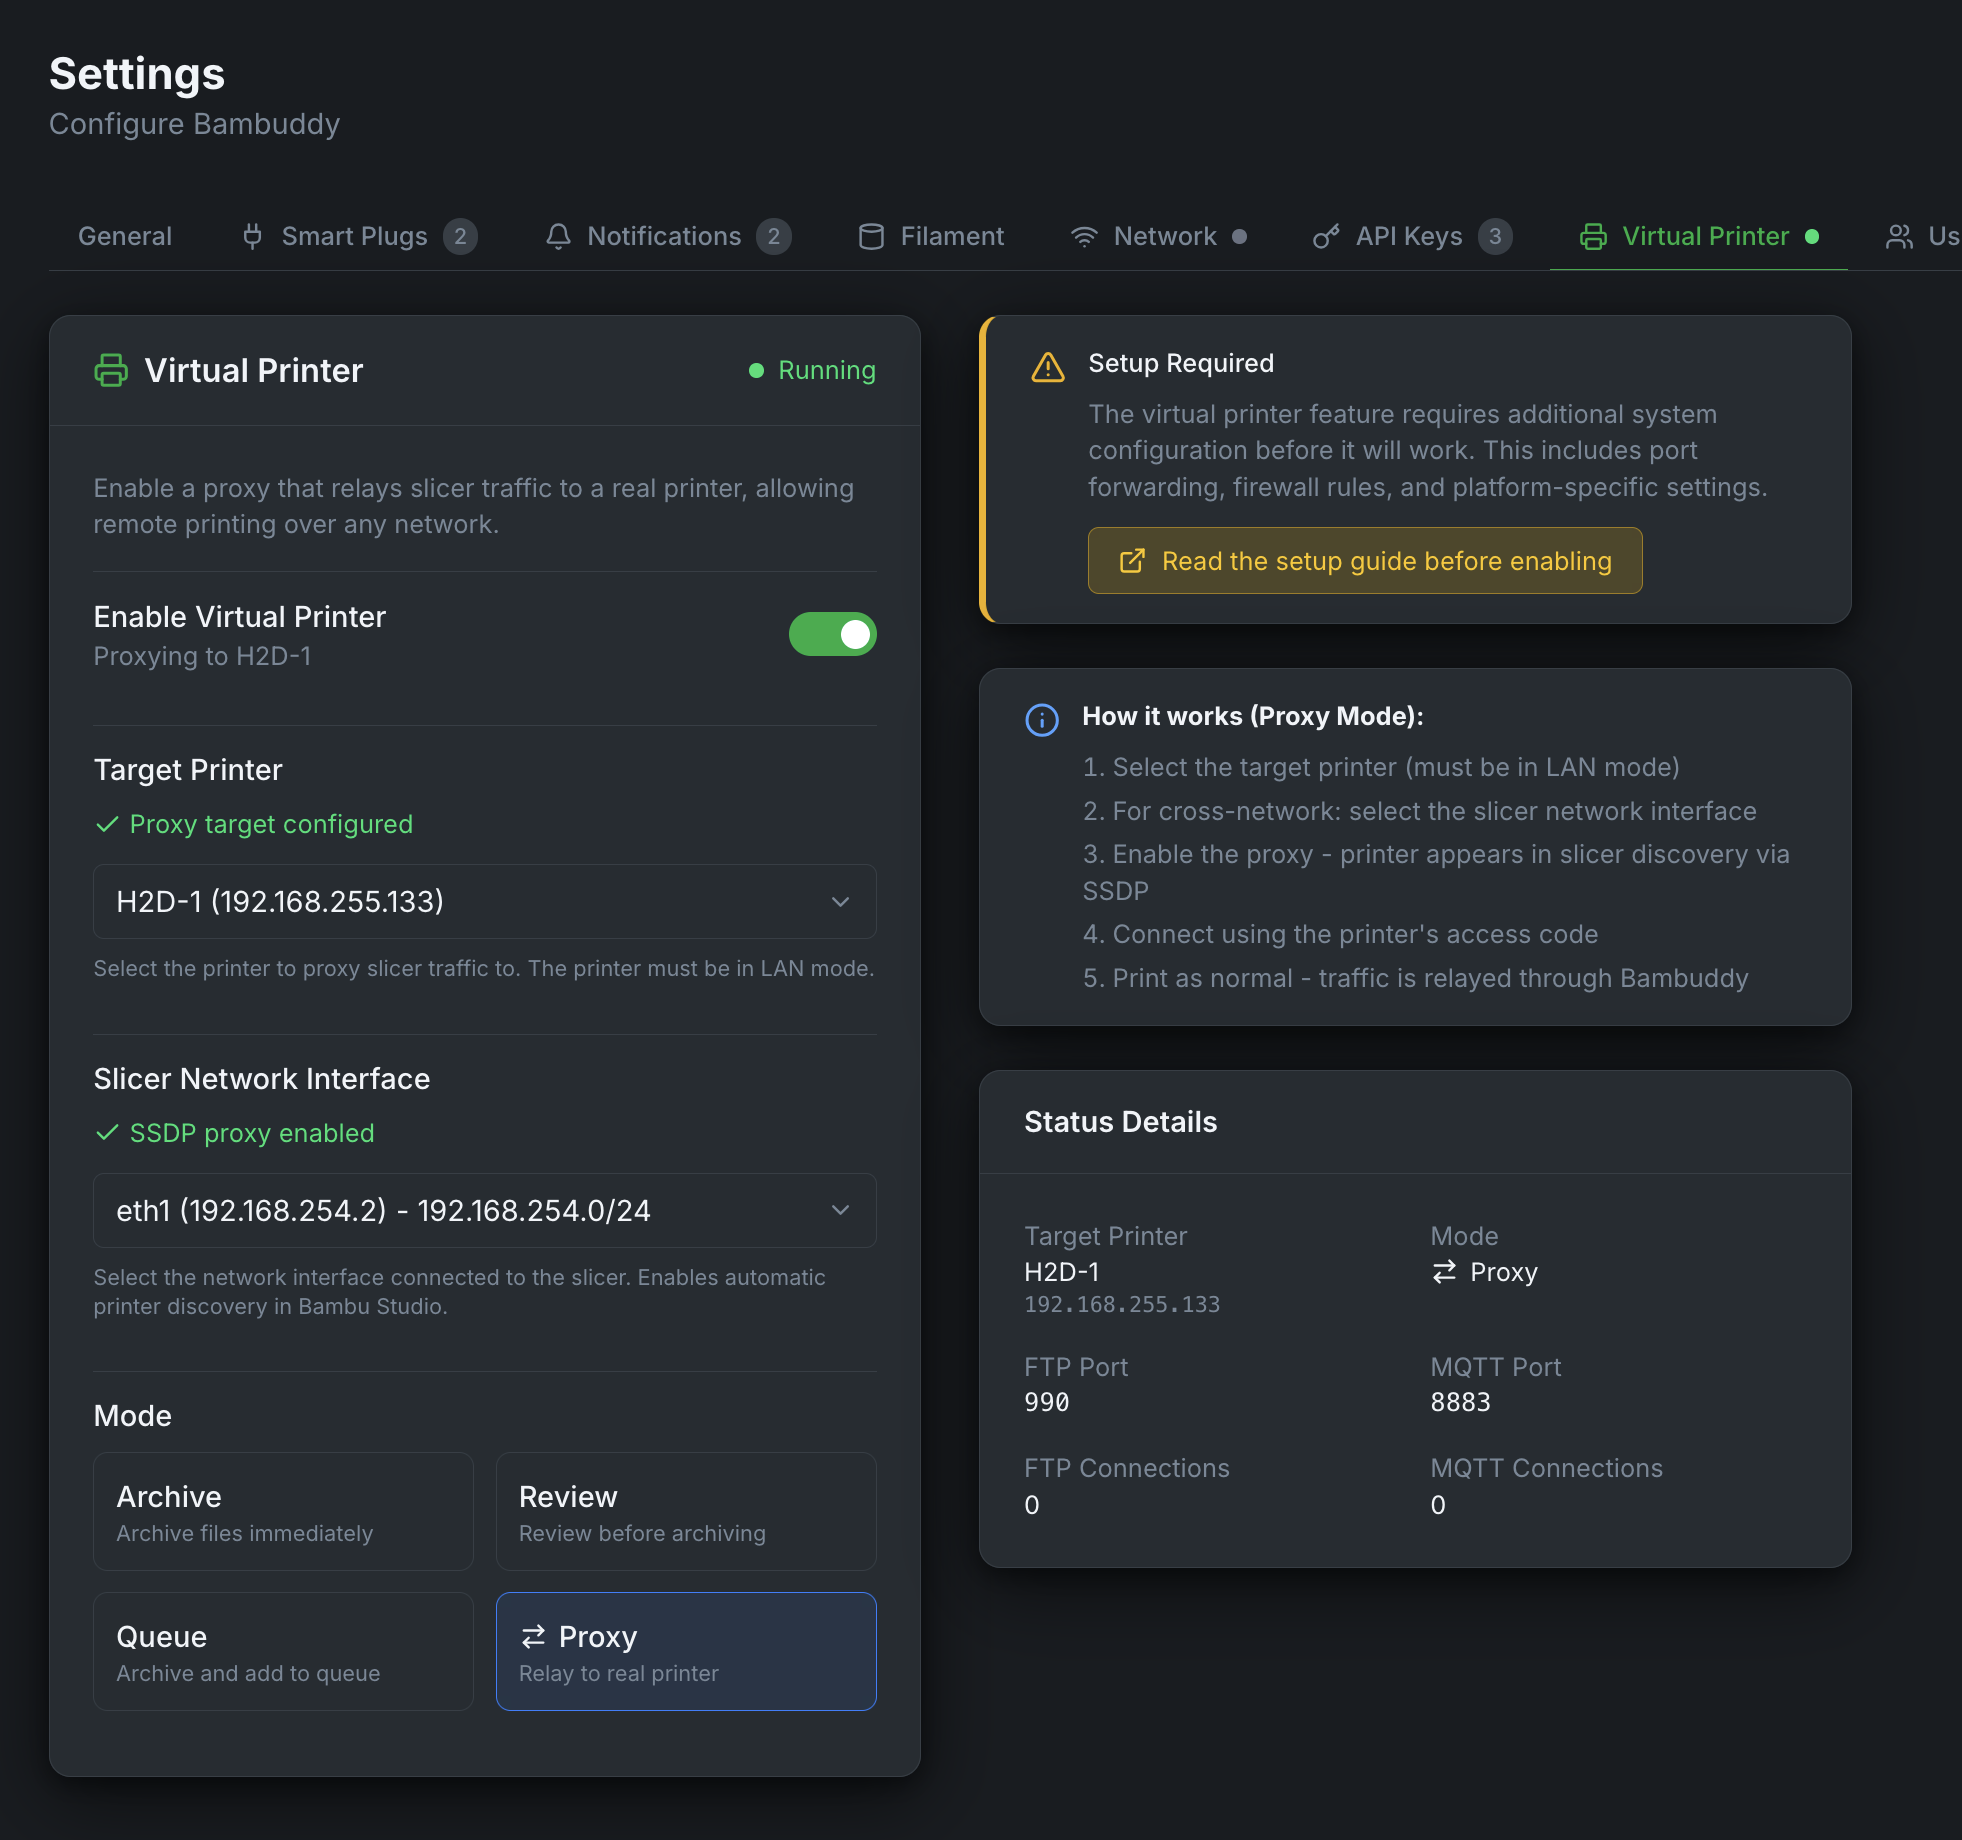
The Virtual Printer feature allows Bambuddy to emulate one or more Bambu Lab printers on your network. This enables you to send prints directly from Bambu Studio or OrcaSlicer to Bambuddy, even without a physical printer connected.
You can create multiple virtual printers, each with its own dedicated IP address, mode, printer model, and access code. Each virtual printer runs completely independent services (FTP, MQTT, SSDP, Bind).
When enabled, each virtual printer:
- Can be discovered automatically via SSDP (same LAN) or added manually by IP (VPN, remote, Docker bridge)
- Accepts print jobs over secure TLS connections (MQTT + FTP)
- Archives prints directly, queues them for review, or adds them to the print queue
- Works with the same workflow as sending to a real Bambu Lab printer
- Runs on its own dedicated bind IP with independent services
Modes
The virtual printer supports four modes:
| Mode | Description |
|---|---|
| Immediate | Files are archived automatically when received |
| Review | Files go to pending uploads for manual review before archiving |
| Print Queue | Files are archived AND added to the print queue (unassigned). Four optional toggles:
|
| Proxy | Forwards traffic directly to a real printer (remote printing) |
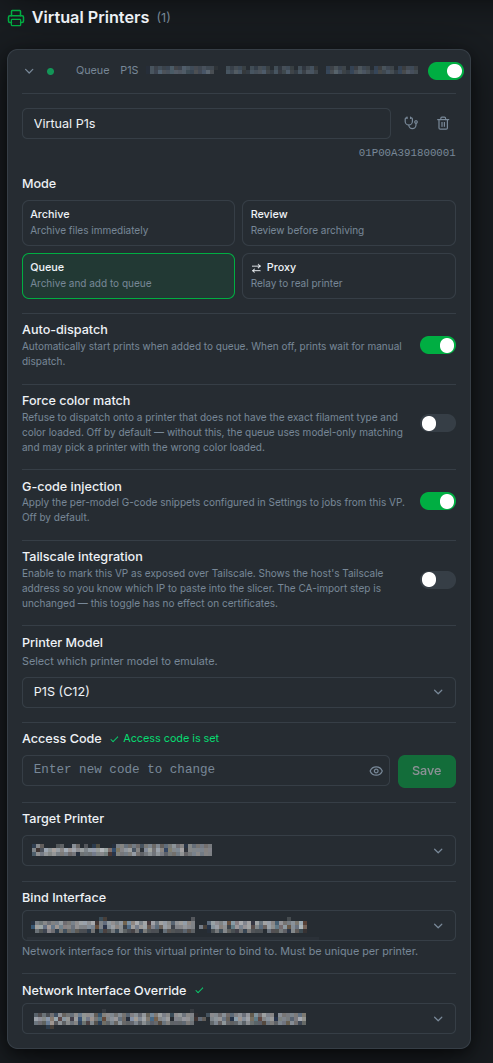
The first three are server modes — Bambuddy runs its own FTP/MQTT servers and receives files locally. Proxy mode is different — Bambuddy uses transparent TCP proxying to forward traffic to a real printer, with end-to-end TLS between the slicer and printer for most protocols.
Server modes with a target printer mirror its live state to the slicer
When you set a target printer on an Immediate / Review / Print Queue VP, the slicer sees the target's live AMS slots, FTS / dual-extruder routing, k-profiles, nozzle / temperature state, the camera stream, and the progress of whatever it is currently printing — same view a direct slicer connection would get, but with Bambuddy's queue / archive / review workflow on the receiving end, and with the Send button still available while the printer is busy. AMS load / dry / calibration commands from the slicer pass through to the real printer too. See Live target-printer mirror for setup and the access-code rule (Bambuddy auto-derives the VP's access code from the target so the bridge can authenticate; the field becomes read-only in the card once a target is picked). If you don't set a target, the VP behaves as a pure file receiver with no live data — which is fine if you only need slice-and-archive.
Required Ports
You don't usually need to configure these
The installer and UI handle port setup automatically. This table is reference for advanced setups, firewall rules, or Docker networking — safe to skim on a first read.
Each virtual printer uses these ports on its dedicated bind IP:
| Service | Port | Protocol | Purpose |
|---|---|---|---|
| Bind | 3000, 3002 | TCP | Slicer bind/detect handshake (required for all modes) |
| SSDP | 2021 | UDP | Printer discovery (same LAN only, not needed for VPN/remote) |
| MQTT | 8883 | TCP/TLS | Printer communication |
| File Transfer | 6000 | TCP/TLS | Verify job & file upload tunnel (proxy mode) |
| RTSP Camera | 322 | TCP/TLS | Camera streaming for X1/H2/P2 series (proxy mode, and non-proxy modes when a target printer is configured — required for the slicer's live camera view to work through the VP). Bambuddy listens on the VP's dedicated bind IP and transparently passes the RTSPS session through to the real printer's :322, end-to-end TLS, same as proxy mode. |
| FTPS | 990 | TCP/TLS | File transfer control |
| FTP Data | 50000-50029 (default; 10 per VP) | TCP | File transfer passive data — per-VP non-overlapping slice (#1646). VP 1 → 50000-50009, VP 2 → 50010-50019, etc. Proxy mode still uses 50000-50100. |
Dual Bind Ports
Different versions of BambuStudio and OrcaSlicer use different ports for the bind/detect handshake. Bambuddy listens on both 3000 and 3002 to support all slicer versions.
Port 990
The FTP server binds directly to port 990 (the standard FTPS port). This requires the CAP_NET_BIND_SERVICE capability for the process, or running as root.
The Docker image and the install scripts set this up for you. A hand-written systemd unit does not — if you created /etc/systemd/system/bambuddy.service yourself, check it contains AmbientCapabilities=CAP_NET_BIND_SERVICE. Without it the virtual printer's sockets never open and the slicer never finds it, while the rest of Bambuddy works normally. Bambuddy's own Diagnose button on the virtual printer card reports this directly.
Certificate Installation
Required Step
Bambu Studio and OrcaSlicer require that printers use TLS encryption, with a certificate that matches what's listed in a printer.cer file. Bambuddy virtual printers use TLS encryption with a self-signed CA certificate, which must be appended to printer.cer. If the Bambuddy certificate isn't present in printer.cer, the slicer may show an error like Connect <printer name> failed! [SN:<###>, code=-1] when attempting to connect to Bambuddy virtual printers. The location of printer.cer varies by platform and install method but the process is otherwise similar. Upgrading or reinstalling the slicer will likely overwrite any changes to printer.cer, in which case you will need to re-do this process.
Step 1: Get the CA Certificate
You need to get the Bambuddy certificate file. The easiest way is to download it from the Bambuddy UI - no command line needed:
- Go to Settings → Virtual Printer
- In the Slicer certificate card, click Download to save
bambuddy-virtual-printer-ca.crt, or Copy to put the PEM text on your clipboard - The card also shows the certificate's SHA-256 fingerprint, so you can verify later that the slicer has the right one using
opensslcommands below
All virtual printers for a given Bambuddy instance will share the same certificate, and it is generated automatically the first time you open the Virtual Printer settings, so you do not need to enable a virtual printer first.
Getting it from the filesystem directly
You can copy the Bambuddy CA certificate file from Bambuddy's data directory:
- Native install:
virtual_printer/certs/bbl_ca.crt - Docker:
docker cp bambuddy:/app/data/virtual_printer/certs/bbl_ca.crt ./bambuddy-virtual-printer-ca.crt
Step 2: Append the Bambuddy CA Certificate to Slicer
The slicer's printer.cer file contains preconfigured CA certificates for communicating with printer hardware. In order for the slicer to successfully communicate with Bambuddy's virtual printers, you need to append the self-signed Bambuddy certificate to this file. Avoid removing the original certificates from the file to ensure that connections to physical printers will still work.
This process of appending the Bambuddy certificate to printer.cer will need to be repeated whenever:
- First-time setup - append the Bambuddy CA certificate as in these instructions
- After slicer updates - updates may revert to the original certificate file, requiring you to append again
- New Bambuddy installation - each Bambuddy install generates a new CA
- Switching Bambuddy hosts - each host has its own CA (unless you share the CA)
The slicer's printer connection certificates are completely separate from the system TLS keyring.
When possible, use terminal commands, not a text editor
Some GUI text editors (TextEdit on macOS and Notepad on Windows) will often re-encode and mangle PEM files, which can break the file and cause the slicer to spuriously fail printer connections. Avoid this by using the provided terminal commands instead, or by using a better text editor if doing it by hand.
macOS
Once you've downloaded the Bambuddy CA certificate using the above instructions, you will append the Bambuddy certificate onto printer.cer using the commands listed below.
An alternative is to manually append the Bambuddy certificate to printer.cer with a text editor like BBEdit, Sublime Text, or VS Code, but avoid using TextEdit, which can mess with line endings or insert smart quotes.
macOS - OrcaSlicer:
# save a backup of printer.cer
cp -v /Applications/OrcaSlicer.app/Contents/Resources/cert/printer.cer \
  /Applications/OrcaSlicer.app/Contents/Resources/cert/printer.cer.bak

# ensure printer.cer has a trailing newline to avoid mangled formatting
sed -i '' '$a\' /Applications/OrcaSlicer.app/Contents/Resources/cert/printer.cer

# append bambuddy cert to printer.cer
cat ~/Downloads/bambuddy-virtual-printer-ca.crt \
  >> /Applications/OrcaSlicer.app/Contents/Resources/cert/printer.cer
Then fully quit and relaunch the slicer (Cmd+Q on macOS, not the red X).
macOS - Bambu Studio:
# save a backup of printer.cer
cp -v /Applications/BambuStudio.app/Contents/Resources/cert/printer.cer \
  /Applications/BambuStudio.app/Contents/Resources/cert/printer.cer.bak

# ensure printer.cer has a trailing newline to avoid mangled formatting
sed -i '' '$a\' /Applications/BambuStudio.app/Contents/Resources/cert/printer.cer

# append bambuddy cert to printer.cer
cat ~/Downloads/bambuddy-virtual-printer-ca.crt \
  >> /Applications/BambuStudio.app/Contents/Resources/cert/printer.cer
Then fully quit and relaunch the slicer (Cmd+Q on macOS, not the red X).
Linux
The location of printer.cer can vary depending on distro and/or install method. You can use find to search for it across your local filesystem:
Example locations include:
/usr/share/OrcaSlicer/resources/cert/printer.cer/opt/bambustudio-bin/resources/cert/printer.cer/var/lib/flatpak/app/com.orcaslicer.OrcaSlicer/current/active/files/share/OrcaSlicer/cert/printer.cer- etc...
AppImage installs: extract/modify the filesystem image and run by hand
AppImage stores the Bambu Studio filesystem in a compressed image. In order to run with a modified printer.cer, you can extract the filesystem, edit printer.cer in the extracted tree, then run Bambu Studio by executing AppRun from then on:
# extract the filesystem:
./Bambu_Studio_linux_*.AppImage --appimage-extract

# find the file and proceed with appending to it:
find squashfs-root/ -name printer.cer
From now on, you will want to run Bambu Studio from the extracted filesystem like this:
Once you've found the location of printer.cer, you can append the Bambuddy certificate like this:
CERT_PATH=/my/path/to/resources/cert/printer.cer

# save a backup
cp -v $CERT_PATH ${CERT_PATH}.bak

# ensure printer.cer has a trailing newline to avoid mangled formatting
sudo sed -i '$a\' $CERT_PATH

# append bambuddy cert to printer.cer
sudo tee -a $CERT_PATH < bambuddy-virtual-printer-ca.crt
After updating printer.cer, fully quit and relaunch the slicer.
Windows
Open printer.cer from one of the following locations in a good text editor like Notepad++ or VS Code. Do not use Notepad which will mangle the file. Save an unedited backup to ensure you can still connect to physical printers if there's a problem.
- Bambu Studio:
C:\Program Files\Bambu Studio\resources\cert\printer.cer - OrcaSlicer:
C:\Program Files\OrcaSlicer\resources\cert\printer.cer
After opening the file:
- Save a backup copy to e.g.
printer.cer.bak - Go to the end of the file
- Paste the entire contents of
bambuddy-virtual-printer-ca.crtafter the last-----END CERTIFICATE----- - Save the file
- Fully restart the slicer
Step 3: Verify the Append Worked
If the Bambuddy certificate is missing or invalid, connecting the slicer to a virtual printer can fail with a generic connection error like Connect <printer name> failed! [SN:<###>, code=-1]. In a macOS or Linux terminal, you can check the printer.cer content with a command like this, which prints a summary of all certificates in the file:
while openssl x509 -noout -subject -dates -sha256 -fingerprint; do :; done < \
  /my/path/to/printer.cer
You should see multiple entries like this:
subject=C=CN, O=BBL Technologies Co. Ltd, CN=BBL CA2 RSA
notBefore=Jun 17 01:38:08 2025 GMT
notAfter=Jun 17 01:38:08 2050 GMT
sha256 Fingerprint=[...]
[...other "BBL Technologies" entries...]
subject=CN=Virtual Printer CA D55808BE
notBefore=... 2026 GMT
notAfter=... 2046 GMT
sha256 Fingerprint=...should match Bambuddy UI...
As seen above, the last entry is the Virtual Printer CA that we appended. The printed Fingerprint for that entry can be compared with the fingerprint shown in the Bambuddy Virtual Printer UI. The characters after the name identify the Bambuddy instance that issued the certificate, so two instances' certificates can be told apart in the same file. A certificate generated by an older Bambuddy has no such suffix and reads just CN=Virtual Printer CA.
If the command doesn't work or the output doesn't match up, here are some possible solutions:
- Error message: If
openssl x509returns an error, the cert file is likely malformed from the edit. A common problem may just be that there are-----END CERTIFICATE-----and-----BEGIN CERTIFICATE----headers on the same line. This problem can be fixed by manually editing the file in a text editor. Worst case, restore fromprinter.cer.bakand try again. - Subject and Issuer aren't
Virtual: Thesubjectandissuershould both start withVirtual Printer CA. For example if you instead seeBBL Technologies Co.or similar, then maybe the Bambuddy cert wasn't appended to the file yet? - Two entries named plain
Virtual Printer CA: If you use two Bambuddy instances and appended both of their certificates, and both read exactlyCN=Virtual Printer CAwith no identifier after it, then only one of the two virtual printers will connect — the slicer finds the first certificate of that name and never tries the second. Both were issued by an earlier version of Bambuddy. Upgrade both instances, then on one of them deletebbl_ca.crtandbbl_ca.keyfrom thevirtual_printer/certs/directory in Bambuddy's data folder and restart it: a new certificate is issued with an identifier in its name. Remove that instance's old entry fromprinter.cerand append the new one, which you can download again from Settings → Virtual Printer → Slicer certificate. - Fingerprint doesn't match: The
sha256 Fingerprint=...line above should match theSHA-256: ...fingerprint shown on Bambuddy's Settings → Virtual Printer → Slicer certificate card. If the two don't match, then maybe you have an old copy that Bambuddy has since regenerated, or a copy from a different Bambuddy instance. The above command is printing the last certificate from the file, so it may be further up. If you can't find aprinter.cerfile on your system, then it's possible that Bambu Studio is just using the host CA bundle.
On Linux, if printer.cer has been updated you're still seeing problems, then maybe the slicer is using the system CA bundle rather than printer.cer. You can try one of the following to add the Bambuddy certificate to the system CA store - but note that this will effectively add Bambuddy as a trusted CA for other host applications, like the browser:
Debian / Ubuntu / Mint / Raspberry Pi OS:
sudo cp bambuddy-virtual-printer-ca.crt /usr/local/share/ca-certificates/bambuddy-ca.crt   # extension MUST be .crt
sudo update-ca-certificates
Fedora / RHEL / openSUSE:
sudo cp bambuddy-virtual-printer-ca.crt /etc/pki/ca-trust/source/anchors/bambuddy-ca.crt
sudo update-ca-trust
Arch:
Then fully quit and relaunch the slicer.
Multiple Bambuddy Hosts
Each Bambuddy installation generates its own unique CA certificate. You can deal with this by either adding each Bambuddy instance's certificate to printer.cer, or sharing the same CA keypair (bbl_ca.crt + bbl_ca.key) across the Bambuddy instances.
Option 1: Share the CA (Recommended)
Copy the certs/ directory from one Bambuddy instance to the other(s):
# Copy certs from host1 to host2
scp -r host1:/path/to/virtual_printer/certs/ host2:/path/to/virtual_printer/
Restart Bambuddy on host2. All Bambuddy instances will use the same CA keypair, avoiding the need to append multiple certificates at the slicer.
Option 2: Update Certificate When Switching Hosts
Download the CA certificate from each Bambuddy instance, and add them all to the printer.cer file, one after the other. You can check the content of printer.cer by running the following command and comparing the listed per-cert fingerprints with the fingerprint displayed in the Virtual Printer settings UI on each Bambuddy instance:
while openssl x509 -noout -subject -dates -sha256 -fingerprint; do :; done < \
  /my/path/to/printer.cer
Certificate Persistence
The CA is generated once and persists across Bambuddy restarts. In Docker, keep the certs on a volume so a container recreate (or a switch between Docker and a native install) reuses the same CA instead of regenerating it — which would otherwise force you to re-append the new CA at every slicer:
Tailscale Integration (Optional)
Host-level Tailscale, surfaced on the VP card
Tailscale integration is opt-in per VP (default: off). When you flip the Tailscale integration toggle on a virtual printer card, Bambuddy reads the host's Tailscale identity from the local tailscaled daemon and shows the host's 100.x.x.x IP and MagicDNS hostname inline on that card — so you know which address to paste into your slicer when it's running on a different network than Bambuddy. The Tailscale identity is host-level: every VP on the same Bambuddy install shares the same IP and FQDN. The per-VP toggle controls whether the address is displayed on that card, nothing more.
What this gives you
Secure remote slicer access: when your slicer machine and the Bambuddy host are on the same tailnet, the slicer reaches Bambuddy over a private, end-to-end WireGuard-encrypted tunnel — without port forwarding, DDNS, reverse proxies, or exposing anything to the public internet. The slicer connects to Bambuddy's 100.x.x.x exactly like it would a real printer on the LAN.
Slicer-side caveat — CA import is still required
Two independent reasons make Tailscale's automatic-HTTPS feature unusable for the slicer → printer connection:
- Both Bambu Studio and OrcaSlicer validate printer TLS only against their bundled BBL CA store, not the system trust store. Even a valid Let's Encrypt cert would be rejected.
- Both slicers' Add Printer dialog only accepts an IP address — not a hostname. A Let's Encrypt cert is bound to a hostname (
your-host.<tailnet>.ts.net); the slicer would compare it against the100.x.x.xIP it actually connected to and fail the hostname check, even if its trust store accepted the issuer.
You still need to import Bambuddy's self-signed CA into your slicer, same as a LAN-mode install. Tailscale's role is secure network reach — not cert-import elimination.
How it works
When at least one VP has the toggle enabled, Bambuddy invokes tailscale status --json on the host, parses Self.DNSName and Self.TailscaleIPs, and renders the result on the VP card as 100.x.x.x (your-host.<tailnet>.ts.net) with a copy button. The status is cached for 60 seconds.
Bambuddy itself does not join your tailnet — there is no Bambuddy-side sidecar and no auth-key field in Bambuddy settings. The host running tailscaled is the device in your tailnet; Bambuddy is just a process on that host reporting the host's IP to the UI.
If you run multiple VPs on one Bambuddy install, they share the same host-level Tailscale IP. Your slicer disambiguates them the same way it does on the LAN: by the per-VP serial number written into each VP's SSDP record, plus a matching slicer-side printer profile per VP.
Setup — install Tailscale on the Bambuddy host
Bambuddy does not run Tailscale itself; it just reads tailscale status from the host's tailscaled daemon. Setup is whatever Tailscale's normal install flow looks like for your platform.
If you already have Tailscale running on the Bambuddy host and tailscale status works, skip to Setup — per VP below. Otherwise pick your platform and follow the install steps.
The official Tailscale install script auto-detects your distro and adds the upstream apt repository. Run it as root:
Then bring the daemon up and authenticate. The command prints a one-time login URL — open it in any browser to attach this host to your tailnet:
Verify Bambuddy will see it:
Bambuddy picks up the host's identity automatically the next time you flip a VP's Tailscale toggle on.
Same install script — it auto-detects RPM-based distros and adds the dnf repo:
On selinux-strict systems (RHEL 9 / Rocky / Alma) you may need to sudo setsebool -P httpd_can_network_connect 1 if Bambuddy runs under a confined service unit; the default Bambuddy systemd unit is unconfined and doesn't need this.
Tailscale ships as a Mac App Store app and a standalone CLI. Bambuddy needs the CLI to be reachable from the user running Bambuddy.
Easiest path — Homebrew (CLI + daemon, no App Store account needed):
App Store path: install Tailscale from the Mac App Store, sign in, then open a terminal and run:
If that works but plain tailscale doesn't, symlink the CLI somewhere in $PATH (so the user running Bambuddy can find it):
- Download the MSI installer from tailscale.com/download/windows and run it.
- Sign in via the system-tray icon; the host attaches to your tailnet.
- Open PowerShell as the same user Bambuddy runs under and verify:
The Tailscale MSI adds tailscale.exe to PATH for new shells; if Bambuddy was already running, restart it so it inherits the updated PATH.
This is the recommended Docker path — install Tailscale on the host as one of the platforms above, then mount the host's tailscaled socket into the Bambuddy container so the container's tailscale CLI can talk to it.
In docker-compose.yml:
services:
  bambuddy:
    # ...
    volumes:
      - /var/run/tailscale/tailscaled.sock:/var/run/tailscale/tailscaled.sock
Tailscale itself runs on the host, not inside the Bambuddy container. Bambuddy logs a one-time hint at startup if it detects it's running inside Docker without this socket mounted.
Run tailscale status from inside the container to confirm the socket mount works:
These NAS platforms ship Tailscale as a first-party package or community plugin — install it through the NAS UI rather than via the install script, so updates flow through the platform's package manager. After install, sign in and verify with tailscale status from the NAS shell. Then mount /var/run/tailscale/tailscaled.sock into the Bambuddy container exactly as in the Docker tab above.
| Platform | Where to install Tailscale from |
|---|---|
| Synology DSM 7+ | Package Center → Tailscale (official) |
| TrueNAS SCALE | Apps catalog → community "tailscale" app |
| Unraid | Community Applications → "Tailscale" |
| QNAP | App Center → QNAP Store → All Apps → "Tailscale" |
Authenticating without a browser on the host
On headless machines (Raspberry Pi, NAS, remote server) sudo tailscale up still prints a login URL — copy it to a browser on any other device on your network and sign in there. The host doesn't need a local browser.
Generate a reusable auth key
For unattended setups, generate an auth key in the Tailscale admin console and run sudo tailscale up --authkey=tskey-... instead — no interactive login required.
Setup — install Tailscale on the slicer machine
Tailscale is a tunnel, not a tunnel-server — both ends need to be on the tailnet. Install Tailscale on whichever machine runs Bambu Studio / OrcaSlicer and sign it in to the same Tailscale account (or accept an invite to the host's tailnet, if you split accounts).
- Download the MSI from tailscale.com/download/windows and run it.
- Sign in via the system-tray icon — use the same Tailscale account as the Bambuddy host, or accept the host's tailnet invite.
- Open PowerShell and verify reachability to your Bambuddy host. Replace
100.x.x.xwith the IP shown on the Bambuddy VP card:
A successful ping confirms the tunnel is up.
Install from the Mac App Store (recommended for desktop use — the menu-bar app handles sign-in and auto-reconnect), then sign in to the same tailnet as the Bambuddy host.
Verify from Terminal:
Use the same install script as the host:
Tailscale's iOS and Android apps both connect the device to your tailnet for browser access to the Bambuddy UI (http://100.x.x.x:8000 or http://your-host.<tailnet>.ts.net:8000). The mobile apps are read-only as far as the Bambu slicer is concerned — there is no Bambu Studio / OrcaSlicer for mobile — but they're useful for monitoring prints away from home.
Same account, or shared node?
The simplest setup is to sign in to the same Tailscale account on both the Bambuddy host and the slicer machine — everything works automatically. If you'd rather keep them on separate accounts (e.g. work laptop), the Bambuddy admin can share the Bambuddy node from their tailnet to your account — same effect, separate billing.
Verify the connection works
Before you touch the slicer, confirm end-to-end reachability from the slicer machine. Open a terminal / PowerShell on the slicer machine and run:
tailscale pingshould showpongwithin a few ms once the direct path is established (it may briefly showvia DERPfirst while NAT traversal negotiates — that's normal and still works).curl -kshould return the Bambuddy login page HTML. The-kis needed only until you import Bambuddy's CA into the slicer machine (see certificate installation).
If both succeed, your slicer is ready to talk to Bambuddy over Tailscale.
Setup — per VP
- On the VP card, flip Tailscale integration on.
- Within a few seconds, the card shows
100.x.x.x (your-host.<tailnet>.ts.net)with a copy button. - Paste that
100.x.x.x(or the MagicDNS hostname) into your slicer's Add Printer dialog. - (One-time) import Bambuddy's CA into the slicer if you haven't already.
When Tailscale is the right choice
| You want… | Tailscale helps? |
|---|---|
| Print to Bambuddy from your laptop on another network | Yes — private tunnel, no port forwarding |
| Print from a friend's house or public wifi | Yes — tailnet reach is location-independent |
| Avoid exposing Bambuddy on the public internet | Yes — tailnet is private (CGNAT) |
| Eliminate the one-time CA import in Bambu Studio / Orca | No — slicer trusts only its bundled BBL CA |
| A separate Tailscale identity per VP | Not today — see roadmap below |
Roadmap — per-VP Tailscale identities
A future release may register each VP as its own node in your tailnet (each with its own 100.x.x.x and bambuddy-<vp>.<tailnet>.ts.net MagicDNS hostname) so multiple VPs are individually discoverable. That work is being scoped — track #701 and related issues.
Troubleshooting
Toggle is on but no Tailscale address shows on the card
Bambuddy couldn't reach tailscaled. Usual causes:
- Native install:
tailscaleis not in$PATHof the user running the Bambuddy service, ortailscaledis not running. Verify withtailscale statusfrom the same shell environment Bambuddy runs under. - Docker: the host's
/var/run/tailscale/tailscaled.sockisn't mounted into the container. Bambuddy logs a one-time hint when it detects this — check the container log for the message starting "Running in Docker but …". - Not logged in: tailscaled is running but the host is not authenticated (
tailscale upwas never run, or the device was logged out). The status query returns an emptyDNSNameand Bambuddy treats Tailscale as unavailable.
Slicer still shows "untrusted cert" / "failed to connect"
Expected if you skipped the CA import. Both Bambu Studio and OrcaSlicer trust only their bundled BBL CA store for printer-MQTT connections — system-trusted certs are rejected regardless of how the slicer reaches the host. Import Bambuddy's CA into the slicer as described above, then connect to the host's Tailscale IP.
FQDN copy button shows "Failed to copy"
navigator.clipboard is only available in secure contexts (HTTPS or localhost). On plain HTTP Bambuddy falls back to a legacy document.execCommand('copy') path. If both fail (very old browser, hostile extension), select the hostname manually and copy with Ctrl/Cmd-C.
Platform Setup
Choose your platform below for specific setup instructions.
Linux (Native Installation)
Port 990 is a privileged port. The process needs CAP_NET_BIND_SERVICE to bind to it.
For systemd services, add to the service file:
For manual runs, grant the capability to the Python binary:
sudo setcap cap_net_bind_service=+ep $(readlink -f $(which python3))
    ```

**Firewall rules (if using UFW):**

```bash
sudo ufw allow 3000/tcp  # Bind/detect
sudo ufw allow 3002/tcp  # Bind/detect
sudo ufw allow 2021/udp  # SSDP
sudo ufw allow 8883/tcp  # MQTT
sudo ufw allow 990/tcp   # FTPS
sudo ufw allow 6000/tcp  # File transfer tunnel
sudo ufw allow 322/tcp   # RTSP camera (X1/H2/P2)
sudo ufw allow 2024:2026/tcp  # Proprietary slicer ports (A1/P1S)
sudo ufw allow 50000:50099/tcp  # FTP passive data (10 ports per VP from 50000; widen for >10 VPs)
Firewall rules (if using firewalld):
sudo firewall-cmd --permanent --add-port=3000/tcp  # Bind/detect
sudo firewall-cmd --permanent --add-port=3002/tcp  # Bind/detect
sudo firewall-cmd --permanent --add-port=2021/udp  # SSDP
sudo firewall-cmd --permanent --add-port=8883/tcp  # MQTT
sudo firewall-cmd --permanent --add-port=990/tcp   # FTPS
sudo firewall-cmd --permanent --add-port=6000/tcp  # File transfer tunnel
sudo firewall-cmd --permanent --add-port=322/tcp   # RTSP camera (X1/H2/P2)
sudo firewall-cmd --permanent --add-port=2024-2026/tcp  # Proprietary slicer ports (A1/P1S)
sudo firewall-cmd --permanent --add-port=50000-50099/tcp  # FTP passive data (10 ports per VP from 50000; widen for >10 VPs)
sudo firewall-cmd --reload
Docker (Linux)
Docker requires host networking for SSDP discovery to work.
docker-compose.yml:
services:
  bambuddy:
    image: ghcr.io/maziggy/bambuddy:latest
    container_name: bambuddy
    network_mode: host  # Required for SSDP discovery
    cap_add:
      - NET_BIND_SERVICE  # Required for virtual printer proxy (port 990)
    volumes:
      - bambuddy_data:/app/data
      - bambuddy_logs:/app/logs
    environment:
      - TZ=Europe/Berlin
    restart: unless-stopped

volumes:
  bambuddy_data:
  bambuddy_logs:
No iptables redirect needed
The FTP server binds directly to port 990 inside the container. With network_mode: host, no port mapping or iptables redirect is required.
Firewall rules (if using UFW):
sudo ufw allow 3000/tcp  # Bind/detect
sudo ufw allow 3002/tcp  # Bind/detect
sudo ufw allow 2021/udp  # SSDP
sudo ufw allow 8883/tcp  # MQTT
sudo ufw allow 990/tcp   # FTPS
sudo ufw allow 6000/tcp  # File transfer tunnel
sudo ufw allow 322/tcp   # RTSP camera (X1/H2/P2)
sudo ufw allow 2024:2026/tcp  # Proprietary slicer ports (A1/P1S)
sudo ufw allow 50000:50099/tcp  # FTP passive data (10 ports per VP from 50000; widen for >10 VPs)
Firewall rules (if using firewalld):
sudo firewall-cmd --permanent --add-port=3000/tcp  # Bind/detect
sudo firewall-cmd --permanent --add-port=3002/tcp  # Bind/detect
sudo firewall-cmd --permanent --add-port=2021/udp  # SSDP
sudo firewall-cmd --permanent --add-port=8883/tcp  # MQTT
sudo firewall-cmd --permanent --add-port=990/tcp   # FTPS
sudo firewall-cmd --permanent --add-port=6000/tcp  # File transfer tunnel
sudo firewall-cmd --permanent --add-port=322/tcp   # RTSP camera (X1/H2/P2)
sudo firewall-cmd --permanent --add-port=2024-2026/tcp  # Proprietary slicer ports (A1/P1S)
sudo firewall-cmd --permanent --add-port=50000-50099/tcp  # FTP passive data (10 ports per VP from 50000; widen for >10 VPs)
sudo firewall-cmd --reload
Docker (macOS / Windows)
Limited Support
Docker Desktop on macOS and Windows doesn't support host network mode. SSDP discovery will not work — you must add the printer manually by IP.
Use bridge networking with port mapping:
services:
  bambuddy:
    image: ghcr.io/maziggy/bambuddy:latest
    container_name: bambuddy
    cap_add:
      - NET_BIND_SERVICE
    ports:
      - "${PORT:-8000}:8000"           # Web UI
      - "3000:3000"                    # Bind/detect
      - "3002:3002"                    # Bind/detect (alt port)
      - "990:990"                      # FTPS
      - "6000:6000"                    # File transfer tunnel
      - "8883:8883"                    # MQTT
      - "322:322"                      # RTSP camera (X1/H2/P2)
      - "2024-2026:2024-2026"          # Proprietary slicer ports (A1/P1S)
      - "50000-50029:50000-50029"      # FTP passive data (3 VPs × 10-port slice; widen for more VPs; proxy mode needs 50000-50100)
    volumes:
      - bambuddy_data:/app/data
      - bambuddy_logs:/app/logs
    environment:
      - TZ=Europe/Berlin
      # Required for FTP passive mode behind Docker NAT:
      # Set to your Docker host's LAN IP
      #- VIRTUAL_PRINTER_PASV_ADDRESS=192.168.1.100
      # The address slicers use to reach Bambuddy — same LAN IP.
      # Without it, uploads are sent to the container's private IP.
      #- VIRTUAL_PRINTER_ADVERTISE_ADDRESS=192.168.1.100
    restart: unless-stopped

volumes:
  bambuddy_data:
  bambuddy_logs:
Bridge mode has to be told your host's address
A container on a bridge network cannot see the address your slicer uses to reach it. Set both of these to your Docker host's LAN IP:
VIRTUAL_PRINTER_ADVERTISE_ADDRESS— the address written into the MQTT status that the slicer reads its upload destination from.VIRTUAL_PRINTER_PASV_ADDRESS— the address used for the FTP passive data connection.
Neither is needed on host or macvlan networking.
Default bridge (docker0 NAT): uploads need VIRTUAL_PRINTER_ADVERTISE_ADDRESS
Bridge networking with port mapping works for detection, MQTT, status, and camera, but print uploads fail by default (typically stalling around 10% with "Failed to send"). The upload is the one flow where the printer advertises its own IP to the slicer, and inside a default-bridge container the only address that exists is the NAT IP (e.g. 172.17.0.10) — which your LAN clients can't route to.
Setting VIRTUAL_PRINTER_ADVERTISE_ADDRESS to your Docker host's LAN IP (#2930) tells the slicer where to actually send the file, which removes that blocker. Set VIRTUAL_PRINTER_PASV_ADDRESS alongside it.
That said, bridge mode is still not the mode Virtual Printer is developed and tested against, and the variable fixes one flow rather than making bridge mode equivalent. network_mode: host (recommended, Linux) or macvlan give the container its own LAN-routable address, so nothing has to be overridden and every flow — including discovery — behaves the way the rest of this page describes. If uploads still fail with the variable set, switch networking mode before filing a bug. macOS/Windows Docker Desktop has no host mode, so it stays limited to slice-and-archive unless you set up macvlan.
How many FTP-data ports do I need to expose?
Each Virtual Printer is allocated its own 10-port passive-mode slice (#1646): VP 1 → 50000-50009, VP 2 → 50010-50019, VP N → 50000 to 500{N-1}9. Expose only the range your VPs actually use — with Docker's default userland-proxy, each exposed port spawns ~2 host processes (~3.5 MB RAM each), so a 1001-port pool can cost ~3.5 GB of host RAM that doesn't show in docker stats (it's host-level, not container-level). Proxy mode is the one exception: it transparently forwards the real printer's full FTP data range, so a proxy-mode VP needs 50000-50100:50000-50100 exposed.
Unraid
- Set Network Type to
hostin container settings - No additional configuration needed — the FTP server binds directly to port 990
Synology NAS
- Use Host Network in Container Manager
- No additional configuration needed — the FTP server binds directly to port 990
TrueNAS SCALE
- Use Host Network when creating the app/container
- No additional configuration needed — the FTP server binds directly to port 990
Proxmox LXC
- No special configuration needed — the FTP server binds directly to port 990
- Ensure the LXC container runs Bambuddy as root or with
CAP_NET_BIND_SERVICE
QNAP NAS
- Use Host Network when creating the app/container
- No additional configuration needed — the FTP server binds directly to port 990
Configuration
Creating a Virtual Printer
- Complete the platform setup above first
- Go to Settings in Bambuddy
- Scroll to the Virtual Printer section
- Click Add Virtual Printer
- Set a Name for this virtual printer
- Choose your Mode: Immediate, Review, Print Queue, or Proxy
- For Proxy mode only, choose the Target Printer
-
Click Create
Those are the only fields in the dialog. Everything else is configured on the virtual printer's own card, which appears in the list underneath.
-
Choose the Printer Model to emulate
- Set an Access Code (exactly 8 characters) — not needed for Proxy mode
- Pick a Bind Interface — the dedicated IP address this virtual printer listens on. The dropdown lists one entry per IP address, not per adapter, so a single network card carrying several addresses gives you several choices. See Dedicated Bind IP below for how to add those addresses.
- Toggle the card to Enabled — a virtual printer with no bind IP will not start
You can create multiple virtual printers, each with its own mode, model, and bind IP. They appear as separate printers in your slicer.
Dedicated Bind IP
Each virtual printer requires its own dedicated IP address. This IP is used for all services (FTP, MQTT, SSDP, Bind) and must be unique across all enabled virtual printers.
For example, if you want to run 3 virtual printers:
| IP | |
|---|---|
| Bambuddy web UI | 192.168.1.100 (your main IP) |
| Virtual Printer 1 | 192.168.1.101 |
| Virtual Printer 2 | 192.168.1.102 |
| Virtual Printer 3 | 192.168.1.103 |
You add these extra IPs as interface aliases (secondary addresses) on your network adapter. The commands below are temporary — see the persistence section for each platform to keep them across reboots.
Adding Interface Aliases
Choose Unused IPs
Pick IP addresses that are outside your DHCP range or reserve them in your router to avoid conflicts. Check with ping 192.168.1.101 before adding.
Required package
The ip command comes from the iproute2 package, which is pre-installed on most distros. If missing: sudo apt install iproute2 (Debian/Ubuntu) or sudo dnf install iproute (Fedora/RHEL).
Find your interface name first:
Add secondary IPs:
sudo ip addr add 192.168.1.101/24 dev eth0
sudo ip addr add 192.168.1.102/24 dev eth0
sudo ip addr add 192.168.1.103/24 dev eth0
Verify:
Make persistent (choose your distro):
Install netplan if not already present:
Find your existing netplan config:
Edit the file (e.g., /etc/netplan/01-netcfg.yaml) and add the addresses block:
network:
  version: 2
  ethernets:
    eth0:
      dhcp4: true
      addresses:
        - 192.168.1.101/24
        - 192.168.1.102/24
        - 192.168.1.103/24
Apply:
Install ifupdown if not already present:
Add to /etc/network/interfaces:
auto eth0:1
iface eth0:1 inet static
    address 192.168.1.101
    netmask 255.255.255.0

auto eth0:2
iface eth0:2 inet static
    address 192.168.1.102
    netmask 255.255.255.0

auto eth0:3
iface eth0:3 inet static
    address 192.168.1.103
    netmask 255.255.255.0
Apply without reboot:
NetworkManager and nmcli are pre-installed on Fedora, RHEL, and most Arch desktop installs. If missing:
Add secondary IPs to your connection:
sudo nmcli con mod "Wired connection 1" +ipv4.addresses "192.168.1.101/24"
sudo nmcli con mod "Wired connection 1" +ipv4.addresses "192.168.1.102/24"
sudo nmcli con mod "Wired connection 1" +ipv4.addresses "192.168.1.103/24"

# Apply (brief reconnect)
sudo nmcli con up "Wired connection 1"
Find your connection name
Run nmcli con show to see your connection names. Common names: "Wired connection 1", "eno1", "enp0s3".
Bambuddy 1.2.6 or newer
Older builds listed one entry per network adapter, so extra addresses on the same adapter were invisible to the Bind Interface dropdown.
Open an Administrator PowerShell. Find the adapter name first:
Get-NetIPAddress -AddressFamily IPv4 | Select-Object InterfaceAlias, IPAddress, PrefixLength
# Example output: Ethernet0   192.168.1.100   24
Add the extra addresses to that same adapter:
New-NetIPAddress -InterfaceAlias "Ethernet0" -IPAddress 192.168.1.101 -PrefixLength 24
New-NetIPAddress -InterfaceAlias "Ethernet0" -IPAddress 192.168.1.102 -PrefixLength 24
Verify — every address should report AddressState: Preferred:
These survive a reboot with no further step. To remove one again:
Extra network adapters are not a substitute
Giving each virtual printer its own NIC works only if each NIC sits on its own subnet / VLAN. Several adapters of one machine on a single subnet is the classic ARP flux case: the host answers for all of them from whichever adapter it likes, and other machines end up able to reach only one address. From inside Windows everything looks correct — route print -4 shows an on-link route per adapter and netstat -a shows every virtual-printer port LISTENING on every IP — while ping and every port time out from anywhere else on the LAN. Enabling weak host (weakhostreceive / weakhostsend) does not fix it. Add extra addresses to the one adapter instead.
Loopback adapters do not work
A Microsoft KM-TEST Loopback Adapter holding one of the spare IPs has no link to the physical NIC or the switch, so nothing outside the machine can ARP for that address. Windows shows it bound and Preferred while the slicer cannot reach it at all.
SSH into your Unraid server or use the terminal in the web UI:
Make persistent — add to /boot/config/go:
SSH into your NAS:
Make persistent — create a triggered task:
- Control Panel → Task Scheduler → Create → Triggered Task → User-defined script
- Event: Boot-up
- User: root
- Script:
You can add aliases through the web UI:
- Network → Interfaces → Edit your interface
- Add Aliases:
192.168.1.101/24,192.168.1.102/24, etc. - Click Save and Apply
These persist automatically.
Option A — Inside the LXC container (recommended):
Use the Linux instructions above. Install iproute2 if missing:
Then add IPs and make persistent with netplan or /etc/network/interfaces.
Option B — From the Proxmox host:
Add additional network devices to the LXC config (/etc/pve/lxc/100.conf):
net0: name=eth0,bridge=vmbr0,ip=192.168.1.100/24,gw=192.168.1.1
net1: name=eth1,bridge=vmbr0,ip=192.168.1.101/24
net2: name=eth2,bridge=vmbr0,ip=192.168.1.102/24
Or via CLI:
pct set 100 -net1 name=eth1,bridge=vmbr0,ip=192.168.1.101/24
pct set 100 -net2 name=eth2,bridge=vmbr0,ip=192.168.1.102/24
Restart the container after adding network devices.
Single Virtual Printer Only
Docker Desktop on macOS and Windows uses a VM — you cannot add host interface aliases into the container. Bridge mode limits you to one virtual printer per Docker host.
For multiple virtual printers, use Linux (native or VM with host networking).
Create virtual switch
- Control Panel → Network & Virtual Switch
- Change to Advanced (bottom left option)
- Check in Overview if in "Virtual Switch" column you have "Container Network" and "Virtual Switch X". If not - proceed with point nr 4. If yes - proceed with SSH instruction.
- Virtual Switch → Add → Advanced Mode
- Mark active Physical Adapter (green circle in status)
- Any other settings are optional. Click Next till the end and Apply.
SSH into your NAS:
# Check your interface name with IP assigned to your NAS. Default is qvs0
ifconfig
sudo ifconfig qvs0:1 192.168.1.101 netmask 255.255.255.0 up # Example for 1st Virtual Printer
sudo ifconfig qvs0:2 192.168.1.102 netmask 255.255.255.0 up # Example for 2nd Virtual Printer
Make persistent: SSH into your NAS:
1. Control Panel → Hardware → General 2. Mark "Run user processes during startup" 3. Click "View autorun.sh" to see if your settings are addedDocker Host Mode
If you're running Bambuddy in Docker with network_mode: host, add the aliases on the Docker host (not inside the container). The container inherits all host IPs automatically.
Printer Model Selection
Choose which Bambu printer model the virtual printer should emulate:
| SSDP Code | Printer | Serial Prefix |
|---|---|---|
| 3DPrinter-X1-Carbon | X1C (default) | 00M |
| 3DPrinter-X1 | X1 | 00M |
| C13 | X1E | 03W |
| C11 | P1P | 01S |
| C12 | P1S | 01P |
| N7 | P2S | 22E |
| N2S | A1 | 039 |
| N1 | A1 Mini | 030 |
| O1D | H2D | 094 |
| O1C | H2C | 094 |
| O1S | H2S | 094 |
Model Change
Changing the printer model will automatically restart the virtual printer. You may need to re-add the printer in your slicer since the serial number changes.
Network Interface Override
Multi-NIC / Docker / VPN Users
If Bambuddy has multiple network interfaces (e.g., LAN + Tailscale, Docker with multiple bridges), the auto-detected IP may be wrong. Use Network Interface Override in Virtual Printer settings to select the correct interface.
This applies to all modes and affects:
- The IP address advertised via SSDP discovery
- The IP included in the TLS certificate (SAN)
Adding to Bambu Studio / OrcaSlicer
When Does Automatic Discovery Work?
SSDP discovery only works when the slicer and Bambuddy are on the same network segment (same LAN/subnet). You must add the printer manually by IP when:
- Connecting over a VPN (WireGuard, Tailscale, etc.)
- Using Docker bridge mode (macOS/Windows)
- Connecting over the internet via port forwarding
- The slicer is on a different subnet than Bambuddy
Automatic Discovery
- Ensure the virtual printer is enabled and running
- In Bambu Studio/OrcaSlicer, go to Device tab
- Click Refresh or wait for discovery
- The virtual printer "Bambuddy" should appear
- Click to add it, entering the access code when prompted
Manual Addition (Bind with Access Code)
If automatic discovery doesn't work (VPN, remote, bridge mode):
- In Bambu Studio, go to Device → Add Printer
- Select Add printer by IP (or Bind with access code)
- Enter the IP address of your Bambuddy server
- Enter the access code (8 characters)
- The printer will be added to your device list
Bind/Detect Ports Required
The "bind with access code" handshake uses port 3000 or 3002 (depending on your slicer version). Bambuddy listens on both. Make sure these ports are reachable from the slicer (firewall, port forwarding, Docker port mapping).
Sending Prints to Bambuddy
Server Modes (Immediate / Review / Print Queue)
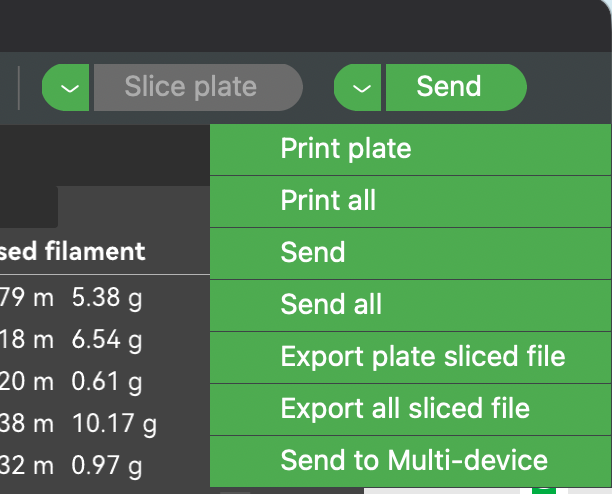
Use Send, Not Print
You must use the Send button, not the Print button!
- Send → Transfers the file to Bambuddy (correct)
- Print → Attempts to start printing immediately (won't work — there's no real printer)
- Slice your model as usual
- Select "Bambuddy" from the printer dropdown
- Click the Send button (next to the Print button)
- The file will be transferred to Bambuddy
What Happens Next:
- Immediate: The file is automatically archived
- Review: The file appears in Pending Uploads for you to review, assign to a project, add notes, or queue for printing
- Print Queue: The file is archived and added to the print queue as an unassigned job
Send Button Location
In Bambu Studio/OrcaSlicer, the Send button is typically a small icon next to the large Print button, or accessible via the dropdown arrow on the Print button.
Print Queue mode: Force color match
When Print Queue mode is selected, extra toggles appear on the VP card:
- Auto-dispatch (on by default) — controls whether the queued job starts automatically or sits as
manual_startuntil you click Start. - Force color match (off by default — opt-in) — when on, Bambuddy parses the per-slot filament requirements out of the sliced 3MF at upload time and pins them onto the queue item. The scheduler then refuses to dispatch onto a printer that does not have the exact filament type and colour loaded.
Why this is opt-in. Without Force color match, the scheduler still validates filament type when the job is "Any [model]" assigned (so a PLA job won't auto-dispatch onto a printer with only PETG loaded), but it does not check colour — the first available printer of the target model wins. This matches Bambuddy's behaviour before the toggle existed; turning it on is strict enough that it can leave a job sitting in the queue if no printer has the right colour loaded, which is sometimes what you want and sometimes not.
When to turn it on. If you have multiple printers of the same model and care about colour accuracy — e.g. you don't want a job sliced for matte white PLA running on a printer that has black PLA loaded just because it happens to be free first.
When to leave it off. If your fleet runs the same colour on every printer of a given model, or you reload colour by hand and want the queue to keep moving regardless.
Per-VP setting (so different virtual printers can have different policies if you have a "best-fit" VP and a "first-available" VP). The default for new and existing virtual printers is off — no behaviour change for upgraders.
Print Queue mode: Save AMS mapping
Bambu Studio and OrcaSlicer resolve the physical AMS tray for each filament themselves, right before sending — either automatically, or from the slicer's own per-filament AMS-slot dialog. That choice rides along in the print command as ams_mapping.
By default Bambuddy ignores it and works the mapping out again at dispatch time, from the filament type and colour baked into the 3MF. That is usually the better answer, because it is computed against the printer's live AMS contents and it respects your other settings — Prefer lowest filament, the AMS-filament-backup gate that goes with it, and Bambuddy's own inventory figures.
It is the wrong answer when the type-and-colour match isn't unique. Two spools of the same red PLA, and Bambuddy has no way to know you meant the one in slot 3; you picked it in the slicer, and the pick is thrown away.
Save AMS mapping (off by default — opt-in) keeps that pick:
- The queue item dispatches to exactly the trays the slicer resolved, instead of the ones Bambuddy would have matched
- The mapping is also stored on the archive, so a reprint can reuse the same physical spools — the print modal grows a Mapping button next to Re-read that selects every slot from the saved pick in one click, and the archive card shows an AMS mapping saved badge naming the printer it belongs to
Requires a target printer. A tray number only means something against one printer's AMS layout — tray 5 on one machine can hold a completely different spool than tray 5 on the next. So the saved mapping records which printer it was resolved against, and is only ever reused on that same printer. A model-based ("Any [model]") VP has no fixed printer and no live AMS layout for the slicer to have resolved against, so the toggle has no effect there.
Interaction with Force color match. If both are on, Force color match wins for the print being dispatched: you asked Bambuddy to match strictly against the printer's live trays, and it does. The slicer's pick is still saved onto the archive for later reprints.
Why this is opt-in. Honouring the slicer's mapping means Bambuddy's own matching never runs for that job, and with it Prefer lowest filament and the AMS-backup gate. That's the right trade when you want the slicer's pick and the wrong one when you don't, so nothing changes for existing virtual printers until you turn it on.
Print Queue mode: Send All on multi-plate projects
Bambu Studio and OrcaSlicer's Send All button on a multi-plate project uploads a single 3MF containing every plate — one FTP transfer, one filename — with slice_info.config inside listing each plate as its own <plate> block. From 0.2.5 (#1733), a Print Queue mode VP enqueues one queue item per plate when it receives a multi-plate Send All:
- Each plate becomes an independent queue row, with the plate index (
plate_id= 1, 2, 3, …) taken from the 3MF - Queue positions are consecutive in slicer plate order, so the slicer's plate sequence becomes the queue's execution sequence
- Each plate's
required_filament_typesand any colour overrides are computed per plate, so the scheduler's per-printer "Any [model]" matching dispatches each plate onto a printer with the right filaments loaded for that plate (not for plate 1's set) - All plates share one archive — the single 3MF upload is archived once and every queue item references that same archive row
- The VP's
auto_dispatchandmanual_startposture are inherited unchanged by every plate
Single-plate Send (or Send All on a single-plate project) is unchanged — one upload, one queue item, one archive.
Live target-printer mirror in non-proxy modes
If you set a target printer on an Immediate / Review / Print Queue VP, the slicer sees the target printer's live state through the VP — AMS slots, FTS / dual-extruder routing, k-profiles, nozzle / bed / chamber temperatures, lights, and camera. AMS load / dry / calibration commands the user issues from the slicer pass through to the real printer. The slicer behaves as if it were directly connected to the real printer for reads and device management, while file uploads still terminate at Bambuddy and feed the queue / archive / review workflow. No second MQTT session is opened on the printer — the bridge fans out from Bambuddy's existing per-printer subscription, so the firmware in-flight budget is not affected.
This is what makes it possible to slice an FTS / dual-extruder file with the VP selected as the active device — Studio reads the target printer's nozzle diameters, AMS contents, and FTS ID through the VP and bakes the right values into the .3mf. The earlier guidance "don't slice with the VP active" no longer applies when the VP has a target printer set.
Live print progress. While the target printer is printing, the VP mirrors its progress into the slicer's Device tab — file name, current stage, percentage, layer count, and time remaining, updated once a second (#1887). The Send button stays enabled the whole time, which is the point of a server-mode VP: you can queue the next job while the current one is still running.
That comes with one deliberate limitation. Bambu Studio and OrcaSlicer decide "this printer is busy, hide the Send button" and "this printer is printing, draw the progress bar" from the same internal flag, so a VP cannot both show a running print and accept a new one. Bambuddy resolves it in favour of accepting jobs: the progress is real, but the slicer's Pause, Resume, and Stop buttons stay greyed out for a server-mode VP. Control the running print from Bambuddy itself, or use Proxy Mode, where the slicer talks to the real printer and those buttons work normally.
Setup: in Settings → Virtual Printer, set the target printer for each Immediate / Review / Print Queue VP. The bridge starts automatically.
Access-code rule (auto-managed by Bambuddy). The bridge forwards the slicer's MQTT and RTSPS auth bytes through to the real printer — the slicer holds one code in its profile (the one it bound the VP with), and that code has to satisfy both the VP's listener and the real printer at the other end of the bridge. The only way both pass is if the VP's code equals the real printer's code. Bambuddy now derives the VP's access code from the target automatically: when you pick a target printer in Settings → Virtual Printer, the VP's access-code field switches to read-only and inherits the printer's LAN access code. Changing the target re-syncs the code; re-add the VP in your slicer afterwards so it picks up the new value. Earlier Bambuddy releases let the codes diverge — a one-time startup migration silently fixes mismatched VPs on first launch after upgrade. If you didn't set a target, the VP has its own independent code (and the field is editable) — the bridge is off in that case, so there's no other side to match.
If you don't want a live mirror. Leave the target printer unset, or use the VP without binding it to a real printer at all. The slicer will see synthetic stub state and you set filaments manually — the original "file receiver" behaviour, useful when you want to slice for a class of printer without picking a specific one yet.
If you want the slicer to be in continuous live contact with a real printer — including for slicing-time hardware fields — use Proxy Mode, not a server-mode VP.
Proxy Mode
In Proxy mode, you use the slicer normally — slice, select the printer, and click Print or Send just like you would with a local printer. Bambuddy relays everything to the real printer transparently.
Proxy Mode — Remote Printing
NEW FEATURE
Proxy Mode enables remote printing from anywhere in the world through a secure TLS relay.
What is Proxy Mode?
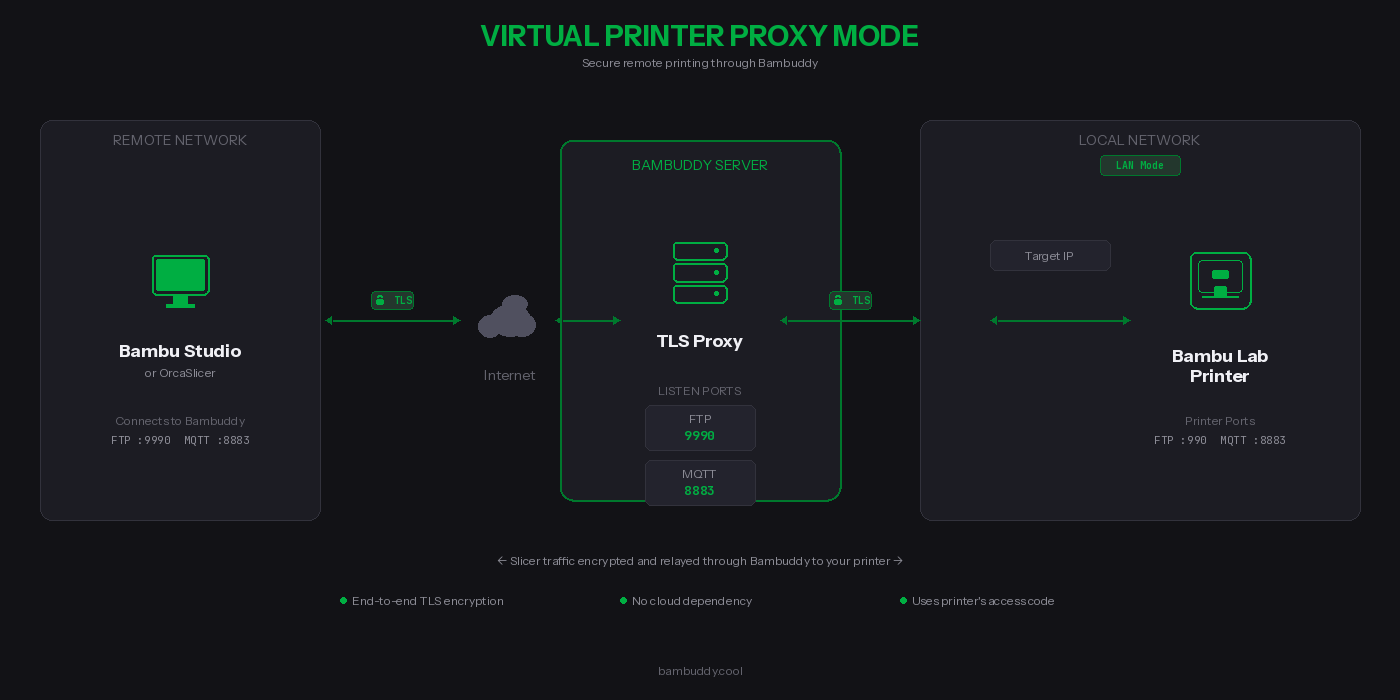
Unlike the server modes that archive files locally, Proxy Mode forwards your print jobs directly to a real Bambu Lab printer. Bambuddy acts as a secure relay between your slicer and your printer.
How It Works
- Select the target printer in Bambuddy settings (must be in LAN mode)
- For cross-network: select the slicer network interface for SSDP relay
- Enable the proxy — printer appears in slicer discovery via SSDP
- Connect using the printer's access code
- Print as normal — traffic is relayed through Bambuddy
Proxy Mode Ports
| Protocol | Bambuddy Listen Port | Printer Port | Purpose |
|---|---|---|---|
| Bind | 3000, 3002 | — (local) | Slicer bind/detect handshake (served locally) |
| MQTT/TLS | 8883 | 8883 | Printer control & status (TLS-terminated, IP rewriting) |
| File Transfer | 6000 | 6000 | File transfer tunnel (transparent proxy, end-to-end TLS) |
| RTSP Camera | 322 | 322 | Camera streaming (transparent proxy, end-to-end TLS) |
| FTP/FTPS | 990 | 990 | FTP control (transparent proxy, end-to-end TLS) |
| FTP Data | 50000-50100 | dynamic | FTP passive data (transparent proxy) |
| Proprietary | 2024-2026 | 2024-2026 | Slicer–printer communication (A1/P1S, transparent proxy) |
Key Benefits
| Feature | Description |
|---|---|
 TLS-encrypted control channels TLS-encrypted control channels | End-to-end TLS for FTP, file transfer, and camera; MQTT TLS-terminated for IP rewriting |
 No cloud dependency No cloud dependency | Your data never touches third-party servers |
 Uses printer's credentials Uses printer's credentials | No additional passwords — use your printer's access code |
 Full protocol support Full protocol support | FTP, MQTT, file transfer tunnel, camera, and bind protocol |
 Camera streaming Camera streaming | RTSP camera feed proxied for X1/H2/P2 series (port 322) |
 Connection monitoring Connection monitoring | Real-time status showing active connections |
FTP Data Channel Security
Bambu Studio's FTP implementation does not encrypt the data channel — even though it negotiates PROT P (encrypted), it sends file data in cleartext. The MQTT control channel (commands, status) is fully TLS-encrypted.
What this means: Your 3MF print files are transferred unencrypted between the slicer and Bambuddy. Between Bambuddy and your printer, the data channel encryption depends on the printer model (some use PROT P, some use PROT C).
Recommendation: When using Proxy Mode over the internet, place a VPN (WireGuard, Tailscale, or similar) between your slicer and Bambuddy to protect the FTP data channel.
Requirements
Printer Requirements:
- Bambu Lab printer in LAN Mode (Developer Mode)
- Printer must be accessible from Bambuddy on your local network
- Printer's IP address and access code
Network Requirements:
- Bambuddy server accessible from the slicer (same LAN, VPN, or internet)
- Ports 3000 + 3002 (bind), 990 (FTP), 6000 (file transfer), 8883 (MQTT), 322 (RTSP camera), 2024-2026 (A1/P1S proprietary), and FTP data reachable from the slicer (10 ports per VP starting at 50000 — VP 1 = 50000-50009, etc.; proxy mode uses the full 50000-50100)
- Static IP or dynamic DNS for your Bambuddy server (if remote)
Supported Network Configurations:
| Setup | SSDP Discovery | Manual Add | Notes |
|---|---|---|---|
| Same LAN | Automatic | Yes | SSDP broadcast reaches slicer directly |
| Dual-homed (2 NICs) | Automatic | Yes | Use Network Interface Override to select correct NIC |
| Docker host mode (Linux) | Automatic | Yes | Host networking passes SSDP traffic |
| Different VLANs (routed) | Automatic | Yes | SSDP cross-subnet listener responds to M-SEARCH from any interface |
| Docker bridge mode | Not available | Required | Bridge networking blocks UDP multicast |
| VPN (tun mode) | Not available | Required | Tun VPN tunnels don't carry UDP broadcast; use manual add |
| VPN (tap mode) | Automatic | Yes | Tap mode bridges L2 traffic including broadcasts |
| Port forwarding / internet | Not available | Required | SSDP is local-network only |
Setting Up Proxy Mode
Step 1: Complete Platform Setup
Make sure you've completed the Platform Setup for your installation (iptables rules, firewall ports, Docker config).
Step 2: Configure Remote Access (if needed)
To access from outside your home network, forward these ports on your router:
| External Port | Internal Port | Protocol | Destination |
|---|---|---|---|
| 3000 | 3000 | TCP | Bambuddy server IP |
| 3002 | 3002 | TCP | Bambuddy server IP |
| 990 | 990 | TCP | Bambuddy server IP |
| 6000 | 6000 | TCP | Bambuddy server IP |
| 8883 | 8883 | TCP | Bambuddy server IP |
| 322 | 322 | TCP | Bambuddy server IP |
| 50000-500N9 | 50000-500N9 | TCP | Bambuddy server IP (10 ports per VP; N = vp_count - 1. Proxy mode: forward 50000-50100 instead) |
Recommended: Use a VPN
For best security, use a VPN like Tailscale or WireGuard between your slicer and Bambuddy. This encrypts all traffic including the FTP data channel (see security note above).
Other options:
- Cloudflare Tunnel — Free tunneling (TCP passthrough for ports 3000, 3002, 990, 8883, and the per-VP FTP-data range)
- nginx/Caddy/Traefik — Reverse proxy for web UI only; FTP/MQTT/bind need direct access
Security Note
These ports will be exposed to the internet. The MQTT and FTP control channels are protected by TLS encryption and your printer's access code. The FTP data channel is not encrypted on the slicer side — use a VPN for full encryption.
Step 3: Enable Proxy Mode in Bambuddy
- Go to Settings → Virtual Printer
- Select Proxy mode from the mode options
- Select your Target Printer from the dropdown
- Click the toggle to Enable Virtual Printer
- Verify the status shows "Running" with the proxy ports
Step 4: Configure Your Slicer
In Bambu Studio or OrcaSlicer:
- Go to Device → Add Printer → Add printer manually
- Enter your Bambuddy server's IP or hostname
- Enter your printer's access code (not a Bambuddy password)
- The printer should connect and show as online
Step 5: Print!
Select a model, slice it, and click Print. The job will be:
- Sent to Bambuddy (encrypted via TLS)
- Relayed to your printer on the local network
- Started on your printer just like a local print
Dual-Homed (Cross-Network) Setup
For setups where Bambuddy has interfaces on two networks (e.g., printer on LAN A, slicer on LAN B):
- Enable the virtual printer, then select the slicer-facing interface under Network Interface Override
- Bambuddy will re-broadcast printer SSDP on the slicer's network
- The slicer discovers the printer automatically via SSDP
- All protocols are proxied including camera streaming (RTSP port 322) — no additional NAT rules needed
Proxy Mode vs Server Modes
| Feature | Immediate | Review | Print Queue | Proxy |
|---|---|---|---|---|
| Files stored locally | Yes | Yes | Yes | No |
| Sends to real printer | No | No | No | Yes |
| Remote printing | No | No | No | Yes |
| Requires target printer | No | No | No | Yes |
| Uses printer's access code | No | No | No | Yes |
| Requires Bambuddy access code | Yes | Yes | Yes | No |
| Live print progress in slicer | With target | With target | With target | Yes |
| Send while the printer is busy | Yes | Yes | Yes | No |
| Pause / Resume / Stop from slicer | No | No | No | Yes |
Setup Check
Every virtual printer card has a stethoscope button (next to the delete button) that runs a built-in setup diagnostic. Reach for it whenever a virtual printer doesn't show up in the slicer or won't accept a print — it checks the things that usually go wrong so you don't have to guess.
The check probes, from Bambuddy's side:
| Check | What it confirms |
|---|---|
| Virtual printer enabled | The VP is switched on |
| Services running | Its FTP / MQTT / discovery services actually started |
| Bind network interface | The bind IP still matches a live interface on the host — a stale bind IP after a DHCP lease change or a container restart is a common cause of "it vanished" |
| Access code set | Non-proxy modes have an access code configured |
| Target printer | Proxy mode has a target printer selected and reachable |
| Service ports | A live connection test of the FTP (990), MQTT (8883) and discovery (3002) ports on the bind IP. This is the decisive check — it confirms a service is genuinely listening, catching a port conflict that a "Running" status alone would hide |
| TLS certificate | The certificate chain exists on disk |
Each row is marked pass, fail, warning or skipped, with a short explanation of what to fix. After making a change, hit Run again to re-check.
Troubleshooting
Slicer Can't Find or Connect to Virtual Printer
Run the Setup Check first
Click the stethoscope button on the virtual printer card — the Setup Check pinpoints most of the problems below automatically (disabled VP, dead service port, stale bind IP, missing access code).
- Check virtual printer is enabled and showing "Running" status in Bambuddy Settings
- Verify bind/detect ports are reachable — the slicer needs port 3000 or 3002 for the handshake:
- Check firewall — ports 3000/tcp, 3002/tcp, 2021/udp, 8883/tcp, 990/tcp, 2024-2026/tcp, and the FTP-data range must be open. The FTP-data range is 10 ports per VP starting at 50000 (VP 1 → 50000-50009, VP 2 → 50010-50019, etc.); proxy-mode VPs need the full 50000-50100 forwarded
- Same network? — SSDP discovery only works on the same LAN/subnet. Use "bind with access code" for VPN, remote, or Docker bridge setups
FTP Error / Connection Reset
- Check permissions on the uploads directory
- Check no other FTP server is using port 990
- Verify
CAP_NET_BIND_SERVICE— the process needs this capability to bind to port 990 - Review logs for specific error messages
"Wrong Printer Model" Error
The slicer's selected printer profile must match the virtual printer model in Bambuddy settings.
No Print Progress in the Slicer's Device Tab
- Set a target printer on the VP (Settings → Virtual Printer). Without one there is no printer to mirror, and the slicer sees synthetic state only.
- Check the printer is actually printing. Progress appears while the target is running or paused; an idle printer has none to show.
- Wait a few seconds after a Send. The VP keeps reporting your own upload until the slicer has acknowledged it, then switches to the job on the bed.
- Greyed-out Pause / Resume / Stop is expected on a server-mode VP — see Live target-printer mirror. Control the print from Bambuddy, or use Proxy Mode.
Permission Denied Errors
If you see "Permission denied" in the logs:
# Fix ownership of the virtual printer directory
sudo chown -R $(whoami):$(whoami) /path/to/bambuddy/data/virtual_printer
Authentication Failed
- Verify access code matches in both Bambuddy and slicer
- Access code must be exactly 8 characters
- Try removing and re-adding the printer in your slicer
Wrong IP in SSDP / TLS Handshake Fails (Multi-NIC)
If Bambuddy has multiple network interfaces (LAN + VPN, Docker bridges, etc.), the auto-detected IP may be on the wrong interface:
- Go to Settings → Virtual Printer
- Enable the virtual printer if not already enabled
- Under Network Interface Override, select the interface your slicer connects through
- The virtual printer will restart with the correct IP in SSDP broadcasts and TLS certificate
TLS Connection Failed / Error -1
An error like Connect <printer name> failed! [SN:<###>, code=-1] typically means the slicer doesn't trust the virtual printer's certificate.
Linux AppImage / Flatpak users — start here
The printer.cer shipped inside an AppImage or Flatpak is read-only, so editing it in place isn't possible without extracting the bundle. Recent Linux builds have tls_cert_store_accepted: yes set in BambuStudio.conf, which means the slicer trusts the system CA bundle. Install the Bambuddy CA there instead — see the Linux tab in Step 2.
-
Verify Bambuddy CA is in slicer's certificate file:
The count should be higher than a stock install (stock has 1 certificate). -
Wrong certificate? If you have multiple Bambuddy hosts or reinstalled, you must update the certificate. See Step 2.
-
Verify certificate fingerprints match. The Slicer certificate card in Settings → Virtual Printer shows the CA's SHA-256 fingerprint directly — the quickest reference. To read it from the server instead:
Verify this fingerprint matches the one on the card, and that the CA appears in your slicer's# On Bambuddy server (Docker) docker exec bambuddy openssl x509 -in /app/data/virtual_printer/certs/bbl_ca.crt -noout -fingerprint -sha256 # On Bambuddy server (native) openssl x509 -in virtual_printer/certs/bbl_ca.crt -noout -fingerprint -sha256printer.cer. -
Fully restart the slicer — Cmd+Q on macOS, or End Task on Windows. Just closing the window is not enough.
-
Regenerate certificates (last resort):
You'll need to remove the old Bambuddy CA from the slicer and append the new one.
Proxy Mode: Printer Shows Offline in Slicer
- Verify the target printer is online in Bambuddy
- Check that the printer is in LAN mode
- Restart the proxy by toggling it off and on
Proxy Mode: "Connect Using IP and Access Code" Dialog When Printing
If the slicer connects and shows printer status but shows a connection dialog when you click Print:
- Check port 6000 is reachable — BambuStudio uses this port for the file transfer tunnel:
- Check firewall — port 6000/tcp must be open between slicer and Bambuddy
- Different VLANs/subnets — the MQTT IP rewrite ensures the slicer connects to the proxy, not the printer. Check Bambuddy logs for
IP rewrite activeto confirm it's working
Proxy Mode: Camera Not Loading
- X1/H2/P2 series: Camera uses RTSP on port 322. Ensure this port is reachable from the slicer
- A1/P1 series: Camera uses port 6000 (shared with file transfer). Ensure port 6000 is reachable
Proxy Mode: Connection Drops During Transfer
- Large files may timeout on slow connections
- Check your internet upload speed
Technical Details
Security
- Bind protocol (ports 3000, 3002): In proxy mode, Bambuddy responds with the VP's own identity (not forwarded to printer). Unencrypted TCP — transmits printer identity only, no sensitive data
- MQTT control channel: TLS-terminated at Bambuddy (TLS 1.2). In proxy mode, printer IP addresses in MQTT payloads are rewritten to prevent the slicer from bypassing the proxy
- File transfer tunnel (port 6000): End-to-end TLS (transparent proxy)
- Camera streaming (port 322): End-to-end TLS RTSP (transparent proxy)
- Proprietary ports (ports 2024-2026): End-to-end TLS (transparent proxy). Used by A1/P1S models for slicer–printer communication
- FTP control channel: End-to-end TLS (transparent proxy)
- FTP data channel: In proxy mode, transparent proxy — encryption depends on slicer/printer negotiation. Bambu Studio does not encrypt the data channel. Use a VPN for end-to-end data encryption
- Self-signed certificates are auto-generated (shared CA persists, per-instance device cert regenerates per serial)
- Access code authentication required for all connections (8 characters)
- Certificates stored in
virtual_printer/certs/(shared CA) andvirtual_printer/certs/{id}/(per-instance certs)
Limitations
- Each virtual printer requires its own dedicated bind IP address
- SSDP discovery requires same LAN or routed subnets — use manual IP entry for tun-mode VPN, or Docker bridge setups
- Slicer must trust the self-signed certificate (see Certificate Installation)
- FTP data channel unencrypted on slicer side (use VPN for full encryption)
- VPN tun mode does not support SSDP broadcast — printers must be added manually by IP